Creating a New Mission
For this tutorial, we will go over creating a new custom mission and location.
The mission will take place in:
- The country of
Modlandia - The city of
Modtown
And the name of the mission will be Modtown Throwdown.
For this new mission we'll start it off relatively simple, just a flat floor with a small buildings and one NPCs. Since we've already covered creating and editing a mission in detail before, this time around will be a little more abbreviated. There are a lot of new things to cover since this will be a new location / destination as well, so this page will be a bit of a doozy!
Remember to make small, incremental changes, and to save, deploy, launch the mission, and commit your changes if they are successful. Keep in mind that sometimes the mod will crash on deployment or mission launching if there is a resource that is being referenced but has not been created yet. If you have created all the required resources, double check all the factory and blueprint hashes, and be wary of whether it includes the square brackets (
[and]) and subsequent extension, and whether that extension includes thepc_or not. Also make sure everything is in the correct chunk folder.
Adding a new Location and Parent Location
Since we are making a new mission from scratch, not based on any existing mission, let's also make a new Location and Parent Location for it, so that it will show up in the Destinations tab. This mainly involves updating the manifest and unlockables, and adding some new images.
Updating the Manifest
Let's open the manifest.json file and add some new entries to the end of the localisation > english object:
"UI_LOCATION_PARENT_MODLANDIA_COUNTRY": "Modlandia",
"UI_LOCATION_MODTOWN_COUNTRY": "Modlandia",
"UI_LOCATION_PARENT_MODLANDIA_CITY": "Modtown",
"UI_LOCATION_MODTOWN_CITY": "Modtown",
"UI_LOCATION_MODTOWN_TITLE": "Modtown Throwdown",
"UI_MODTOWN_DESC": "I need to take out Super Targetman.",
"UI_MODTOWN_TITLE": "Modtown Throwdown mission",
"UI_STARTING_LOCATION_MODTOWN_OUTSIDE_DEFAULT_NAME": "Outside",
"UI_STARTING_LOCATION_MODTOWN_OUTSIDE_DESC": "47 has made his way outside in Modtown.",
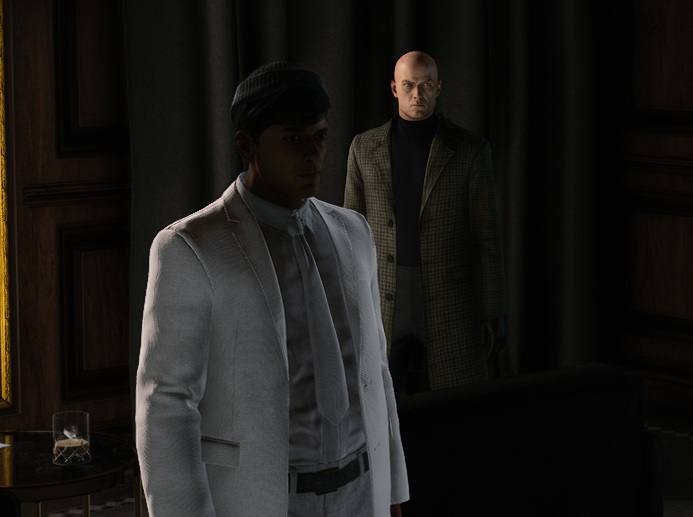
"NPC_SUPER_TARGETMAN_NAME": "Super Targetman",
"NPC_SUPER_TARGETMAN_DESC": "Super Targetman is the villian of Modlandia."
Let's create a new packagedefinition entry:
    {
      "type": "entity",
      "partition": "season3",
      "path": "[assembly:/_pro/scenes/missions/hitman_campaign_demo/mission_modtown/scene_modtown.entity].entitytemplate"
    }
Note that we set the partition to season3. This is because we won't need anything from any chunks other than chunk0, chunk1, and chunk2. For a refresher on chunks, see Chunk Data.
Updating the repository file
In GlacierKit, open the hitman_campaign_demo.repository.json file and click on the New item button.
In the new item, replace the contents with:
{
    "Image": "images/entrances/modtown/modtown_entrance_outside.jpg",
    "Name_LOC": "UI_STARTING_LOCATION_MODTOWN_OUTSIDE_DEFAULT_NAME",
    "Name": "Outside Starting Location",
    "Description": "UI_STARTING_LOCATION_MODTOWN_OUTSIDE_DESC"
}
We will need to add a new image: images/entrances/modtown/modtown_entrance_outside.jpg, which should have a resolution of 693 x 517.
For now let's reuse the bank_entrance_ceo.jpg file from the bank mission:
 and rename it to
 modtown_entrance_outside.jpg.
Click on the New item button again. In the new item, replace the contents with:
{
	"CommonName": "Outfit Super Targetman",
	"Description": "Outfit Super Targetman",
	"Name": "Outfit Super Targetman",
	"Category": "",
	"HeroDisguiseAvailable": false,
	"Image": "",
	"ImageTransparent": "",
	"IsHitmanSuit": false,
	"TokenID": ""
}
We will need this new outfit's repository entry UUID from under the Editor header text.
Click on the New item button again. In the new item, replace the contents with:
{
	"CharacterSetIndex": 0.0,
	"Description": "Super Targetman",
	"Description_LOC": "actor_description",
	"Image": "images/campaign_demo/modtown/super_targetman.jpg",
	"Name": "Super Targetman",
	"Outfit": "[NEW OUTFIT REPOSITORY ENTRY UUID]",
	"OutfitVariationIndex": 0.0,
	"Tile": "images/campaign_demo/modtown/super_targetman.jpg"
}
Replace [NEW OUTFIT REPOSITORY ENTRY UUID] with the UUID of the new outfit repository entry.
We will need to add a new image: images/campaign_demo/modtown/super_targetman.jpg, which should have a resolution of 693 x 517.
For now let's reuse the target_mc_targetface.jpg file from the bank mission:
 and rename it to
 super_targetman.jpg.
Updating the Unlockables
In GlacierKit, open the hitman_campaign_demo.unlockables.json file and click the New item button. In the new Item, replace the contents with:
{
	"Id": "LOCATION_PARENT_MODLANDIA",
	"Guid": "[NEW GENERATED UUID]",
	"Type": "location",
	"Subtype": "location",
	"ImageId": null,
	"RMTPrice": -1,
	"GamePrice": -1,
	"IsPurchasable": false,
	"IsPublished": true,
	"IsDroppable": false,
	"Capabilities": [],
	"Qualities": {},
	"Properties": {
		"Icon": "images/locations/modlandia/tile.jpg",
		"LockedIcon": "images/locations/modlandia/tile.jpg",
		"DlcImage": "images/livetile/dlc/tile_hitman3.jpg",
		"DlcName": "GAME_STORE_METADATA_S3_GAME_TITLE",
		"IsLocked": false,
		"UpcomingContent": false,
		"UpcomingKey": "UI_MENU_LIVETILE_CONTENT_UPCOMING_HEADLINE",
		"Background": "images/locations/modlandia/background.jpg",
		"Order": 0,
		"LimitedLoadout": false,
		"NormalLoadoutUnlock": "",
		"ProgressionKey": "LOCATION_MODLANDIA",
		"Season": 1,
		"RequiredResources": [
			"[assembly:/_pro/scenes/missions/hitman_campaign_demo/mission_modtown/scene_modtown.entity].entitytemplate"
		],
		"Entitlements": [
			"H1_LEGACY_STANDARD"
		]
	},
	"Rarity": null
}
Replace [NEW GENERATED UUID] with a newly generated UUID using GlacierKit.
We will also need to add new two new images: images/locations/modlandia/tile.jpg, which should have a resolution of 693 x 517, and images/locations/modlandia/background.jpg, which should be big enough to fit fullscreen (something like 1920 x 1080).
For now let's reuse the tile.jpg file from the bank mission:
And the campaign_demo_tile.jpg file from the campaign folder:
Now that we have our new parent location, let's add the sublocation.
In GlacierKit, on the hitman_campaign_demo.unlockables.json file, click the New item button. In the new Item, replace the contents with:
{
  "Id": "LOCATION_MODTOWN",
  "Guid": "[NEW GENERATED UUID]",
  "Type": "location",
  "Subtype": "sublocation",
  "ImageId": null,
  "RMTPrice": -1,
  "GamePrice": -1,
  "IsPurchasable": false,
  "IsPublished": true,
  "IsDroppable": false,
  "Capabilities": [],
  "Qualities": {},
  "Properties": {
    "ParentLocation": "LOCATION_PARENT_MODLANDIA",
    "Icon": "images/campaign_demo/modtown/tile.jpg",
    "LockedIcon": "images/campaign_demo/modtown/tile.jpg",
    "DlcImage": "images/livetile/dlc/tile_hitman3.jpg",
    "DlcName": "GAME_STORE_METADATA_S3_GAME_TITLE",
    "IsLocked": false,
    "UpcomingContent": false,
    "UpcomingKey": "UI_MENU_LIVETILE_CONTENT_UPCOMING_HEADLINE",
    "Background": "images/campaign_demo/modtown/background.jpg",
    "Order": 0,
    "LimitedLoadout": false,
    "ProgressionKey": "LOCATION_MODTOWN",
    "CreateContractId": "[ANOTHER NEW GENERATED UUID]",
    "HideProgression": false,
    "RequiredResources": ["[assembly:/_pro/scenes/missions/hitman_campaign_demo/mission_modtown/scene_modtown.entity].entitytemplate"],
    "Entitlements": ["H1_LEGACY_EXPANSION"]
  },
  "Rarity": null
}
Replace [NEW GENERATED UUID] with a newly generated UUID using GlacierKit.
Replace [ANOTHER NEW GENERATED UUID] with a different newly generated UUID using GlacierKit.
We will also need two more new images here: images/locations/modtown/tile.jpg, which should have a resolution of 693 x 517, and images/locations/modtown/background.jpg, which should be big enough to fit fullscreen (something like 1920 x 1080).
For now let's also reuse the tile.jpg file from the bank mission:
And the campaign_demo_tile.jpg file from the campaign folder:
Let's also create a new unlockable for the starting location. Click the New item. On the new item, set the contents to:
{
  "Id": "STARTING_LOCATION_OUTSIDE",
  "Type": "access",
  "Subtype": "startinglocation",
  "RMTPrice": -1,
  "GamePrice": -1,
  "IsPurchasable": false,
  "IsPublished": true,
  "IsDroppable": false,
  "Capabilities": [],
  "Qualities": {},
  "Properties": {
    "Location": "LOCATION_MODTOWN",
    "RepositoryId": "[NEW STARTING LOCATION REPOSITORY ENTRY UUID]",
    "Equip": [],
    "UnlockOrder": 3
  }
}
Replace [NEW GENERATED UUID] with a new UUID generated with GlacierKit.
The next steps are similar to what we did for the bank mission, so let's just quickly go through them.
Update the Story Config
Open the storyconfig.JSON.patch.json file. Add a new object in the StoryData array:
{
    "Type": "Mission",
    "Id": "[NEW GENERATED UUID]",
    "_comment": "The Modtown Throwdown mission for the Hitman Campaign Demo"
}
Replace [NEW GENERATED UUID] with a new UUID generated with GlacierKit.
Click the save button.
Update the Menu Map Setup file
In GlacierKit, open the menumapsetup_hitman_campaign_demo.entity.json file. On the Tree tab, expand the Scene > MenuMapSetup_HitmanCampaignDemo node. Right-click on the MenuMapSetup_HitmanCampaignDemo node and click Create Entity, and name it Scene_Modtown. Replace everything under the parent field with:
	"name": "Scene_Modtown",
	"factory": "[assembly:/templates/ui/mapexportentities.template?/menumap.entitytemplate].pc_entitytype",
	"blueprint": "[assembly:/templates/ui/mapexportentities.template?/menumap.entitytemplate].pc_entityblueprint",
	"properties": {
		"m_pMetaDataResource": {
			"type": "ZRuntimeResourceID",
			"value": {
				"resource": "",
				"flag": "5F"
			}
		}
	}
}
The m_pMetaDataResource > value > resource field is where we will set the planning contract's IOI string for our new mission. Let's use (planning contract) modlandia modtown. Add this to the Custom paths in the GlacierKit Settings.
In the Text tools, convert (planning contract) modlandia modtown to a Hex hash: 001421449C722898, and enter that in the resource field of the Scene_Modtown entity.
Press the save button.
Creating a new Planning Contract file
In the content/chunk0/Planning Contracts folder, create a new folder named modtown. Right-click on the new modtown folder and click New file and set the filename to our new planning contract's hex hash with .JSON at the end: 001421449C722898.JSON.
Open that file and set the contents to:
{
    "scene": "assembly:/_pro/scenes/missions/hitman_campaign_demo/mission_modtown/scene_modtown.entity",
    "actors": [],
    "entrances": [
        {
            "id": "[NEW STARTING LOCATION's REPOSITORY ENTRY'S UUID]",
            "isDefaultSpawn": true,
            "isPreferredSpawn": true,
            "WorldTransform": "0, 0, 0, 0, 0, 0, 0, 0, 1, 0, 0, 0"
        }
	],
	"Exits": [
      {
        "id": "[NEW GENERATED EXIT UUID]",
        "WorldTransform": "0, 0, 0, 0, 0, 0, 0, 0, 1, 0, 0, 0",
        "RequireKey": false
      }
	],
	"AgencyPickups": [
	]
}
Replace [NEW STARTING LOCATION's REPOSITORY ENTRY'S UUID] with your new starting location's repository entry's UUID.
Replace [NEW GENERATED EXIT UUID] with a new UUID generated using GlacierKit.
Press the save button.
Creating a new Mission Contract file
Right-click on the content/chunk0/Mission Contracts folder, click New file, and set the filename to mission_modtown.contract.json. Open that file and set the contents to:
{
    "Data": {
        "EnableSaving": true,
        "Objectives": [
            {
                "Id": "[NEW GENERATED UUID]",
                "Category": "primary",
                "ObjectiveType": "setpiece",
                "DisplayAsKillObjective": true,
                "ForceShowOnLoadingScreen": true,
                "IsHidden": false,
                "BriefingName": "$($repository [TARGET'S UUID]).Name",
                "Image": "images/campaign_demo/modtown/super_targetman.jpg",
                "HUDTemplate": {
                    "display": "Eliminate Super Targetman"
                },
                "BriefingText": "Eliminate Super Targetman",
                "SuccessEvent": {
                    "EventName": "Kill",
                    "EventValues": {
                        "RepositoryId": "[TARGET'S UUID]"
                    }
                }
            }
        ],
        "GameDifficulties": [
            {
                "Difficulty": "easy",
                "Bricks": []
            },
            {
                "Difficulty": "normal",
                "Bricks": []
            },
            {
                "Difficulty": "hard",
                "Bricks": []
            }
        ],
        "Bricks": [],
        "DevOnlyBricks": [],
        "Entrances": [
            "[ENTRANCE UUID]"
        ],
        "GameChangers": [],
        "GameChangerReferences": []
    },
    "Metadata": {
        "Id": "[ANOTHER NEW GENERATED UUID]",
        "IsPublished": true,
        "Title": "UI_MODTOWN_TITLE",
        "Description": "UI_MODTOWN_DESC",
        "CodeName_Hint": "Modtown",
        "ScenePath": "assembly:/_pro/scenes/missions/hitman_campaign_demo/mission_modtown/scene_modtown.entity",
        "TileImage": "images/campaign_demo/modtown/tile.jpg",
        "Location": "LOCATION_MODTOWN",
        "LastUpdate": "2025-05-02T19:44:00.000Z",
        "CreationTimestamp": "2025-05-02T19:44:00.000Z",
        "CreatorUserId": "a38f1dce-a7af-4a3c-a47a-5a94db8c0ed9",
        "Type": "mission",
        "Release": "3.0.0",
        "Entitlements": [
            "H2_LEGACY_EXPANSION"
        ]
    },
    "UserData": {},
    "SMF": {}
}
Replace [NEW GENERATED UUID] and [ANOTHER NEW GENERATED UUID] with newly generated UUIDs using GlacierKit.
Replace [TARGET'S UUID] with the new target's repository entry UUID.
Replace [ENTRANCE UUID] with the new starting location's repository entry UUID.
Click the save button.
Creating a new Scene and Scenario
In the content folder, create a new folder named chunk2.
In GlacierKit, right-click on the new chunk2 folder, and click Create file and name it scene_modtown.entity.json and click on it.
In the Metadata tab, in the Factory hash field, enter:
[assembly:/_pro/scenes/missions/hitman_campaign_demo/mission_modtown/scene_modtown.entity].pc_entitytemplate
In the Blueprint hash, enter:
[assembly:/_pro/scenes/missions/hitman_campaign_demo/mission_modtown/scene_modtown.entity].pc_entityblueprint
In the External Scenes section, click the Add an entry button, enter:
[assembly:/_pro/scenes/missions/hitman_campaign_demo/mission_modtown/scenario_modtown.brick].pc_entitytype
and press the Continue button.
Press the save button.
Download the empty_scenario_brick.entity.json template again and save it as content/chunk2/scenario_modtown.entity.json and click it.
In the Metadata tab, in the Factory hash field, enter:
[assembly:/_pro/scenes/missions/hitman_campaign_demo/mission_modtown/scenario_modtown.brick].pc_entitytype
In the Blueprint hash, enter:
[assembly:/_pro/scenes/missions/hitman_campaign_demo/mission_modtown/scenario_modtown.brick].pc_entityblueprint
In the External scenes section, click Add an entry, enter:
[assembly:/_pro/scenes/missions/hitman_campaign_demo/outfits_modtown.brick].pc_entitytype
and press Continue.
We will also need a few more external scenes to make the mission load properly. Add all of these as well:
[assembly:/_pro/scenes/bricks/gameessentialsbase.brick].pc_entitytype
[assembly:/_pro/scenes/bricks/globaldata.brick].pc_entitytype
[assembly:/_pro/scenes/bricks/ui_hitman_s2.brick].pc_entitytype
[assembly:/_pro/scenes/bricks/ui_hitman_s3.brick].pc_entitytype
Creating a new Starting Location
Switch to the Tree tab and rename the Scenario_Empty node to Scenario_Modtown. Expand the Scenario_Modtown > Gameplay node and right-click on the Starting locations node and click Create Entity and name it Outside and click on the Outside node. Replace everything in the contents after the parent field with:
  "name": "Outside",
  "factory": "[assembly:/_pro/design/levelflow.template?/herospawn.entitytemplate].pc_entitytype",
  "blueprint": "[assembly:/_pro/design/levelflow.template?/herospawn.entitytemplate].pc_entityblueprint",
  "properties": {
    "m_mTransform": {
      "type": "SMatrix43",
      "value": {
        "rotation": {
          "x": 0,
          "y": 0,
          "z": 0
        },
        "position": {
          "x": 0,
          "y": 0,
          "z": 0
        }
      }
    },
    "m_sId": {
      "type": "ZGuid",
      "value": "[OUTSIDE STARTING LOCATION UUID]"
    },
    "m_bDefaultHeroSpawn": {
      "type": "bool",
      "value": true
    },
    "m_bPreferredHeroSpawn": {
      "type": "bool",
      "value": true
    },
    "m_eidParent": {
      "type": "SEntityTemplateReference",
      "value": "fffffffffffffffe",
      "postInit": true
    }
  }
}
Replace [OUTSIDE STARTING LOCATION UUID] with the new outside starting location's repository entry UUID.
Right-click on the Gameplay > Hero node and click Create Entity and set the name to Agent47_Default, and click on the new entity node, and in the contents, replace everything after the parent field with:
	"name": "Agent47_Default",
	"factory": "[assembly:/_pro/characters/templates/hero/agent47/agent47.template?/agent47_default.entitytemplate].pc_entitytype",
	"blueprint": "[assembly:/_pro/characters/templates/hero/agent47/agent47.template?/agent47_default.entitytemplate].pc_entityblueprint",
	"properties": {
		"m_mTransform": {
			"type": "SMatrix43",
			"value": {
				"rotation": {
					"x": 0,
					"y": 0,
					"z": 0
				},
				"position": {
					"x": 0,
					"y": 0,
					"z": 0
				}
			}
		},
		"m_eidParent": {
			"type": "SEntityTemplateReference",
			"value": "fffffffffffffffe",
			"postInit": true
		}
	}
}
Creating a new Outside Room
Expand the Environment node. We have an empty 000_Outside node, but let's replace it with a more filled out one. First let's delete that node by right-clicking it and pressing Delete. The XXX_Room_Folder_Structure node has some useful categories, so let's copy it. Right-click that node and press Clipboard > Copy. Then right-click the Environment node and press Clipboard > Paste.
Click the new XXX_Room_Folder_Structure node and in the contents, change the name to 000_Outside.
Next let's make our new 000_Outside node a zroomentity. In the contents for 000_Outside replace everything after the parent field with:
  "name": "000_Outside",
  "factory": "[modules:/zroomentity.class].pc_entitytype",
  "blueprint": "[modules:/zroomentity.class].pc_entityblueprint",
  "properties": {
    "m_vRoomMin": {
      "type": "SVector3",
      "value": {
        "x": -1000,
        "y": -1000,
        "z": -1000
      }
    },
    "m_vRoomMax": {
      "type": "SVector3",
      "value": {
        "x": 1000,
        "y": 1000,
        "z": 1000
      }
    },
    "m_mTransform": {
      "type": "SMatrix43",
      "value": {
        "rotation": {
          "x": 0,
          "y": 0,
          "z": 0
        },
        "position": {
          "x": 0,
          "y": 0,
          "z": 0
        }
      }
    },
    "m_bIsPrivate": {
      "type": "bool",
      "value": false
    },
    "m_bOutside": {
      "type": "bool",
      "value": true
    },
    "m_bCSMRoom": {
      "type": "bool",
      "value": true
    }
  },
  "subsets": {
    "Rooms": [
      "fffffffffffffffe"
    ]
  }
}
Right-click the 000_Outside > Geometry node and click Create Entity and name it Floor. Click it and in the contents, replace everything after the parent field with:
	"name": "Floor",
	"factory": "0065E6850BB157E2",
	"blueprint": "00B6E9D9DA6DE143",
	"properties": {
		"m_mTransform": {
			"type": "SMatrix43",
			"value": {
				"rotation": {
					"x": 0,
					"y": 0,
					"z": 0
				},
				"position": {
					"x": -10.0,
					"y": 10.0,
					"z": 0.0
				}
			}
		},
		"m_PrimitiveScale": {
			"type": "SVector3",
			"value": {
				"x": 20,
				"y": 20,
				"z": 1
			}
		},
		"m_bVisible": {
			"type": "bool",
			"value": true
		},
		"m_eRoomBehaviour": {
			"type": "ZSpatialEntity.ERoomBehaviour",
			"value": "ROOM_DYNAMIC"
		}
	}
}
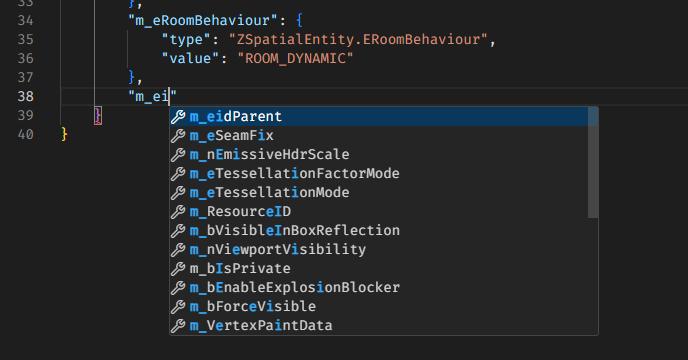
Next, click on the 000_Outside entity and copy the entity id underneath the Editor header text. Then click on the Floor node and at the bottom of the properties object, add a new object by adding a comma, then a ", and then start typing m_eidParent. The autocomplete will pop up. Select m_eidParent and press enter, and it will fill out the rest of the object. Replace the null value with the entity id you copied. Then it should look something like this:
        ...
		"m_eRoomBehaviour": {
			"type": "ZSpatialEntity.ERoomBehaviour",
			"value": "ROOM_DYNAMIC"
		},
		"m_eidParent": {
			"type": "SEntityTemplateReference",
			"value": "abcd2f7d17f552be"
		}
	}
}
Creating a new Exit
Next, right-click on the Gameplay > Exit locations node and click Create Entity and set the name to Exit. Click on the new Exit node and in the contents, replace everything after the parent field with:
	"name": "Exit",
	"factory": "[assembly:/_pro/design/levelflow.template?/exit_pushbutton.entitytemplate].pc_entitytype",
	"blueprint": "[assembly:/_pro/design/levelflow.template?/exit_pushbutton.entitytemplate].pc_entityblueprint",
	"properties": {
		"m_mTransform": {
			"type": "SMatrix43",
			"value": {
				"rotation": {
					"x": 0.0,
					"y": 0.0,
					"z": 0.0
				},
				"position": {
					"x": 5.0,
					"y": 5.0,
					"z": 0.0
				}
			}
		},
		"m_sId": {
			"type": "ZGuid",
			"value": "[EXIT UUID]"
		},
		"Show3dExitSpatial": {
			"type": "bool",
			"value": true
		},
		"m_mTransforminteraction": {
			"type": "SMatrix43",
			"value": {
				"rotation": {
					"x": -0.0,
					"y": 0.0,
					"z": -0.0
				},
				"position": {
					"x": 0.07000000029802322,
					"y": -0.8199999928474426,
					"z": -0.3400000035762787
				}
			}
		},
		"m_mTransformprompt": {
			"type": "SMatrix43",
			"value": {
				"rotation": {
					"x": -0.0,
					"y": 0.0,
					"z": -0.0
				},
				"position": {
					"x": 0.0,
					"y": 0.0,
					"z": 1.2699999809265137
				}
			}
		},
		"m_mTransformexiticon": {
			"type": "SMatrix43",
			"value": {
				"rotation": {
					"x": -0.0,
					"y": 0.0,
					"z": -0.0
				},
				"position": {
					"x": 0.0,
					"y": 0.0,
					"z": 1.6200000047683716
				}
			}
		},
		"m_eidParent": {
			"type": "SEntityTemplateReference",
			"value": "fffffffffffffffe"
		}
	},
	"events": {
		"ExitActivated": {
			"Manual_Exit_Trigger": [
			]
		}
	}
}
Replace [EXIT UUID] with the exit's UUID from the planning contract.
In the events > ExitActivated > Manual_Exit_Trigger array, add this new Exit entity's id.
Creating a new NPC
Now right-click the Scenario_Modtown > NPCs node and click Create Entity and set the name to Super Targetman. Click on the new Super Targetman node and in the contents, replace everything after the parent field with:
	"name": "Super Targetman",
	"factory": "[assembly:/templates/gameplay/ai2/actors.template?/npcactor.entitytemplate].pc_entitytype",
	"blueprint": "[assembly:/templates/gameplay/ai2/actors.template?/npcactor.entitytemplate].pc_entityblueprint",
	"properties": {
		"m_mTransform": {
			"type": "SMatrix43",
			"value": {
				"rotation": {
					"x": 0.0,
					"y": 0.0,
					"z": 0.0
				},
				"position": {
					"x": 10.0,
					"y": 0.0,
					"z": 0.0
				}
			}
		},
		"RepositoryId": {
			"type": "ZGuid",
			"value": "[SUPER TARGETMAN'S REPOSITORY ENTRY UUID]"
		},
		"m_OutfitRepositoryID": {
			"type": "ZGuid",
			"value": "[SUPER TARGETMAN'S OUTFIT'S REPOSITORY ENTRY UUID]"
		},
		"m_nOutfitVariation": {
			"type": "int32",
			"value": 0
		},
		"m_sActorName": {
			"type": "ZString",
			"value": "Super Targetman"
		},
		"m_nOutfitCharset": {
			"type": "int32",
			"value": 0
		},
		"m_eRequiredVoiceVariation": {
			"type": "EActorVoiceVariation",
			"value": "eAVV_CIVMALE08"
		},
		"m_aEnforcedOutfits": {
			"type": "TArray<SEntityTemplateReference>",
			"value": [
			]
		},
		"m_eidParent": {
			"type": "SEntityTemplateReference",
			"value": "fffffffffffffffe",
			"postInit": true
		}
	},
	"subsets": {
		"AudioEmitters": [
			"fffffffffffffffe"
		],
		"Replicable": [
			"fffffffffffffffe"
		]
	}
}
Replace [SUPER TARGETMAN'S REPOSITORY ENTRY UUID] and [SUPER TARGETMAN'S OUTFIT'S REPOSITORY ENTRY UUID] with the repository entries for Super Targetman and his outfit respectively.
Adding a MapMarkup entity
Right-click on the Gameplay node and click Create Entity and name it Map. Right-click on that new node, and click Create Entity, name it Modtown and in the contents, replace everything after the parent field with:
	"name": "Modtown",
	"factory": "[assembly:/templates/ui/mapmarkup.template?/menumap.entitytemplate].pc_entitytype",
	"blueprint": "[assembly:/templates/ui/mapmarkup.template?/menumap.entitytemplate].pc_entityblueprint",
	"properties": {
		"m_pMetaDataResource": {
			"type": "ZRuntimeResourceID",
			"value": {
				"resource": "001421449C722898",
				"flag": "5F"
			}
		}
	}
}
Where 001421449C722898 is the hash of our planning contract for this mission.
Press the save button.
Adding lighting and a sky
Our scenario will also need lighting, a sky, and physics, otherwise everything will be dark and grey.
Download the tod_day_sunny_clear.entity.json file and save it to your content/chunk2 folder as tod_day_sunny_clear.entity.json. This is a basic "time of day" brick that we can drop into any custom scene, that sets up a sunny clear day and blue sky.
Let's add some IOI strings for the time of day brick as well. In GlacierKit, on the Settings tab, in the Custom paths section, click the Add an entry button and enter:
[assembly:/_pro/scenes/missions/hitman_campaign_demo/tod_day_sunny_clear.brick].pc_entitytype
and press Continue. Click the Add an entry button again and enter:
[assembly:/_pro/scenes/missions/hitman_campaign_demo/tod_day_sunny_clear.brick].pc_entityblueprint
and press Continue.
In GlacierKit, go to the scenario_modtown.entity.json file and in the External scenes section click the Add an entry button, enter [assembly:/_pro/scenes/missions/hitman_campaign_demo/tod_day_sunny_clear.brick].pc_entitytype, and press Continue.
We will also need to set an override on this brick so that it's parent is our 000_Outside room. Switch to the Overrides tab and on the Property overrides tab, paste this snippet into the array:
    {
        "entities": [
            {
                "ref": "cafe9e975eba0134",
                "externalScene": "[assembly:/_pro/scenes/missions/hitman_campaign_demo/tod_day_sunny_clear.brick].pc_entitytype"
            }
        ],
        "properties": {
            "m_eidParent": {
                "type": "SEntityTemplateReference",
                "value": "[ENTITY ID OF THE 000_Outside ENTITY]"
            }
        }
    }
Replace [ENTITY ID OF THE 000_Outside ENTITY] with the entity id of the 000_Outside entity from scenario_modtown.entity.json.
Press the save button.
Adding Physics
We will also need the Scenario to have some physics entities defined. In GlacierKit, on the scenario_modtown.entity.json file, switch to the Tree view. Right-click on the Physics node and click Create Entity, name it VolumeBox_WorldBounds and click on the new entity, and in the contents, replace everything after the parent field with:
	"name": "VolumeBox_WorldBounds",
	"factory": "[modules:/zboxvolumeentity.class].pc_entitytype",
	"blueprint": "[modules:/zboxvolumeentity.class].pc_entityblueprint",
	"properties": {
		"m_mTransform": {
			"type": "SMatrix43",
			"value": {
				"rotation": {
					"x": 0,
					"y": 0,
					"z": 0
				},
				"position": {
					"x": 0,
					"y": 0,
					"z": 0
				}
			}
		},
		"m_vGlobalSize": {
			"type": "SVector3",
			"value": {
				"x": 200,
				"y": 200,
				"z": 200
			}
		},
		"m_eidParent": {
			"type": "SEntityTemplateReference",
			"value": "fffffffffffffffe",
			"postInit": true
		}
	}
}
Then right-click on the Physics node again and click Create Entity, name it FX_Logic_PhysicsWorld, and click on it, and in the contents, replace everything after the parent field with:
	"name": "FX_Logic_PhysicsWorld",
	"factory": "[assembly:/_pro/effects/templates/logic/fx_logic_physicsworld.template?/fx_logic_physicsworld.entitytemplate].pc_entitytype",
	"blueprint": "[assembly:/_pro/effects/templates/logic/fx_logic_physicsworld.template?/fx_logic_physicsworld.entitytemplate].pc_entityblueprint",
	"properties": {
		"m_WorldBounds": {
			"type": "SEntityTemplateReference",
			"value": null
		}
	}
}
Replace the null value for the m_WorldBounds property with the entity id of the VolumeBox_WorldBounds entity, for instance "cafe047b052d1376"
Press the save button.
Updating the Charset
For simplicity, let's copy our entire outfit folder from content/chunk12/Outfits to content/chunk2. This cannot be done from GlacierKit, so in GlacierKit right-click on the chunk12 folder and click Show in Explorer. Copy the outfit folder, then go to the content/chunk2 folder and paste it.
In GlacierKit, the new folder should have appeared. Let's modify the files to fit our new mission and NPCs.
First rename the chunk2/Outfits/charset_target_mctargetface.entity.json file to charset_super_targetman.entity.json, then click on that file.
Rename the CHARSET_TargetMcTargetface to CHARSET_SuperTargetman. Expand the CHARSET_SuperTargetman > Actor > 0 node and click on the 0 node. Replace the properties > m_Outfit > value > resource value with:
[assembly:/_pro/characters/templates/hitman_campaign_demo/outfit_super_targetman_actor_v0.entitytemplate].pc_entitytemplate
Next expand the HeroA node and click on Var0. Replace the properties > m_Outfit > value > resource value with:
[assembly:/_pro/characters/templates/hitman_campaign_demo/outfit_super_targetman_actor_v0.entitytemplate].pc_entitytemplate
Next expand the Nude node and click on Var0. Replace the properties > m_Outfit > value > resource value with:
[assembly:/_pro/characters/templates/hitman_campaign_demo/outfit_super_targetman_actor_v0.entitytemplate].pc_entitytemplate
Next, switch to the Metadata tab. In the Factory hash text field enter:
[assembly:/_pro/characters/templates/hitman_campaign_demo/charset_super_targetman.entitytemplate].pc_entitytemplate
In the Blueprint hash text field enter:
[assembly:/_pro/characters/templates/hitman_campaign_demo/charset_super_targetman.entitytemplate].pc_entityblueprint
Press the save button.
Updating the Outfit
Next, rename the chunk2/Outfits/outfit_target_mctargetface_v0.entity.json file to outfit_super_targetman_v0.entity.json and click on it. Rename the OUTFIT_TargetMcTargetface_Actor_v0 node to OUTFIT_SuperTargetman_Actor_v0 and expand it.
Since our outfit for the other mission took place on the New York brick, we might not have access to some of the outfit parts. For each part, we can check using GlacierKit. Click on the Belt_StrapBuckle node, copy the factory hash 0017355DDB3D75A3, switch to the Game content tab and search for that hash. Check the Separate tree by partition checkbox.
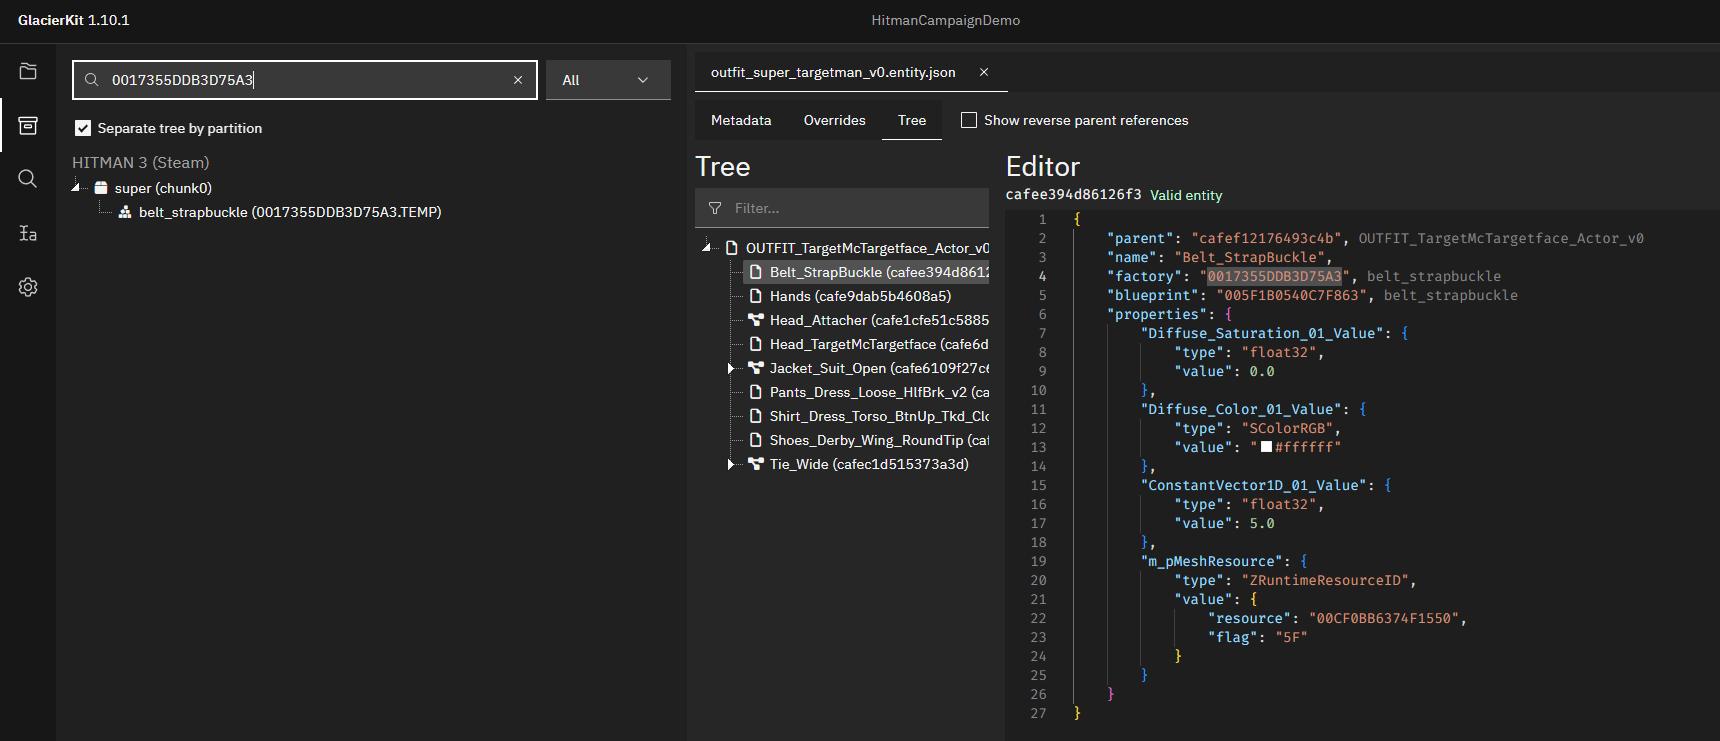
We can see that the Belt_StrapBuckle resource is in the super / chunk0 partition. Consulting our handy Chunk Data guide, we can see that every chunk has access to the content in chunk0 including the season3 / chunk2 partition that our new mission is in. So we are free to use this outfit part. Continuing with the rest of the outfit parts, we can see that every outfit part is in chunk0, except for the resource used by the Head_TargetMcTargetface node. We will need to swap that out. First let's rename the Head_TargetMcTargetface node to Head_SuperTargetman.
Let's find Super Targetman a new head! In the Game content tab search for head_ and set the dropdown to Templates, and make sure the Separate tree by partition checkbox is checked. Expand the super (chunk0) node and scroll down until you see the nodes with the icons of stacks of boxes in a triangle shape, and that end in .TEMP. Choose whichever head you'd like. In this example, head_hippowhisperer is used.

Click on the head you'd like and click Open in editor, and switch to the Metadata tab. Copy the Factory hash value and switch back to the outfit_super_targetman_v0.entity.json file and paste it into the Head_SuperTargetman node's factory field. Switch back to the head_hippowhisperer resource and copy the Blueprint hash value and switch back to the outfit_super_targetman_v0.entity.json file and paste it into the Head_SuperTargetman node's blueprint field.
Next, switch to the Metadata tab. In the Factory hash text field enter:
[assembly:/_pro/characters/templates/hitman_campaign_demo/outfit_super_targetman_actor_v0.entitytemplate].pc_entitytemplate
In the Blueprint hash text field enter:
[assembly:/_pro/characters/templates/hitman_campaign_demo/outfit_super_targetman_actor_v0.entitytemplate].pc_entityblueprint
Press the save button.
Updating the outfits brick
Rename the chunk2/Outfits/outfits_bank.entity.json file to outfits_modtown.entity.json, click on it, and switch to the Metadata tab. In the Factory hash field, enter:
[assembly:/_pro/scenes/missions/hitman_campaign_demo/outfits_modtown.brick].pc_entitytype
In the Blueprint hash field, enter:
[assembly:/_pro/scenes/missions/hitman_campaign_demo/outfits_modtown.brick].pc_entityblueprint
Switch to the Tree tab, and rename the Target McTargetface node to Super Targetman and click on that node.
Change the m_sId value to the repository entry for the Super Targetman outfit.
Change the m_sCommonName and m_sTitle values to Super Targetman
Rename the CHARSET_TargetMcTargetface to CHARSET_SuperTargetman and click on that node.
Change the factory value to:
[assembly:/_pro/characters/templates/hitman_campaign_demo/charset_super_targetman.entitytemplate].pc_entitytemplate
Change the blueprint value to:
[assembly:/_pro/characters/templates/hitman_campaign_demo/charset_super_targetman.entitytemplate].pc_entityblueprint
Delete the Prof_Greedy_Unique_CEO node.
Press the save button.
Fixing game crashes
If all went well, we should be able to deploy the mod now and see our new mission.
If the game crashes when you start a mission, there may be an issue with the IOI strings. One useful trick to find these issues is to check the project.json file. Open it in WebStorm, format the file by going to the Code menu and pressing Reformat Code. Then select all the lines in the custom paths section, go to the Edit menu and press Sort Lines. After sorting, make sure to adjust the commas at the end of the lines to make the json valid.
Double check that all the IOI strings are present and are what you expect, for instance, that there is a blueprint for each entity that needs one, and that there were no copy-paste errors. If you see anything amiss, fix the IOI string in the file that references it.
For instance, if you don't see the [assembly:/_pro/characters/templates/hitman_campaign_demo/charset_super_targetman.entitytemplate].pc_entityblueprint IOI string, then open the charset_super_targetman.entity.json file, go to the Metadata tab, and set the Blueprint hash to that IOI string.
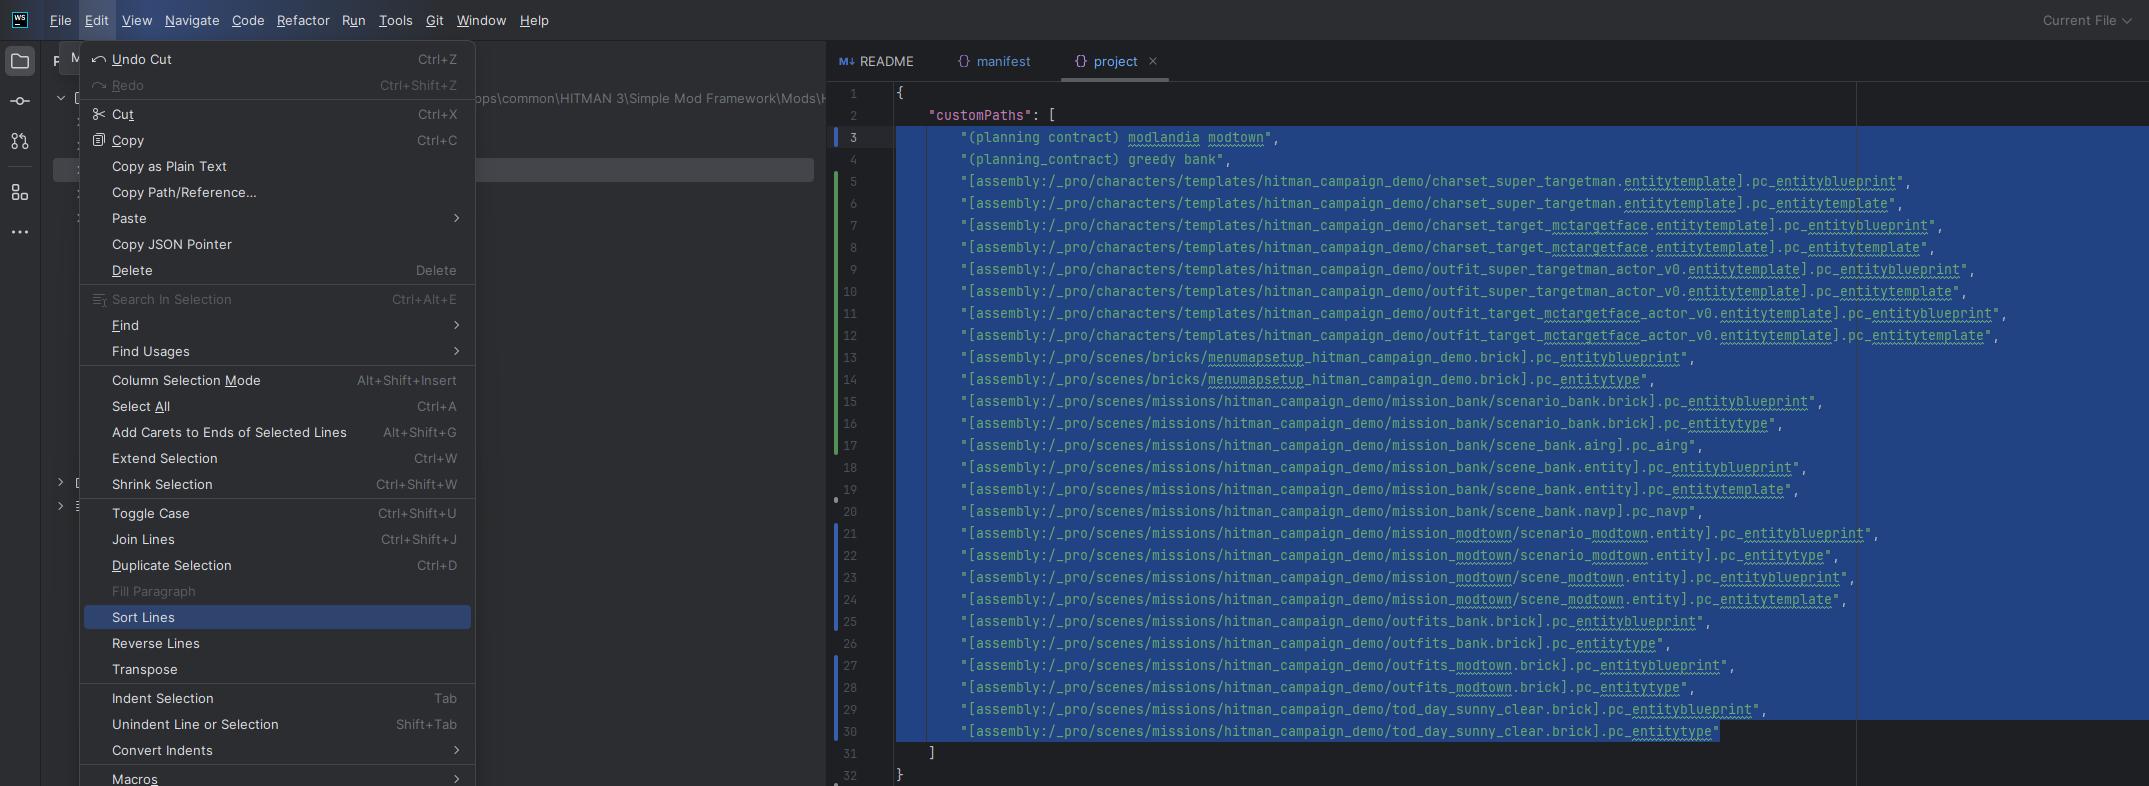
In this screenshot, we can see that there is a typo for the scenario_modtown IOI string. It should be scenario_modtown.brick, but it says scenario_modtown.entity. In this instance, the fix would be to open the scenario_modtown.entity.json file and in the Metadata tab, replace the hash with the correct IOI string.
Also be sure that any Hex hashes you use match the IOI string that you are expecting.
Also make sure that you are not referencing anything that is not in an accessible chunk. For instance, if you left the Prof_Greedy_Unique_CEO profession in the Super Targetman outfit in the outfits_modtown.entity.json file, the game will crash because the [assembly:/_pro/design/actor/profession.template?/prof_greedy_unique_ceo.entitytemplate].pc_entitytype resource is not accessible in chunk2, since it is in chunk12. In this instance, the fix would be to delete the Prof_Greedy_Unique_CEO node from the Super Targetman outfit node.
Also make sure to check each entry in your Unlockables and Repository files to make sure all the IOI strings and hashes are correct.
Sometimes (usually) if it crashes, there's more than one issue, so don't get discouraged, and just keep going through every file, double-checking all the hashes and paths on the Metadata tabs and in entity properties on the Tree tab, and making sure the files are in the correct chunk folder.
Deploying and generating the NAVP and AIRG
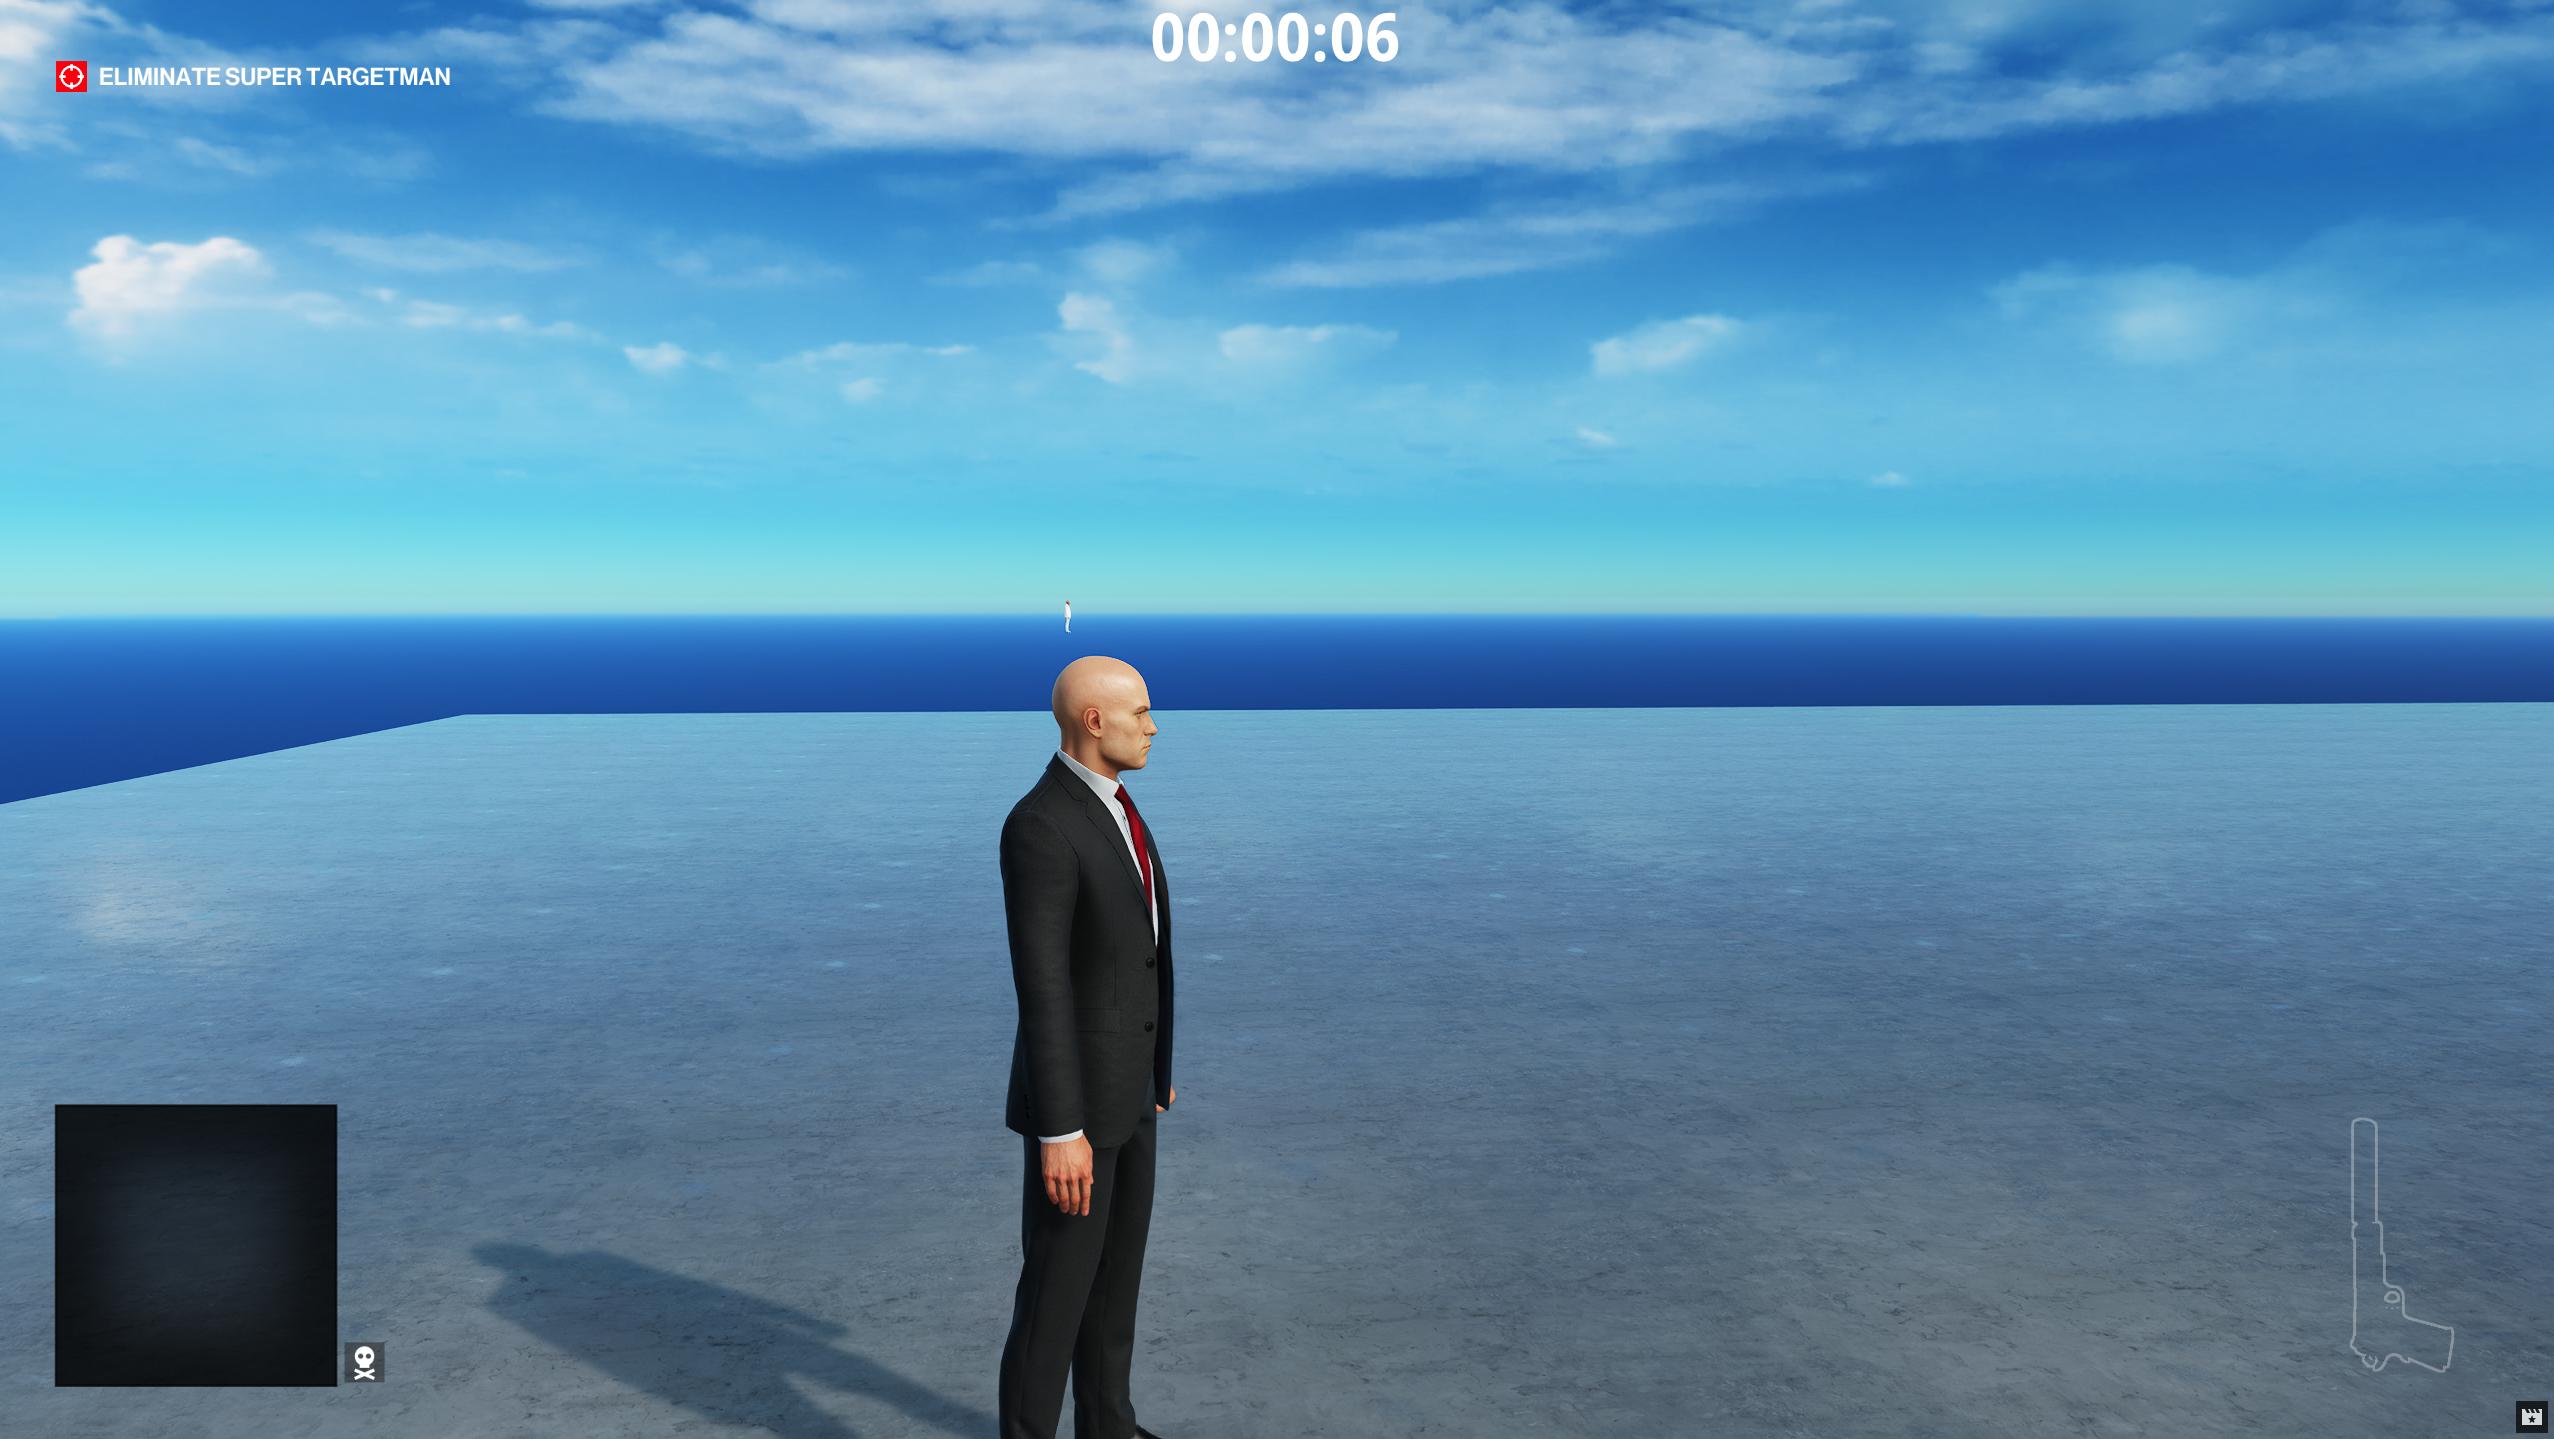 The lighting is nice, there is a sky, and there is a floor we can walk on that reflects the sky properly. But the NPC isn't where we expected him. Let's see if we can fix that by making a NAVP and AIRG.
Open NavKit and click the Extract from game and build obj button on the Extract menu on the right sidebar.
Once that's done, click the Build Navp from Obj and Scene button on the left sidebar.
Once that's done, click the Build Airg from Navp button on the Airg menu on the right sidebar.
 Let's make some new IOI strings for the NAVP and AIRG. For the NAVP, let's use:
[assembly:/_pro/scenes/missions/hitman_campaign_demo/mission_modtown/scene_modtown.navp].pc_navp
In GlacierKit, go to the Settings tab and on the Custom paths section, scroll down and press the Add an entry button. Paste in that IOI string and press Continue.
On the Text tools tab, paste that IOI string into the Hash calculator field and copy the value in the Hex text field.
Back in NavKit, click the Save Navp button, and navigate to the content/chunk2 folder and name it the hex value you copied.
For the AIRG, let's use:
[assembly:/_pro/scenes/missions/hitman_campaign_demo/mission_modtown/scene_modtown.airg].pc_airg
In GlacierKit, go to the Settings tab and on the Custom paths section, scroll down and press the Add an entry button. Paste in that IOI string and press Continue.
On the Text tools tab, paste that IOI string into the Hash calculator field and copy the value in the Hex text field.
Back in NavKit, click the Save Airg button, and navigate to the content/chunk2 folder and name it the hex value you copied.
Now that we have our NAVP and AIRG files, we need to tell the scenario to use them. In GlacierKit, go to the scenario_modtown.entity.json file on the Tree view, expand the Scenario_Modtown > AI node. Right-click on the Pathfinding node and click Create Entity, name it Pathfinder_Configuration, click on the new node and in the contents, replace everything after the parent field with:
    "name": "Pathfinder_Configuration",
    "factory": "[modules:/zpathfinderconfiguration.class].pc_entitytype",
    "blueprint": "[modules:/zpathfinderconfiguration.class].pc_entityblueprint",
    "properties": {
        "m_NavpowerResourceID": {
            "type": "ZRuntimeResourceID",
            "value": {
                "resource": "[assembly:/_pro/scenes/missions/hitman_campaign_demo/mission_modtown/scene_modtown.navp].pc_navp",
                "flag": "5F"
            }
        }
    }
}
Right-click on the AI Reasoning Grid node and click Create Entity, name it AI Reasoning Grid, click on the new node and in the contents, replace everything after the parent field with:
	"name": "AI Reasoning Grid",
	"factory": "[modules:/zreasoninggridconfigentity.class].pc_entitytype",
	"blueprint": "[modules:/zreasoninggridconfigentity.class].pc_entityblueprint",
	"properties": {
		"m_pGrid": {
			"type": "ZRuntimeResourceID",
			"value": {
				"resource": "[assembly:/_pro/scenes/missions/hitman_campaign_demo/mission_modtown/scene_modtown.airg].pc_airg",
				"flag": "5F"
			}
		}
	}
}
Deploy the mod, relaunch Hitman and start the mission.
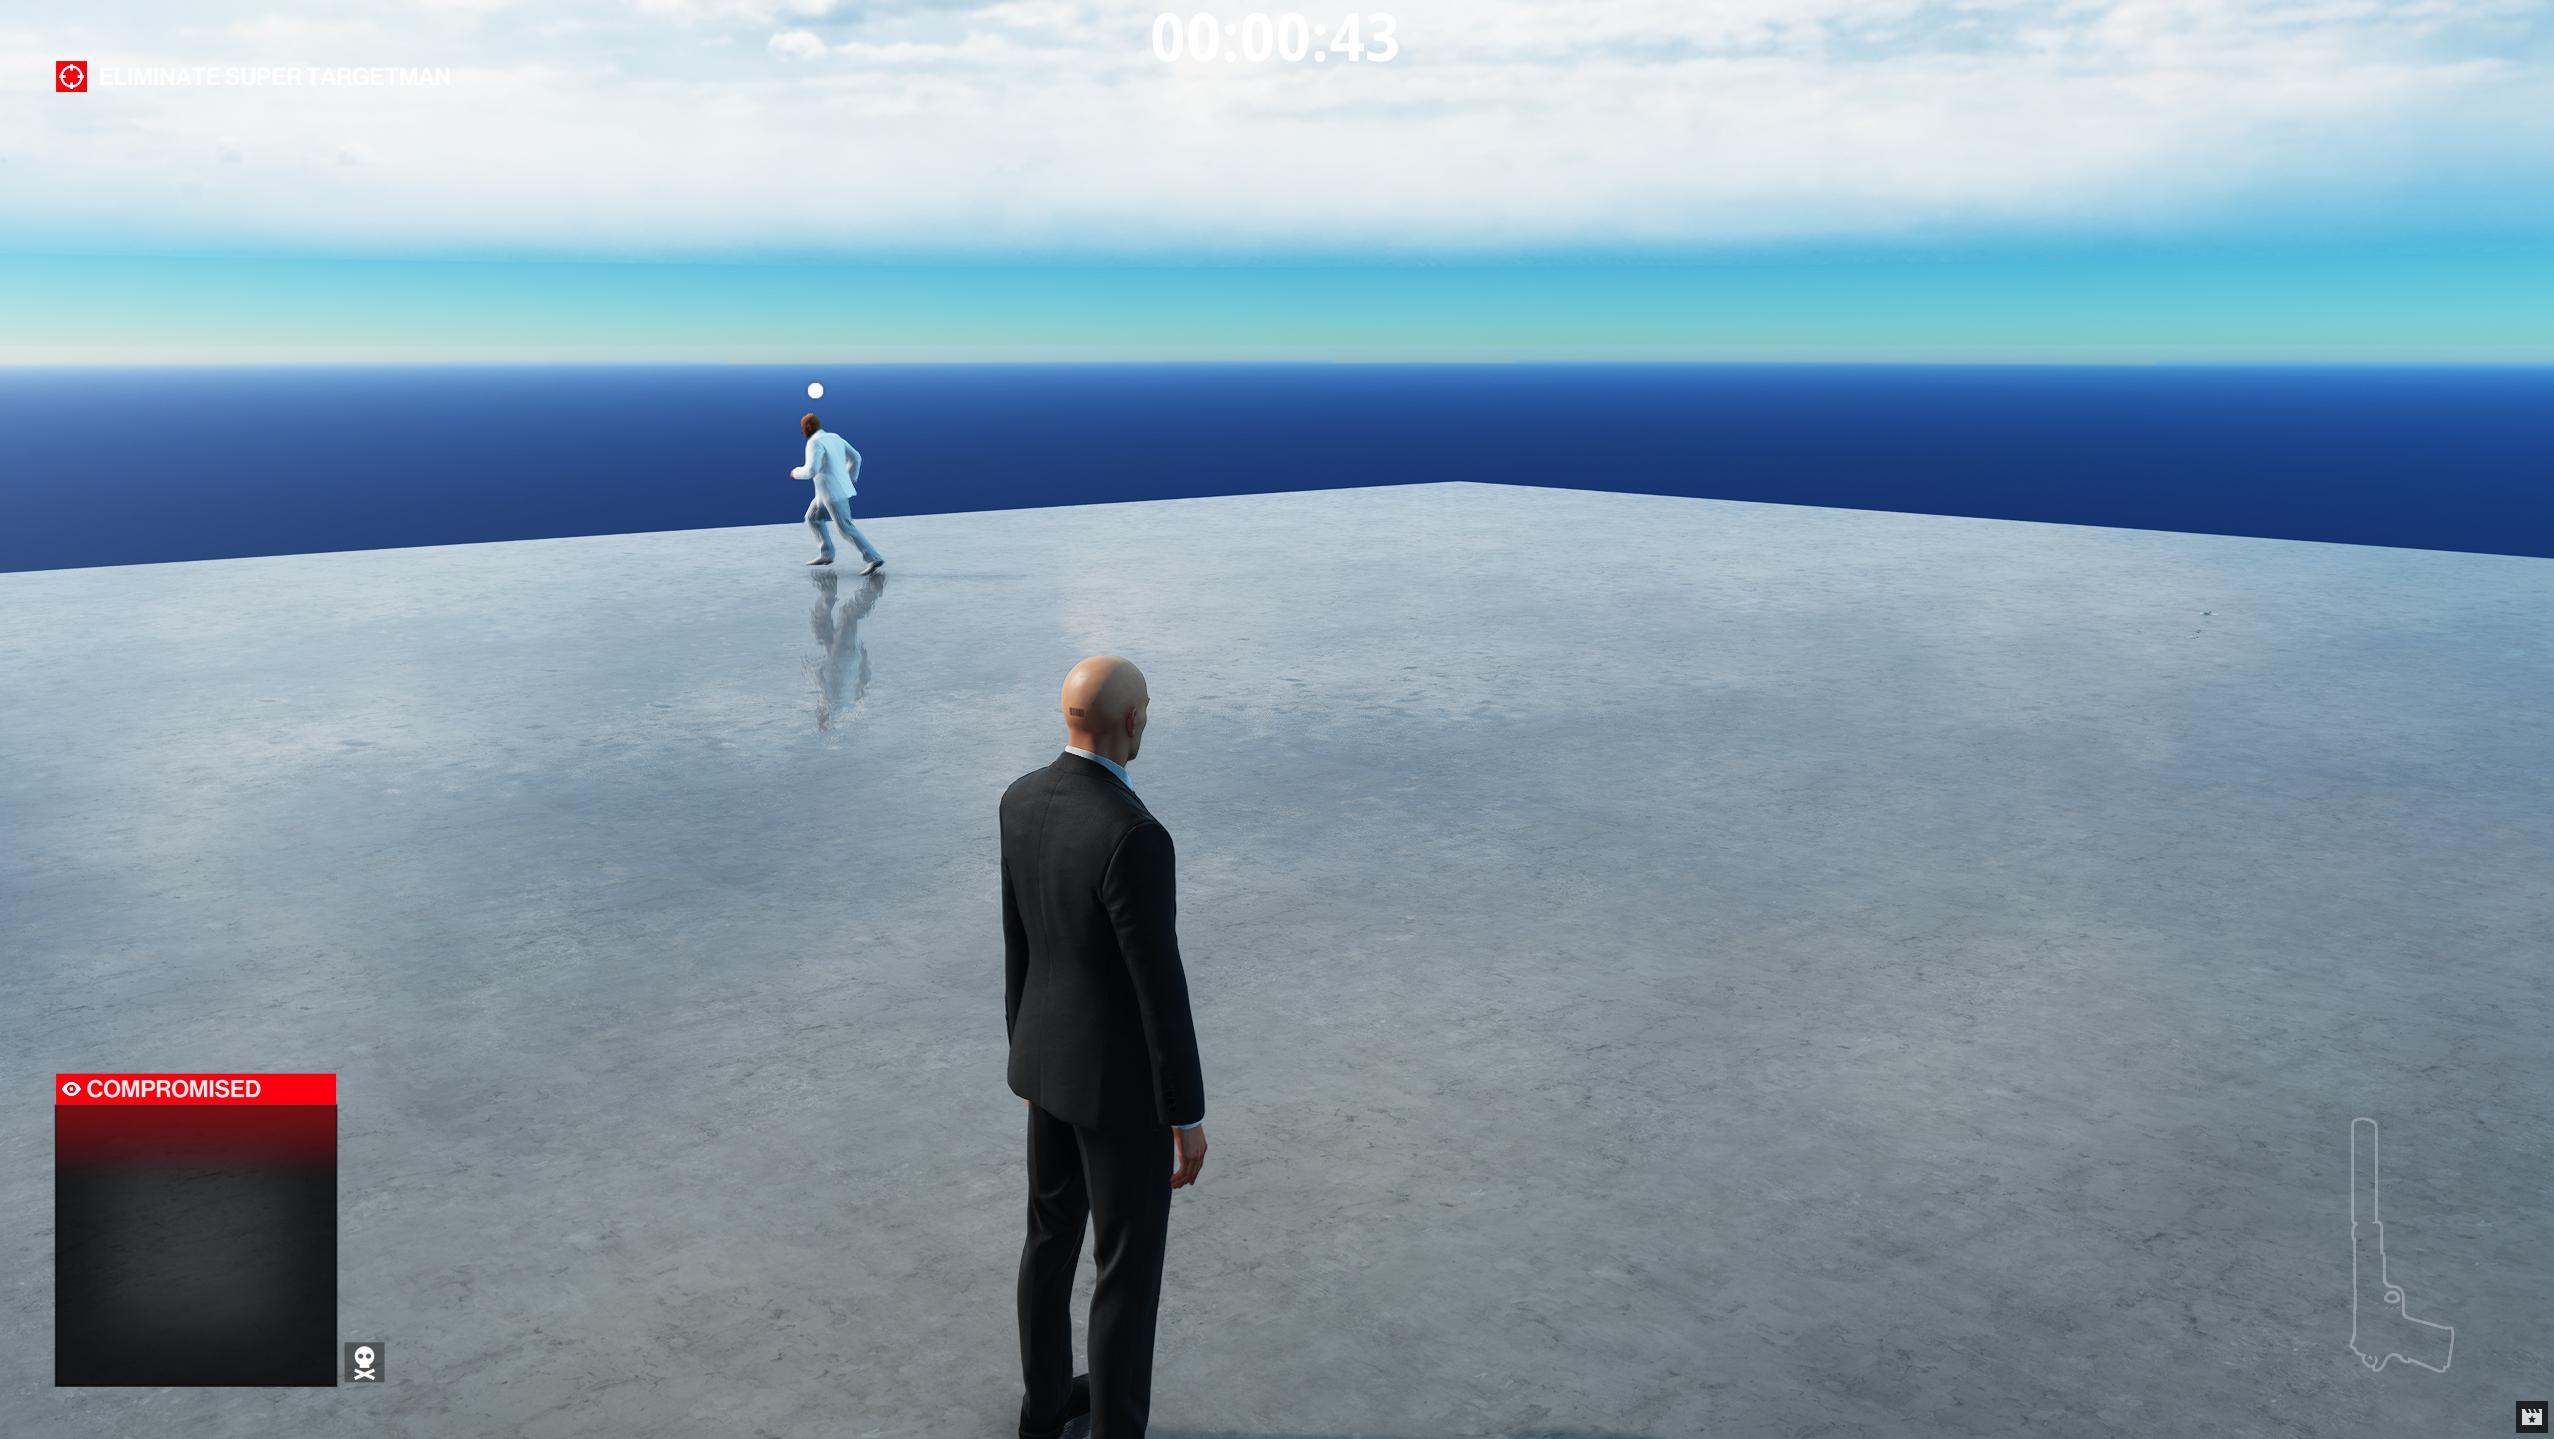
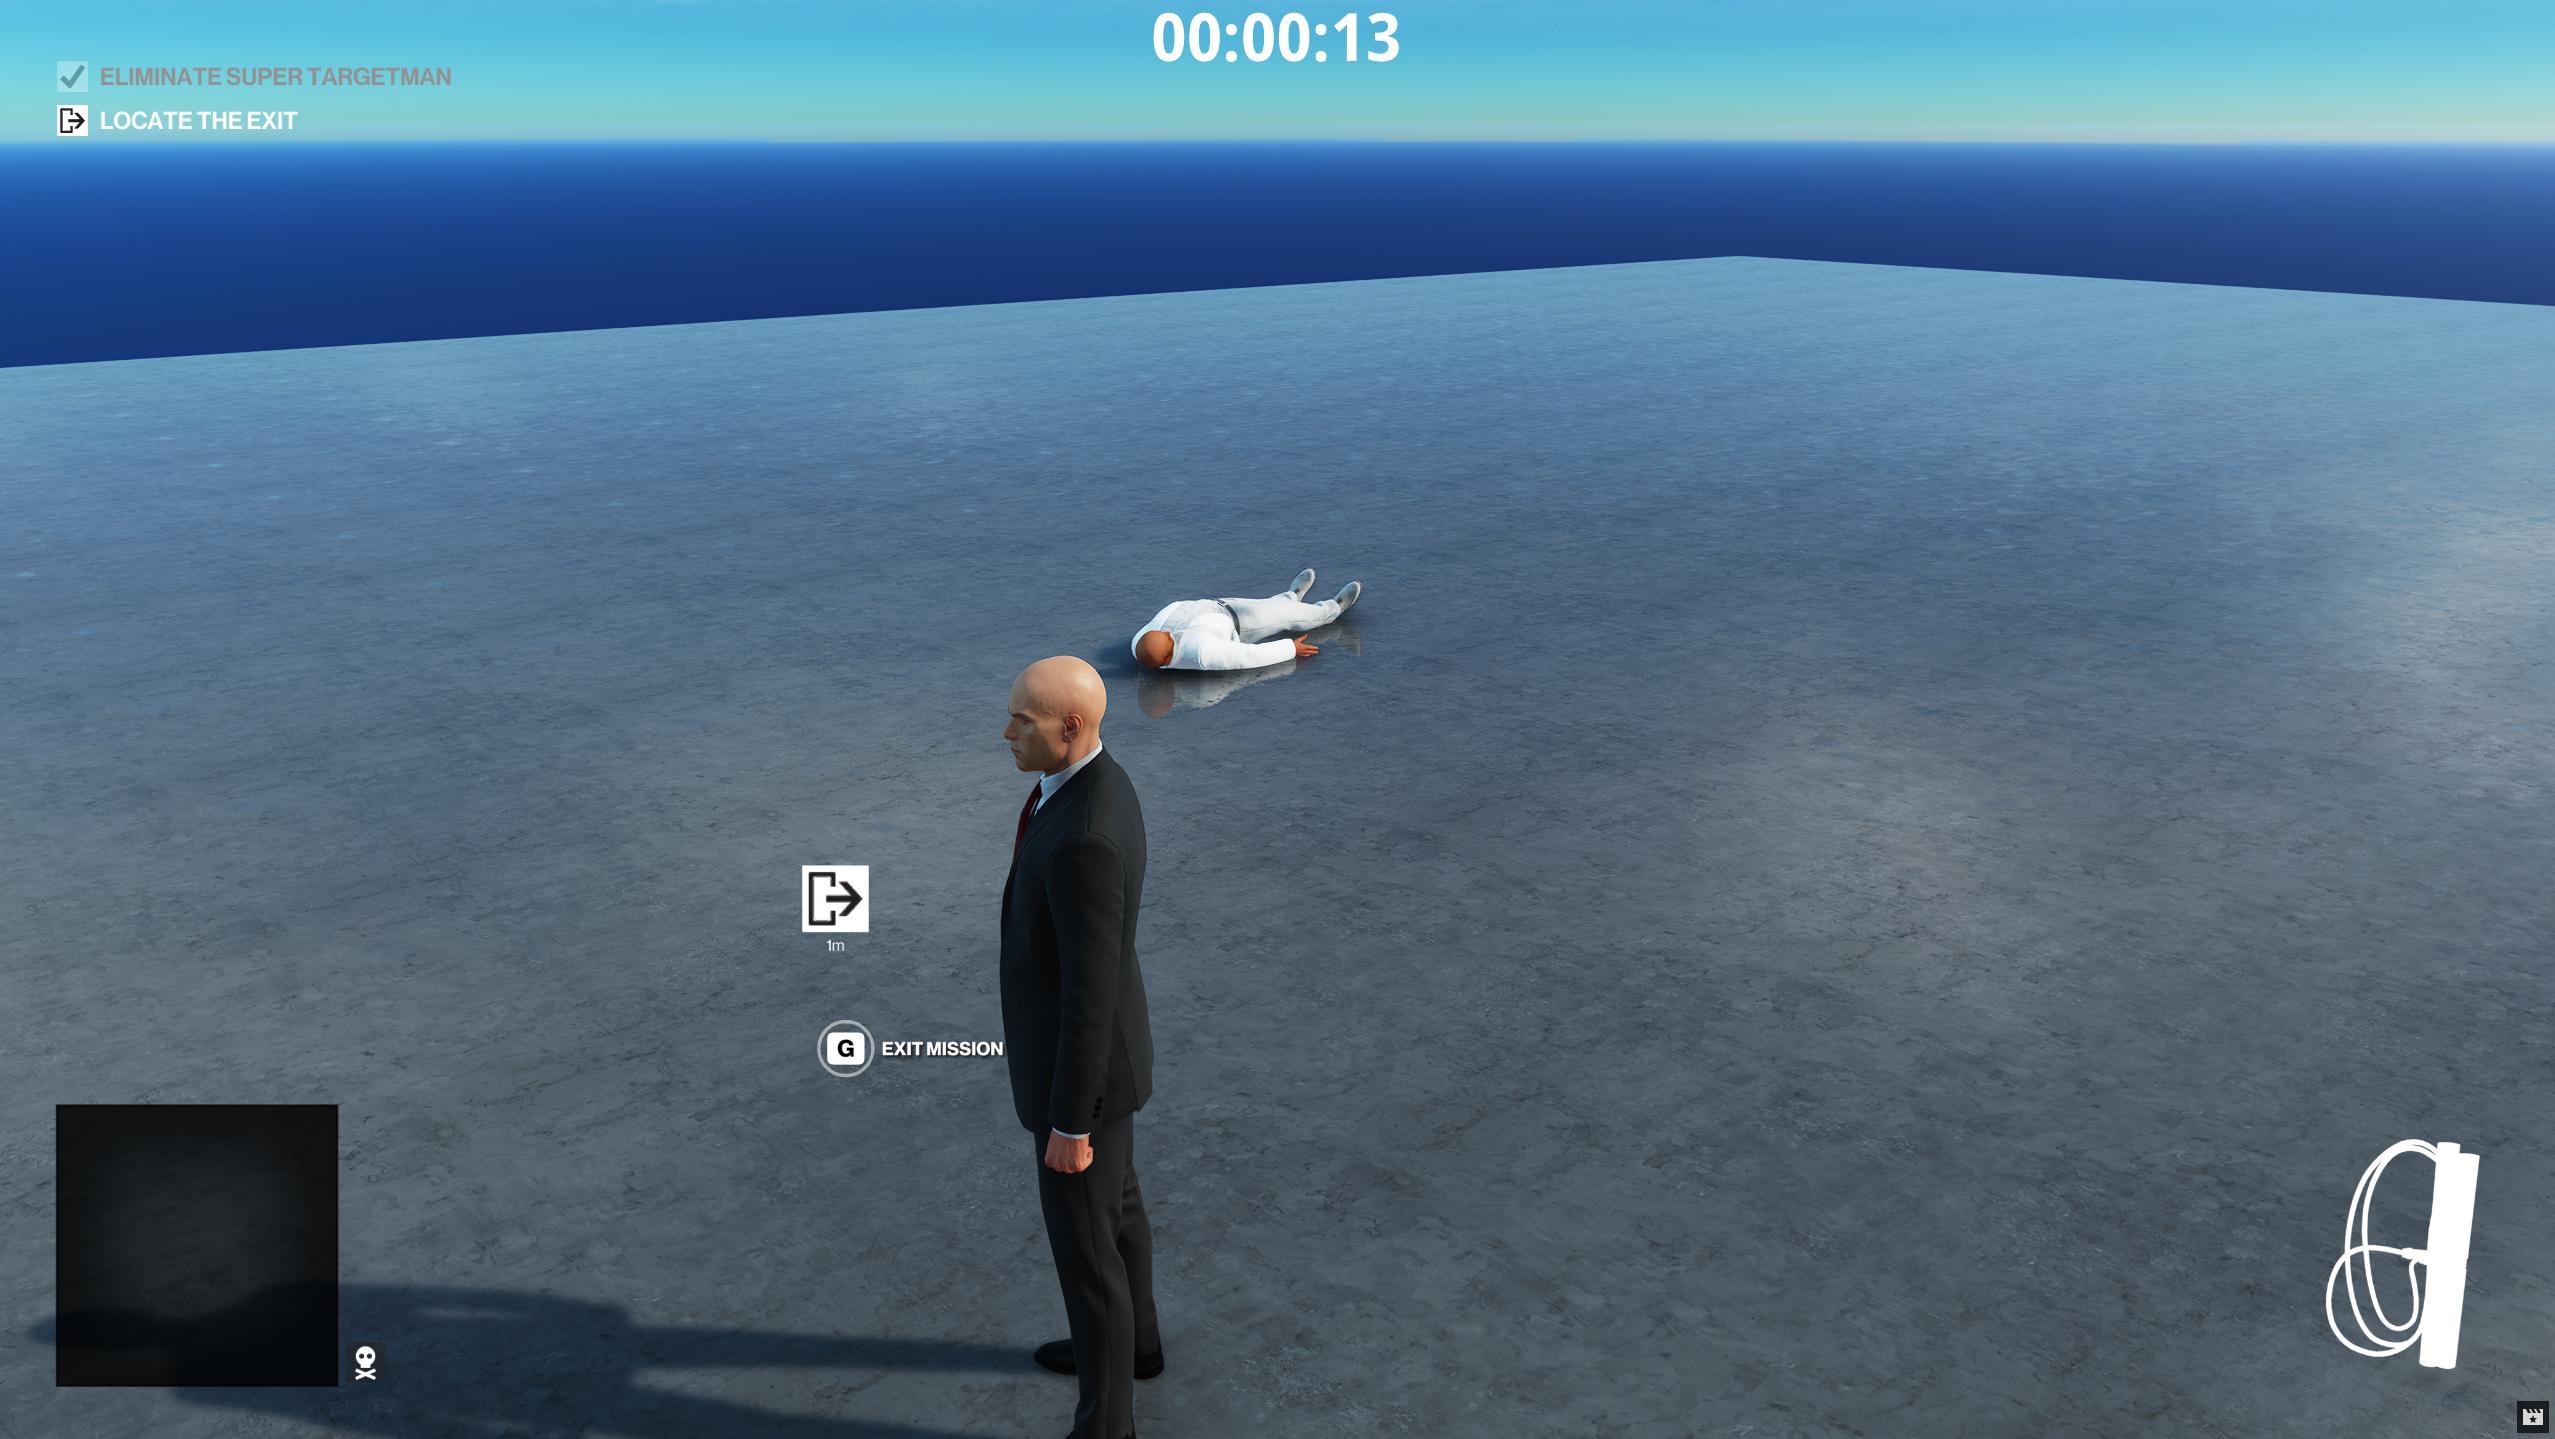
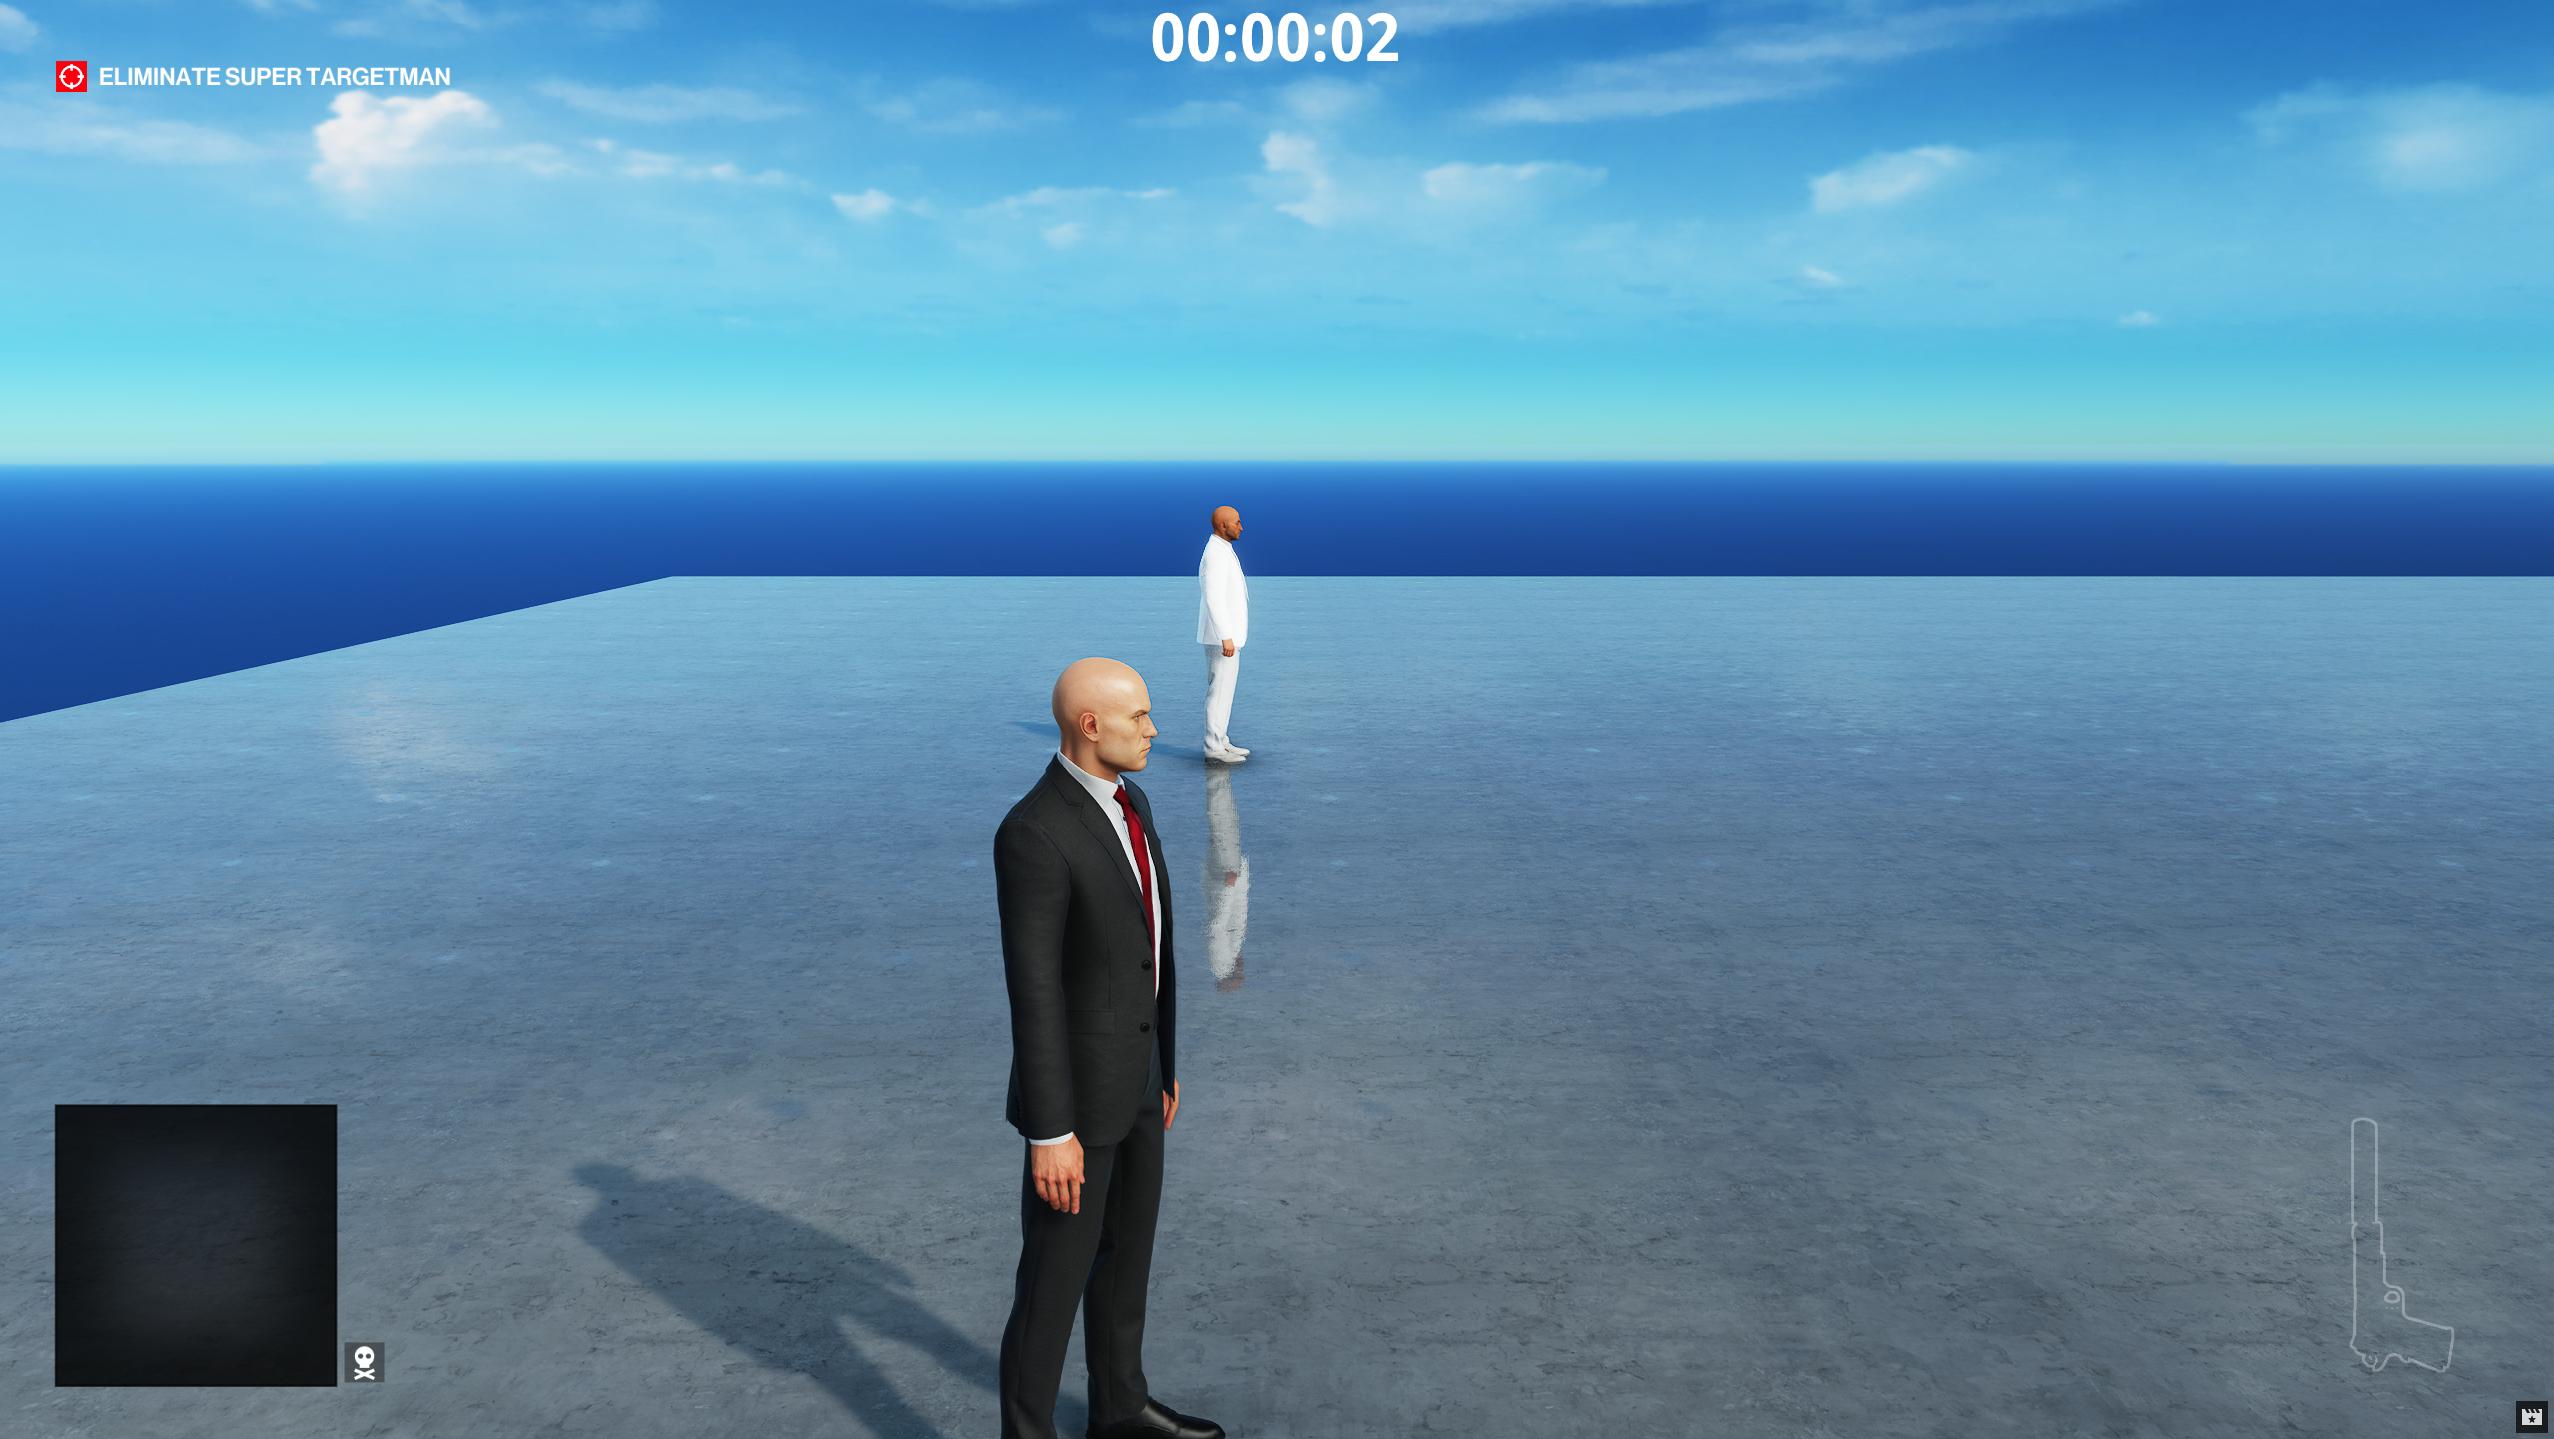 Now our NPC is in the right spot, and reacts properly when distracted or panicking.
 If we take out the target, the exit appears and functions properly.
Finding and adding geometry from in-game
Let's add a building for our NPC. We can build one with a few walls, and a door.
First, to make things a little easier, let's make a new composite entity for this house. Right-click the 000_Outside > Geometry node and click Create Entity and name it House, click it, and in its contents, replace everything after the parent field with:
	"name": "House",
	"factory": "[modules:/zcompositeentity.class].pc_entitytype",
	"blueprint": "[modules:/zcompositeentity.class].pc_entityblueprint",
	"properties": {
		"m_mTransform": {
			"type": "SMatrix43",
			"value": {
				"rotation": {
					"x": 0,
					"y": 0,
					"z": 0
				},
				"position": {
					"x": 10,
					"y": 0,
					"z": 0
				}
			}
		},
        "m_eidParent": {
            "type": "SEntityTemplateReference",
            "value": null,
            "postInit": true
        }
	}
}
Set the m_eidParent value to the entity id of the 000_Outside entity.
Since we're in chunk2, we can use anything from chunk0, chunk1, or chunk2. Dubai is in chunk0 and conveniently has plenty of examples of walls and doors.
Let's use these entities:
penthouse_wall_interior_6x4_a
penthouse_wall_door_interior_6x2_a
penthouse_wall_corner_edge_interior_6m_a
[assembly:/_pro/environment/templates/architecture/doors/doors_gecko_a.template?/gecko_singledoor_penthouse_staff_bathroom_a.entitytemplate].pc_entitytype
In GlacierKit, if the Game content tab, search for scenario_gecko.brick and click on it, click on the Open in Editor button and in the Tree view, search for penthouse_wall_interior_6x4_a. Right-click on one of the entities and click Clipboard > Copy.
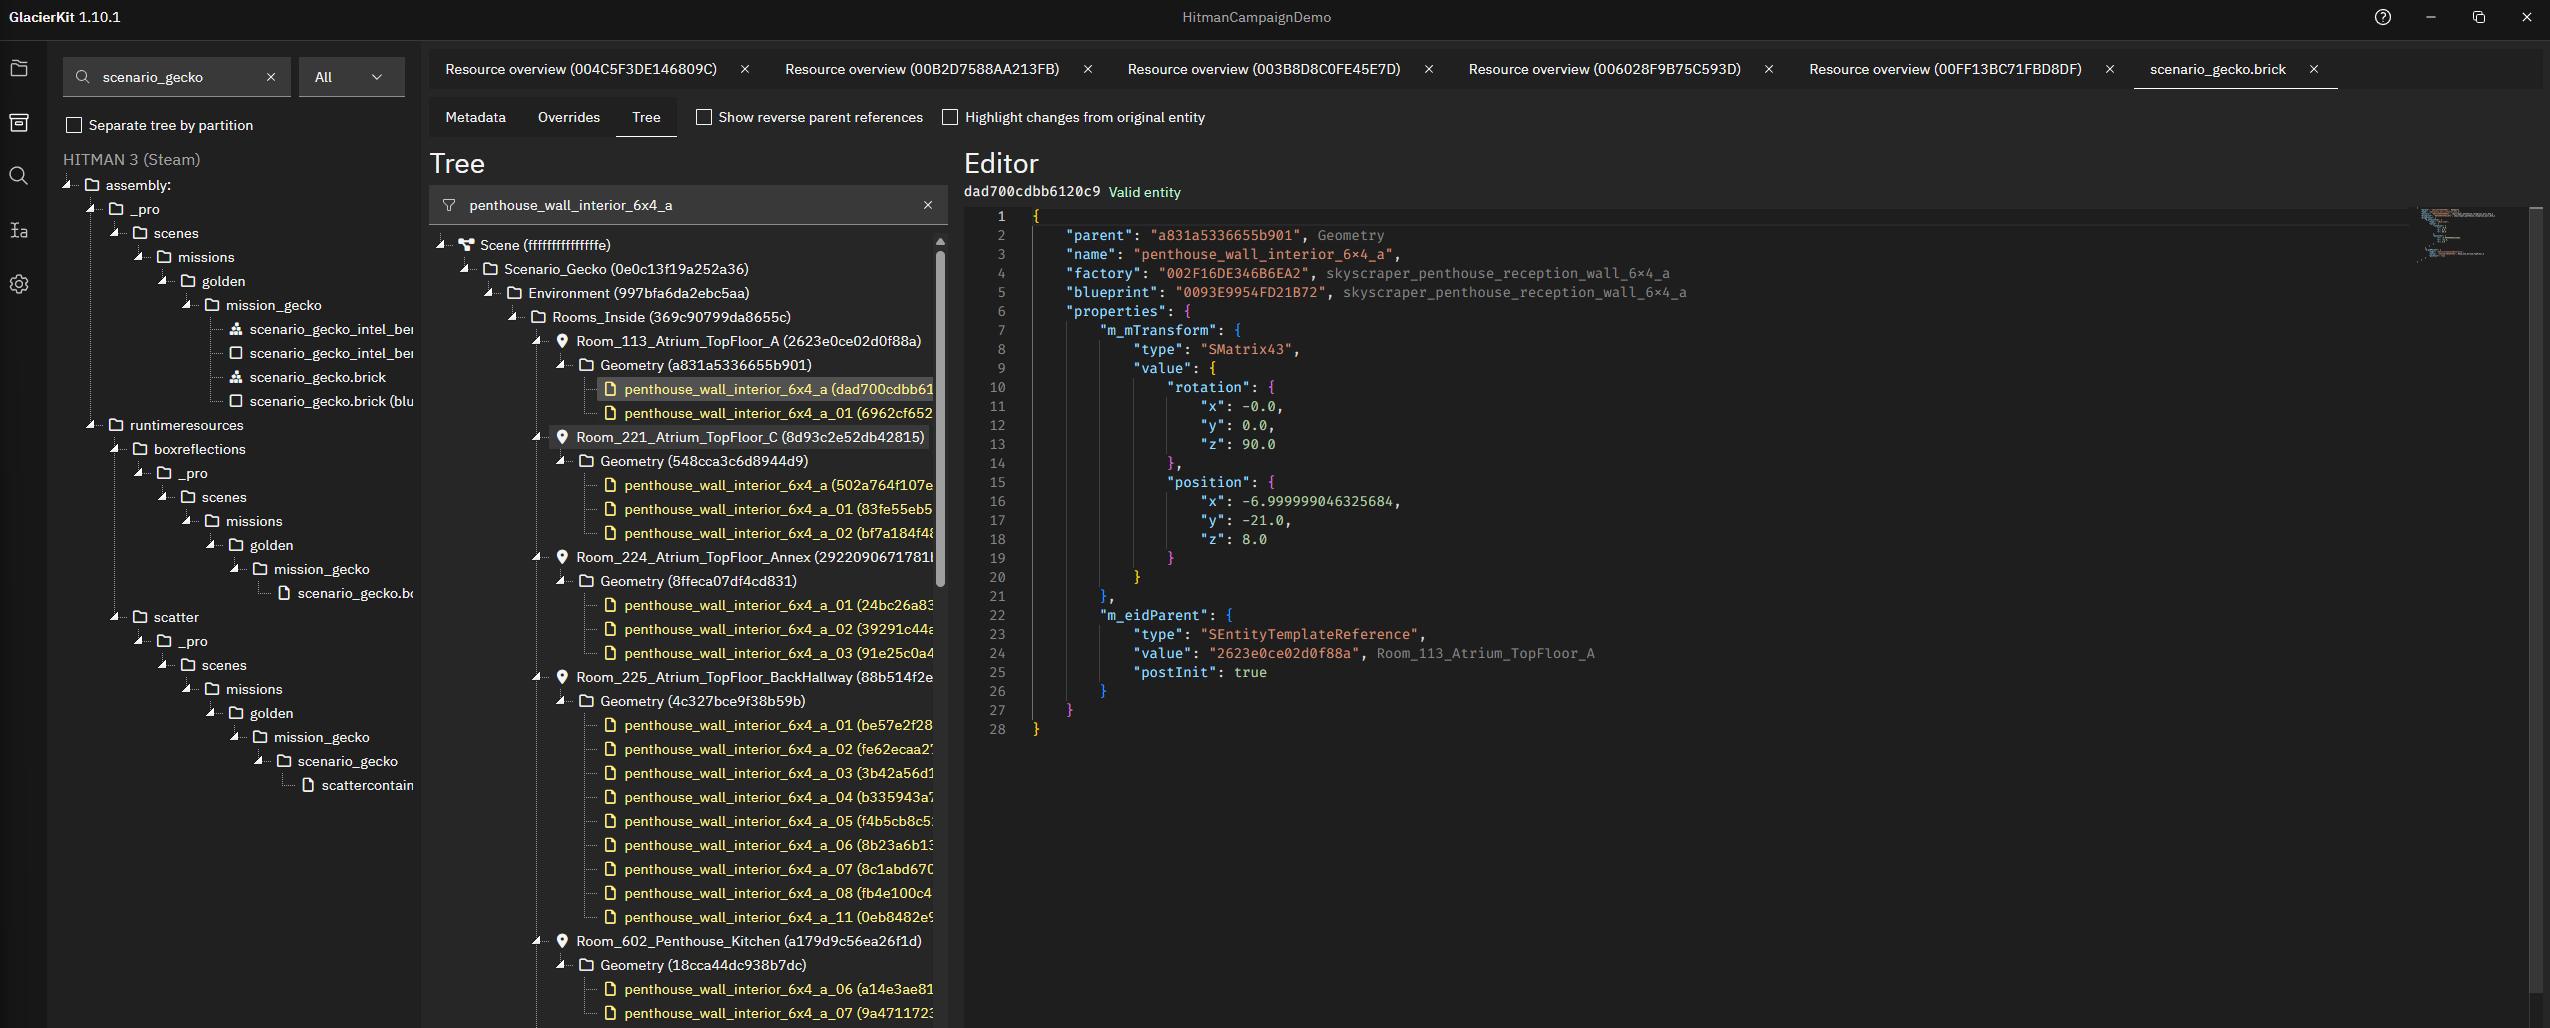 Switch back to the
 scenario_modland.entity.json file and on the tree view, right-click in the Environment > 000_Outside > Geometry > House node and click Clipboard > paste.
Click on the new node and set the m_eidParent value to the entity id of the House entity. Set the position object to:
"position": {
    "x": 8.0,
    "y": 0.0,
    "z": 0.0
}
And the rotation object to:
"rotation": {
    "x": 0.0,
    "y": 0.0,
    "z": 0.0
},
Right-click this new node, and click Clipboard > Copy, and paste five more copies of this node into the House node.
Switch back to scenario_gecko.brick and search for penthouse_wall_door_interior_6x2_a, and similarly copy and paste one of these entities into the scenario_modland.entity.json file and set the m_eidParent value to the entity id of the House entity. Set the rotation to all zeros like before and the position object to:
"position": {
    "x": 5.0,
    "y": 0.0,
    "z": 0.0
}
Click on the new node and set the m_eidParent value to the entity id of the House node. Right-click this new node, and click Clipboard > Copy, and paste in one more copy of this node.
Do the same thing for penthouse_wall_corner_edge_interior_6m_a, and paste in one of these. Set the rotation to all zeros like before and the position object to:
"position": {
    "x": 5.0,
    "y": 6.0,
    "z": 0.0
}
Right-click this new node and click Clipboard > Copy, and paste in 3 copies of this node.
Do the same thing for gecko_singledoor_penthouse_staff_bathroom_a. Set the rotation to all zeros like before and the position object to:
"position": {
    "x": 8.0,
    "y": 6.0,
    "z": 0.0
}
Click on this new entity and set the m_bIsLocked value to false.
The positions of these won't be perfect at the moment, but once we get into the mission, we can modify these.
Press the save button, redeploy, relaunch hitman, and start the mission.
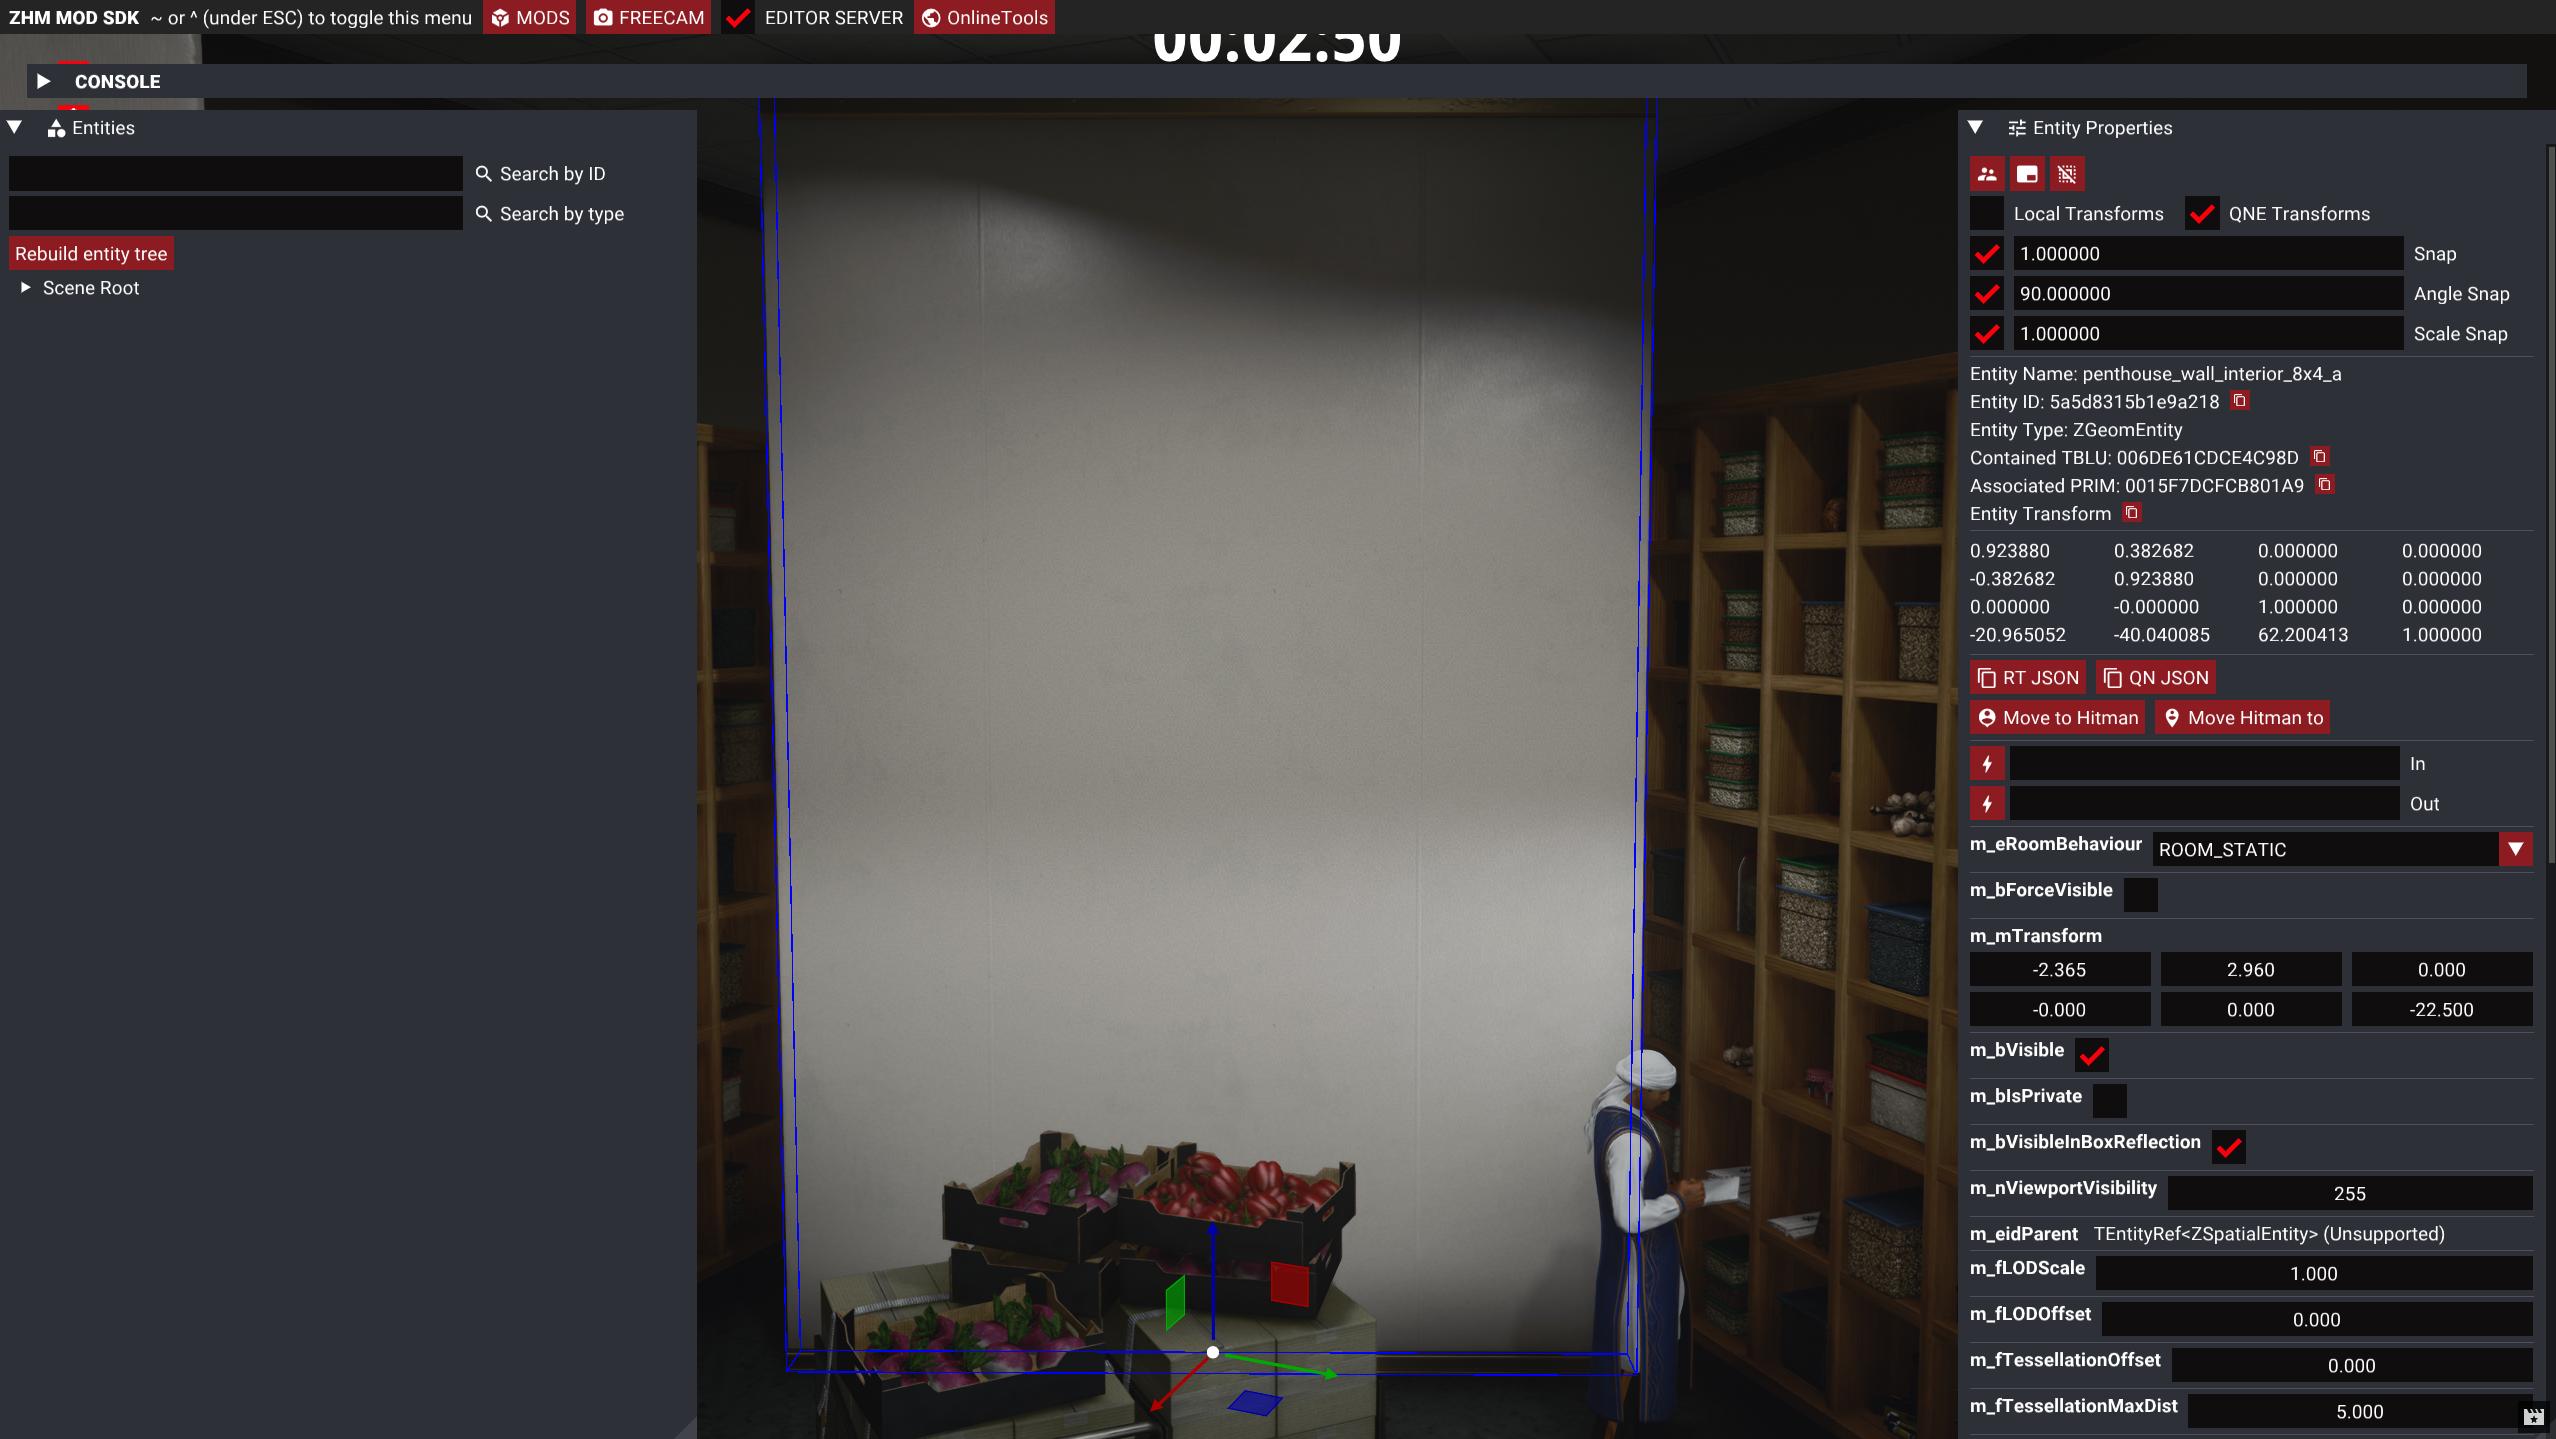
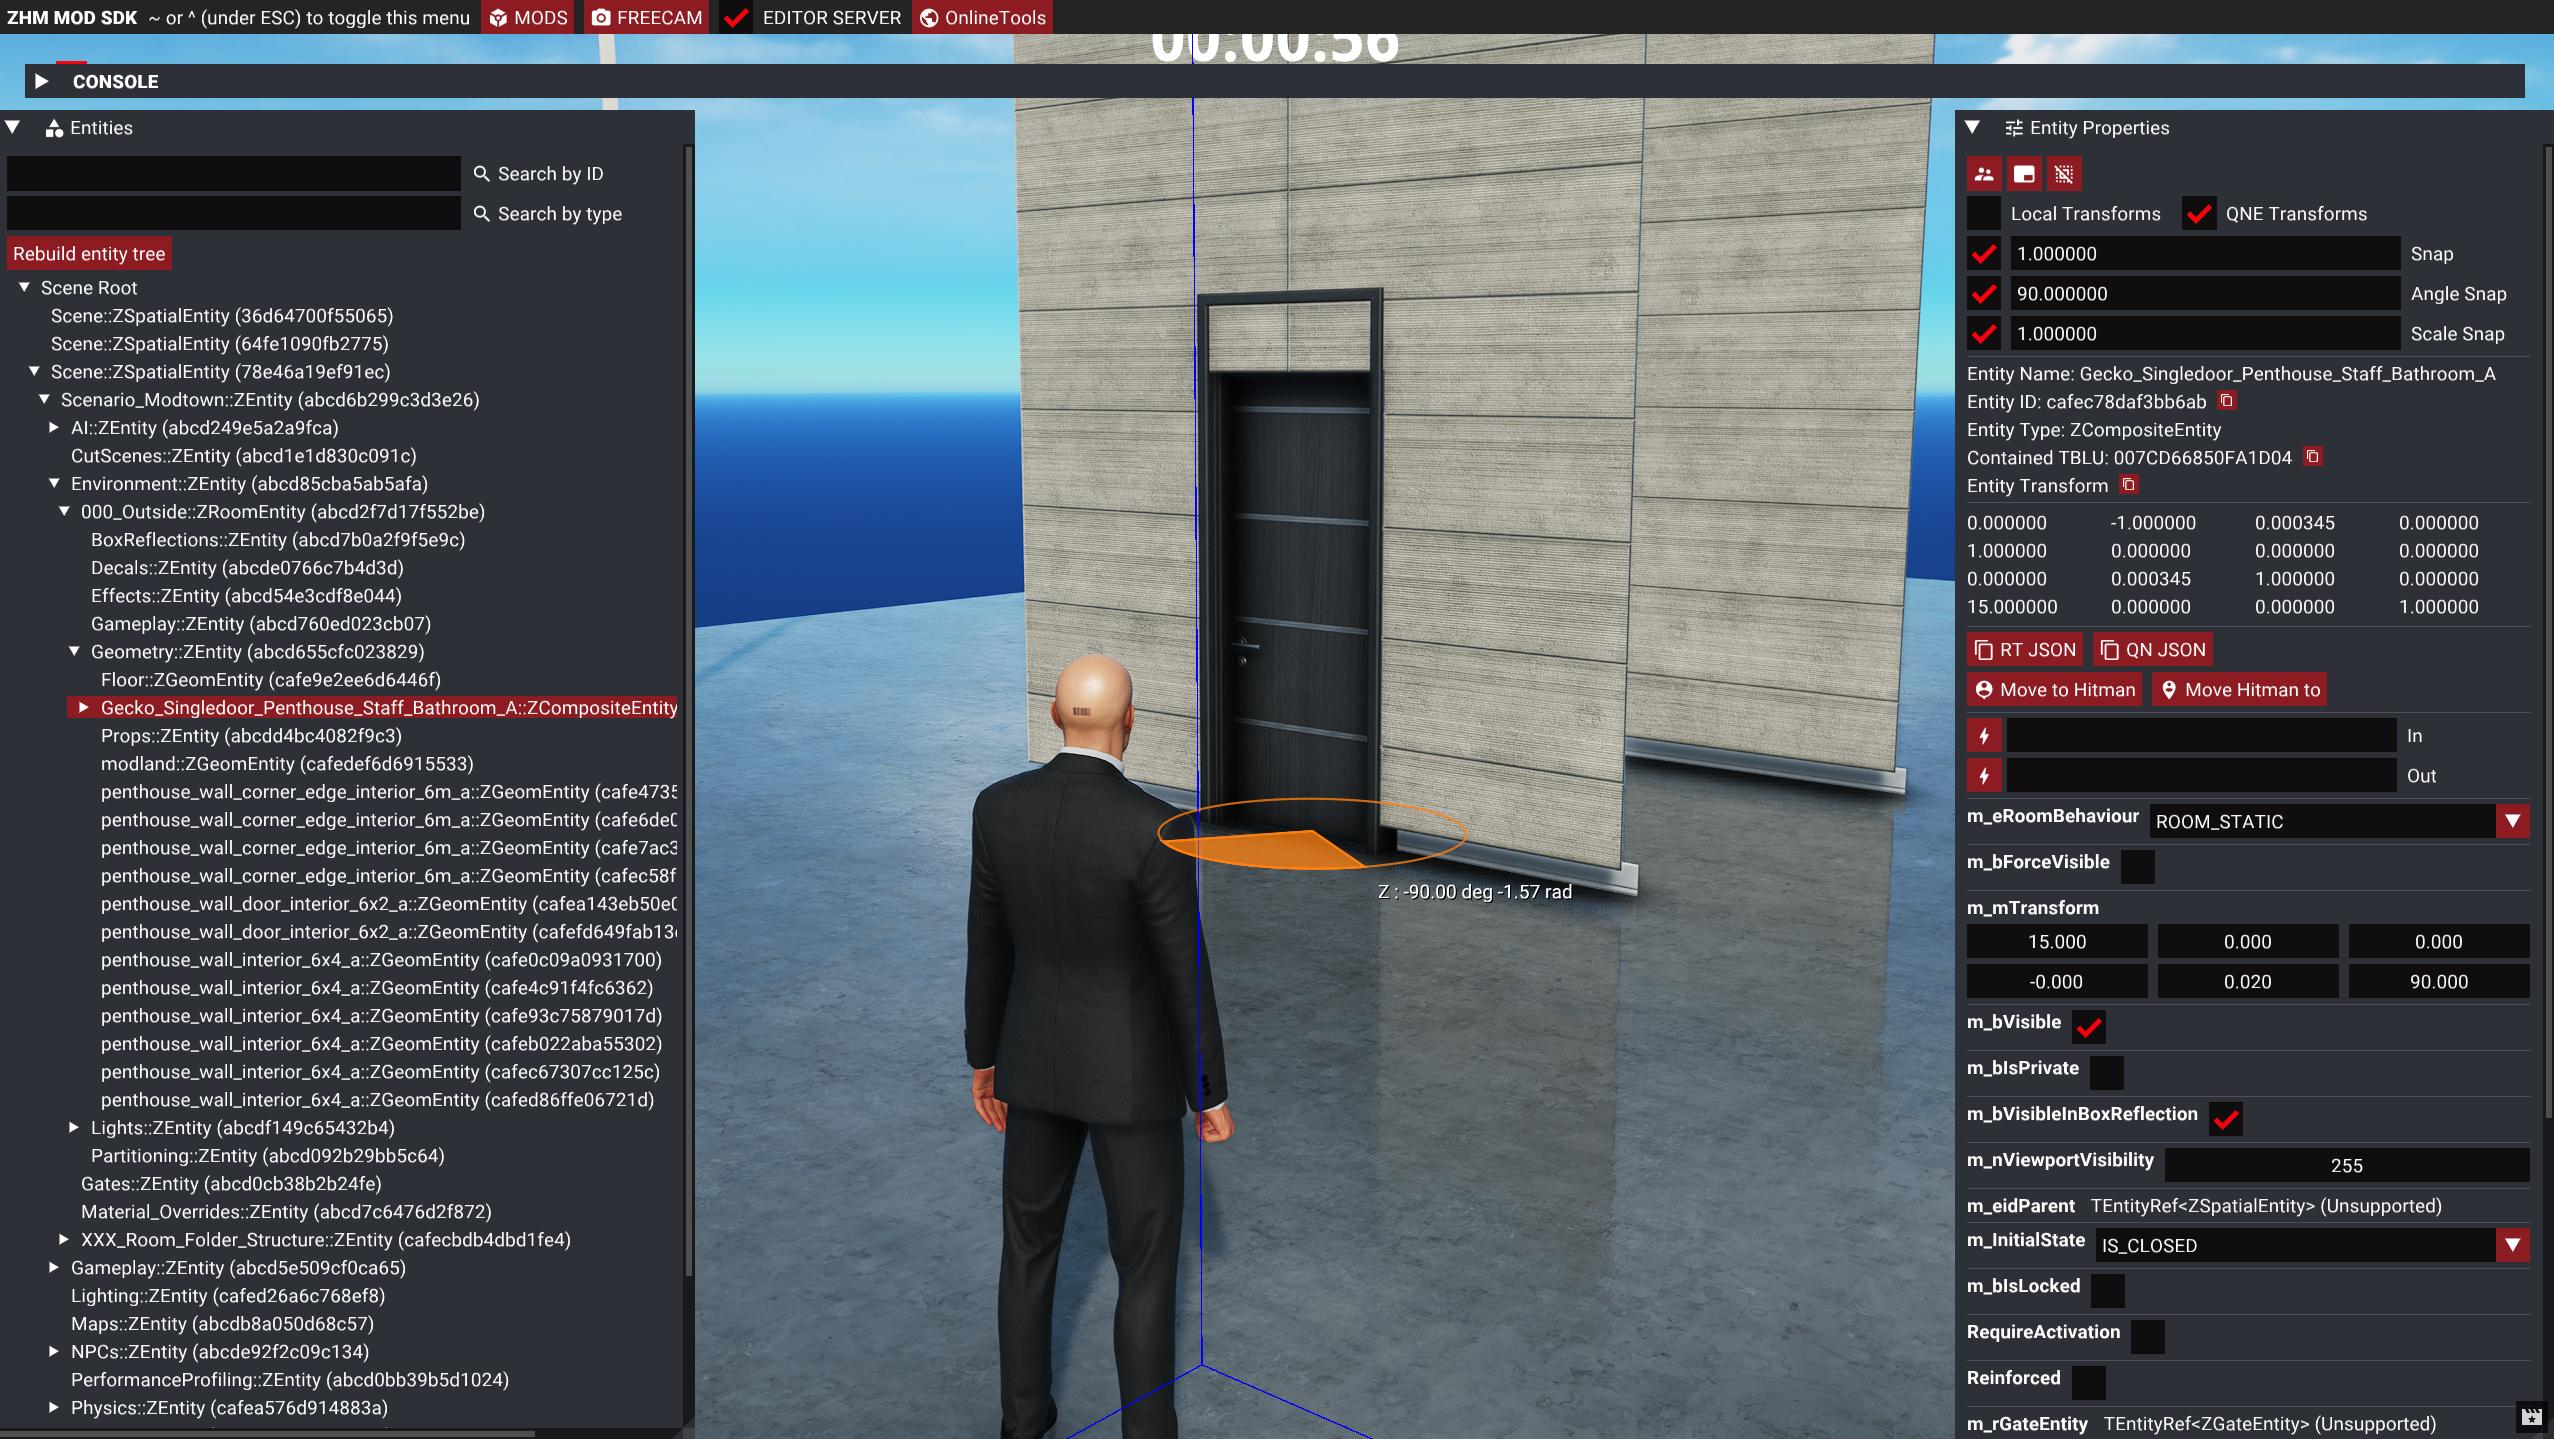
We can see that the door is rotated improperly, as are some of the walls. With GlacierKit open to scenario_modtown.entity.json we can change the transform of objects in our scenario and have the changes mirrored to GlacierKit, which makes editing the scenario relatively easy. First click the Rebuild entity tree.
Next, click on the door and press the Tab key to switch the gizmo from translate mode to rotate mode. Rotate the door so that it fits in the doorframe of the wall.
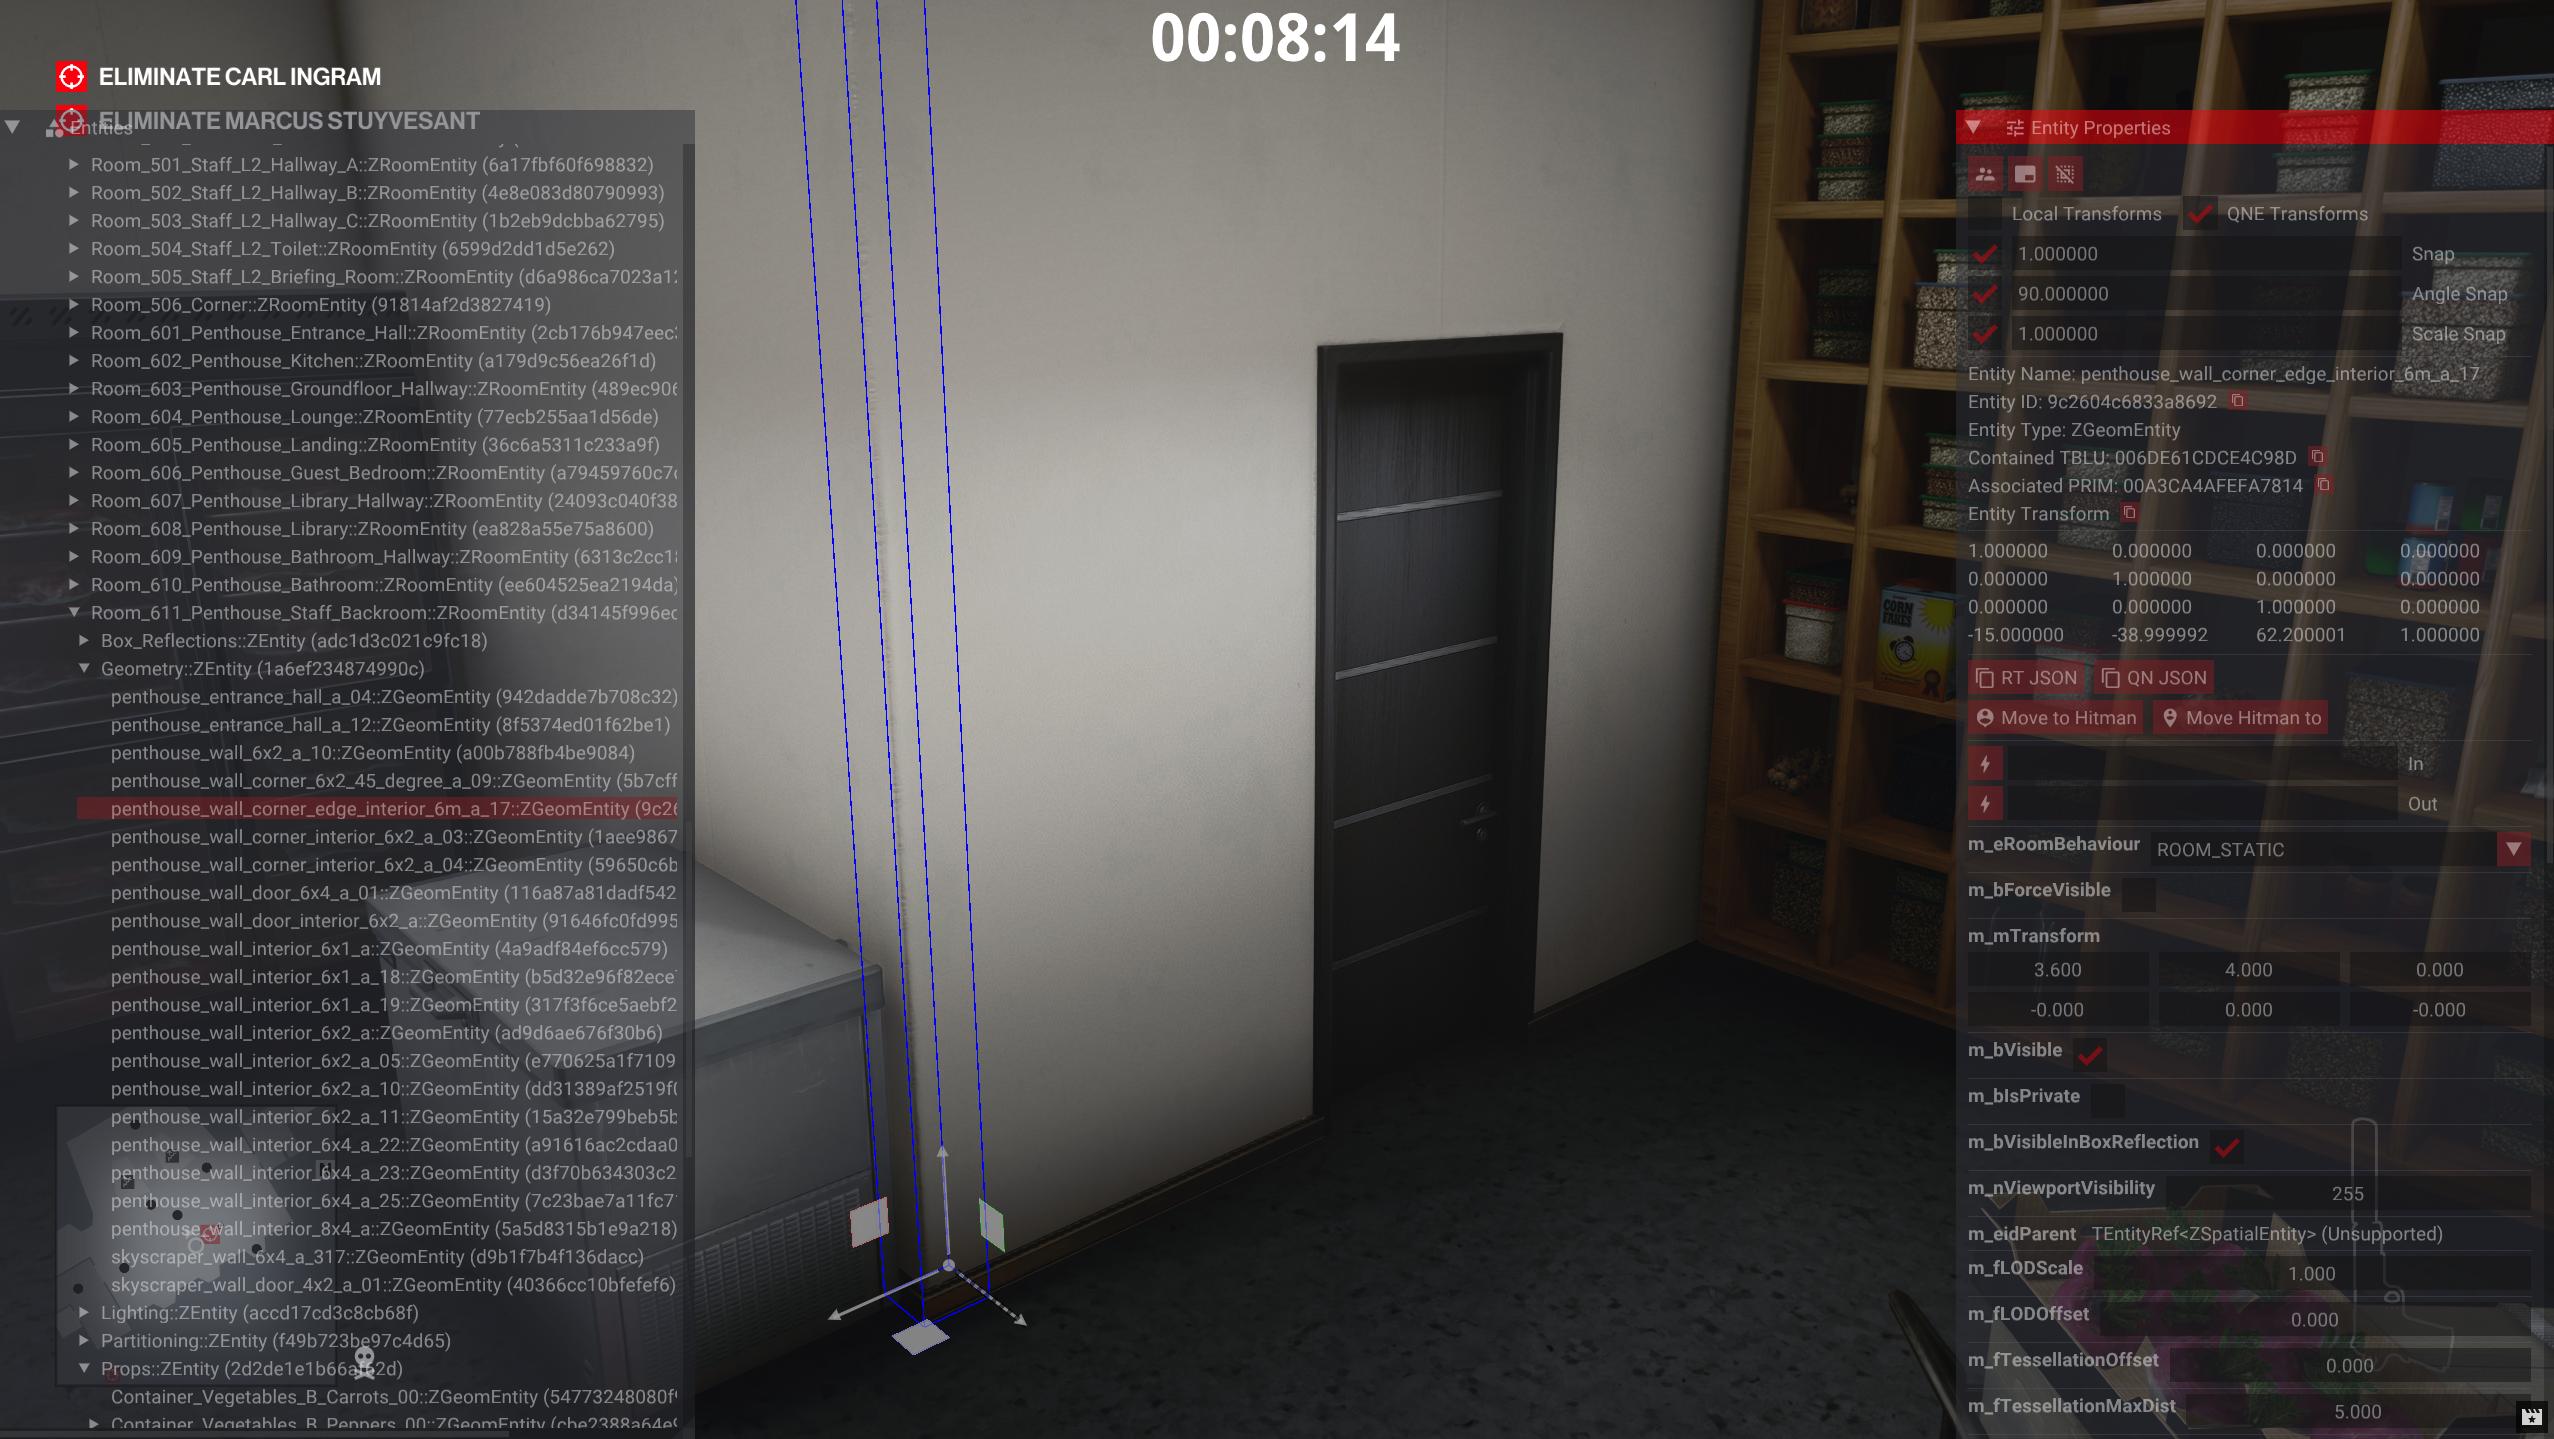
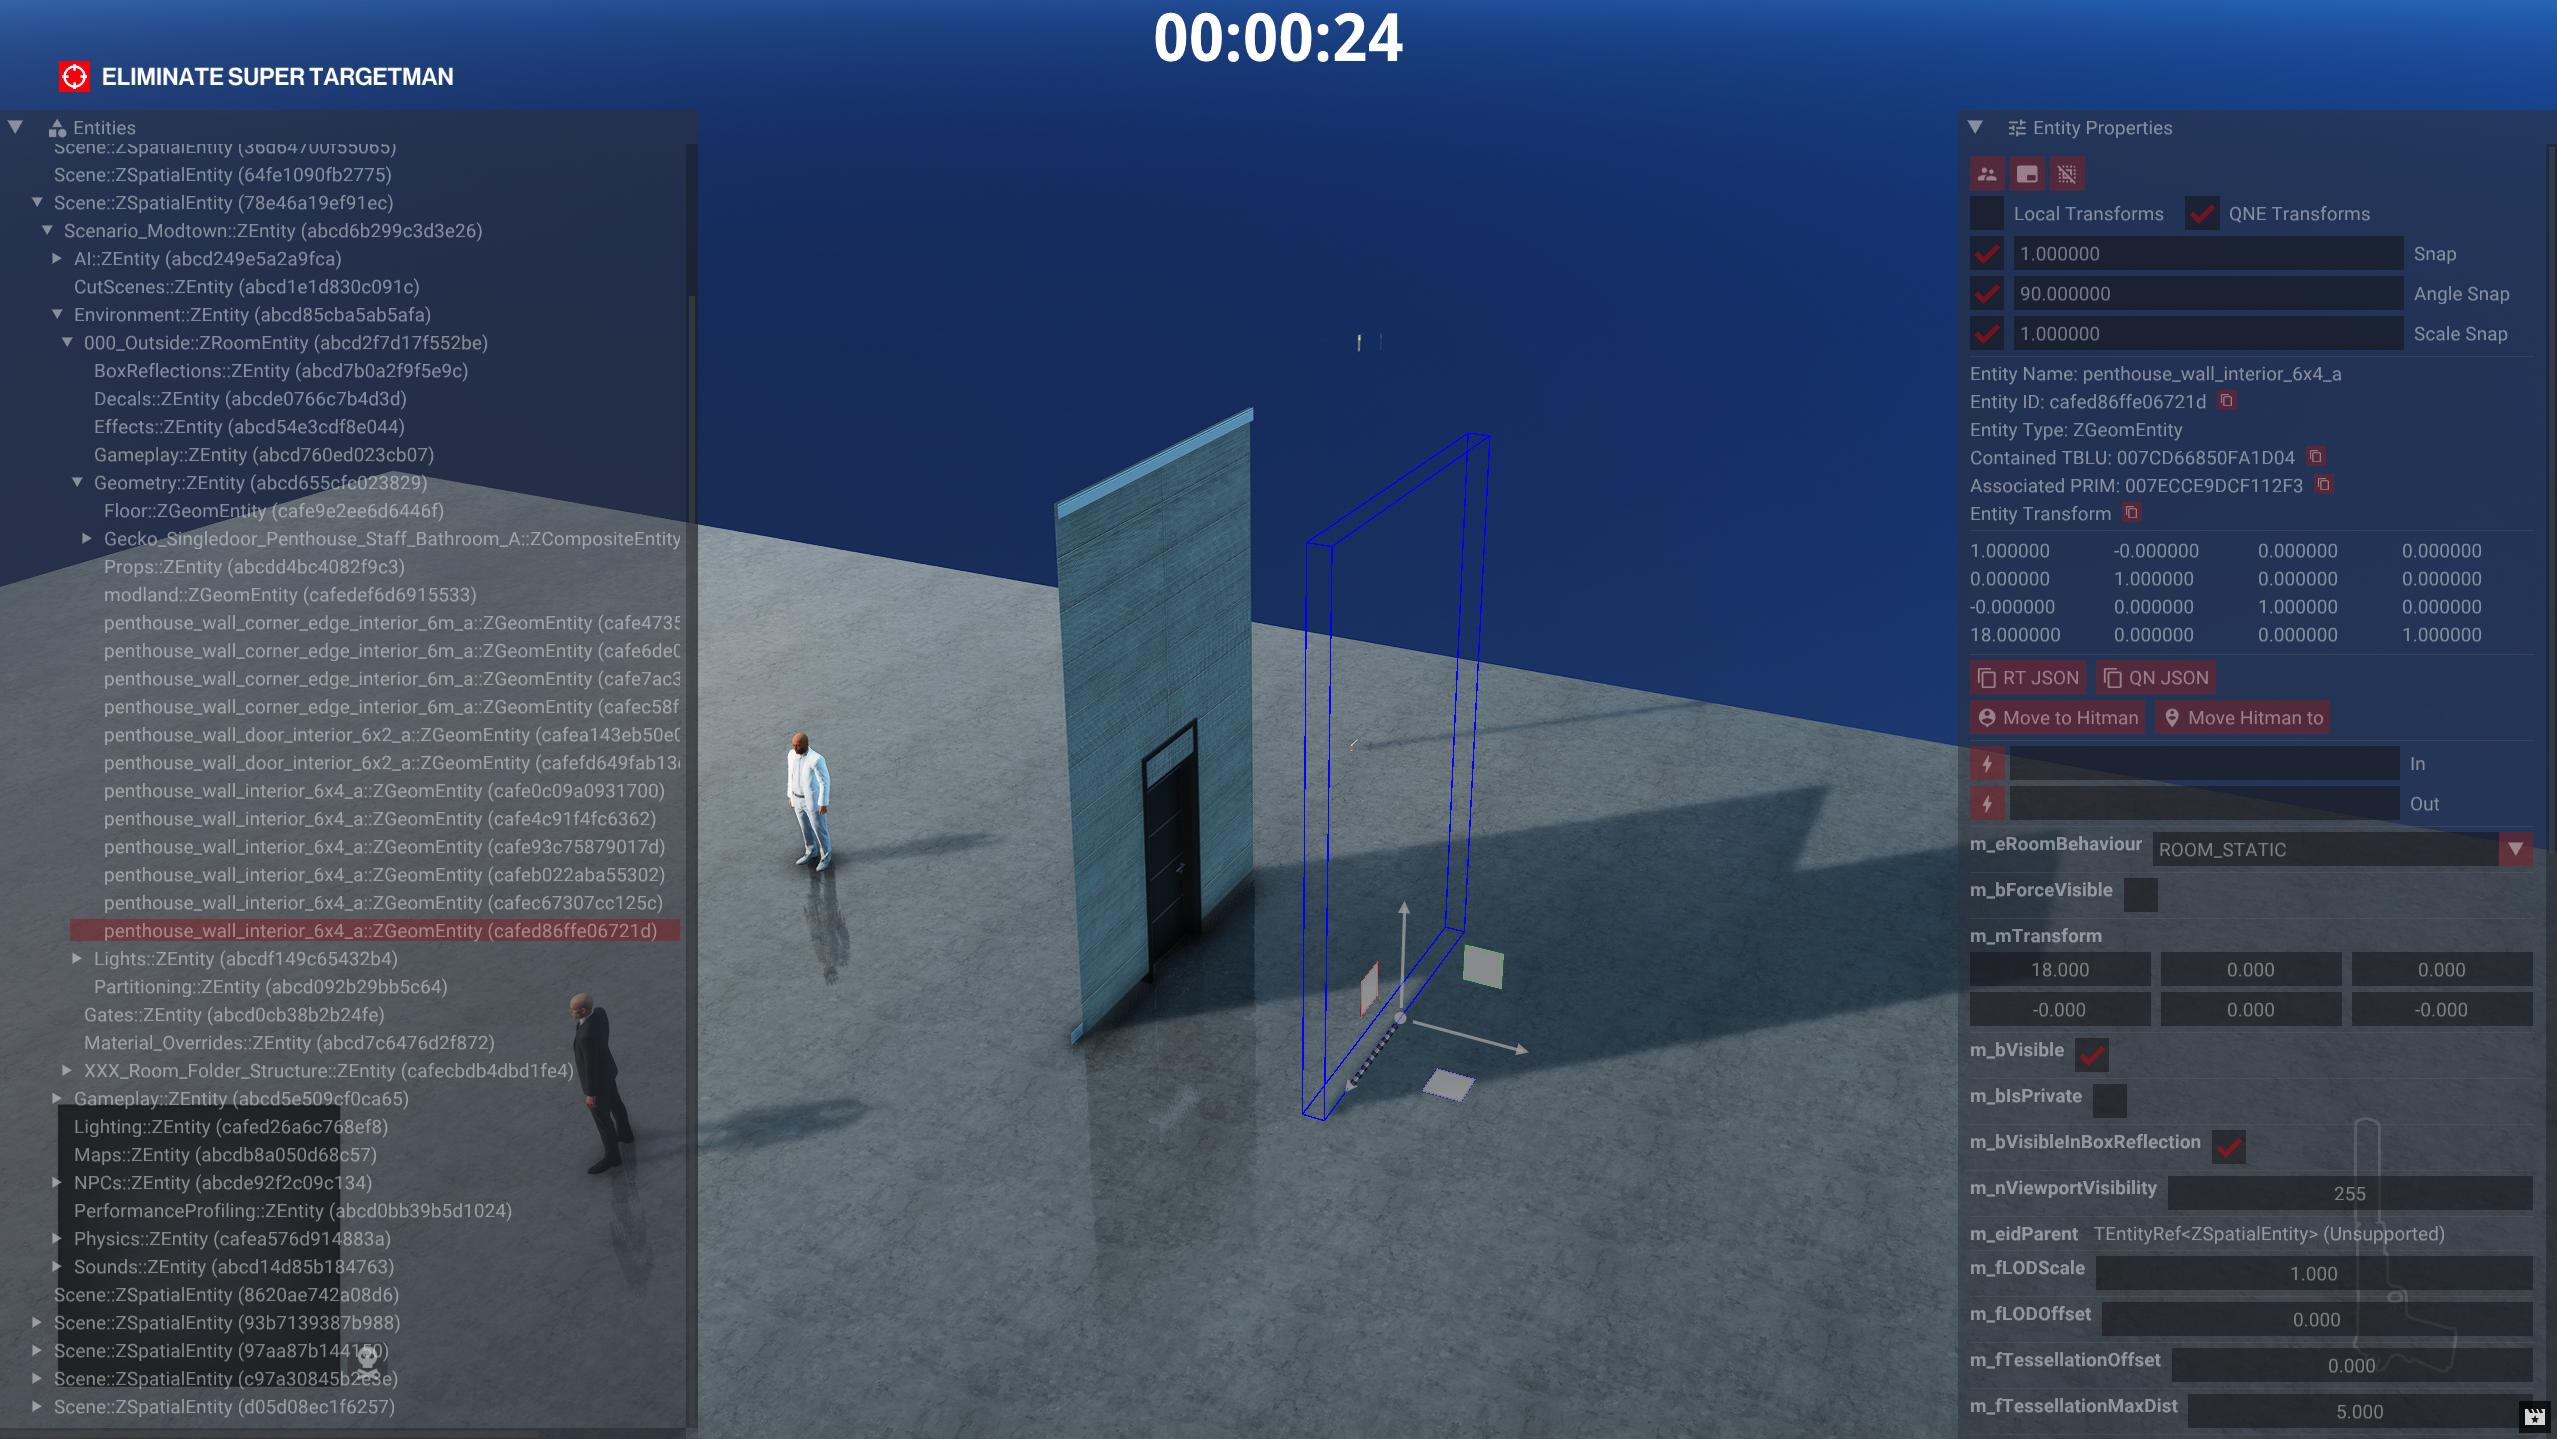
If you move past the walls, we can see that they are actually only one-sided, which is why we make two copies for each wall, so that for each wall we can have one facing each direction.
Click on the wall with the doorframe and rotate that 180 degrees.
Select another wall and move it and rotate it so that it connects with our first wall. Also make sure to move another copy to that same spot and rotate it 180 degrees away from that.
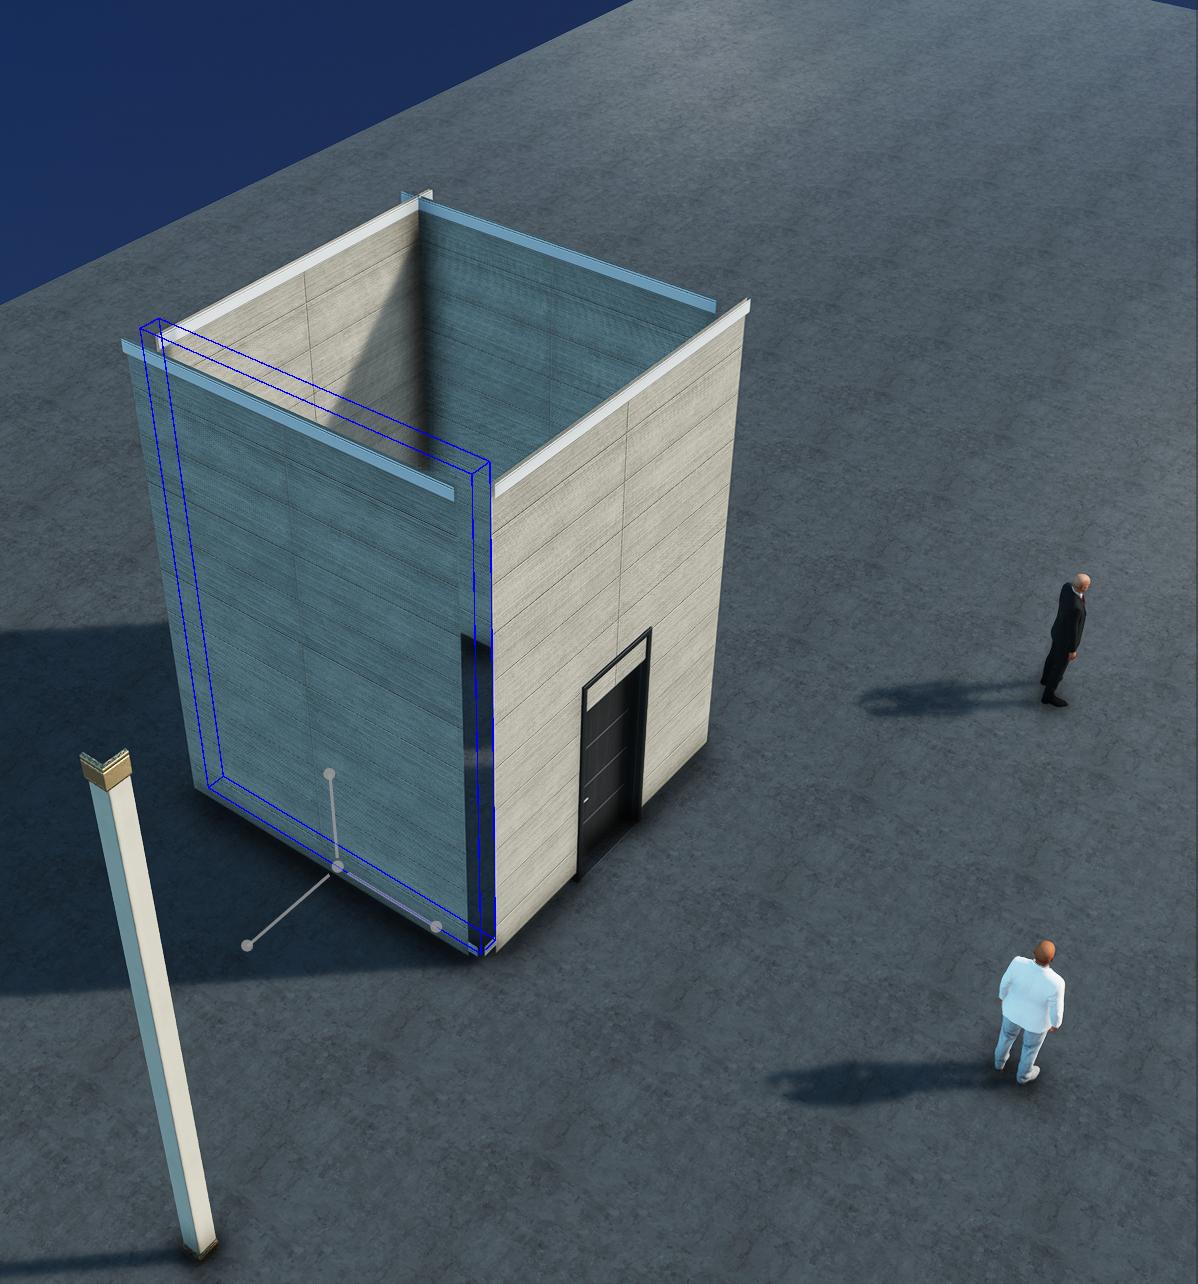
With the corner pieces, move those so that they fit into the outer corners of the house.
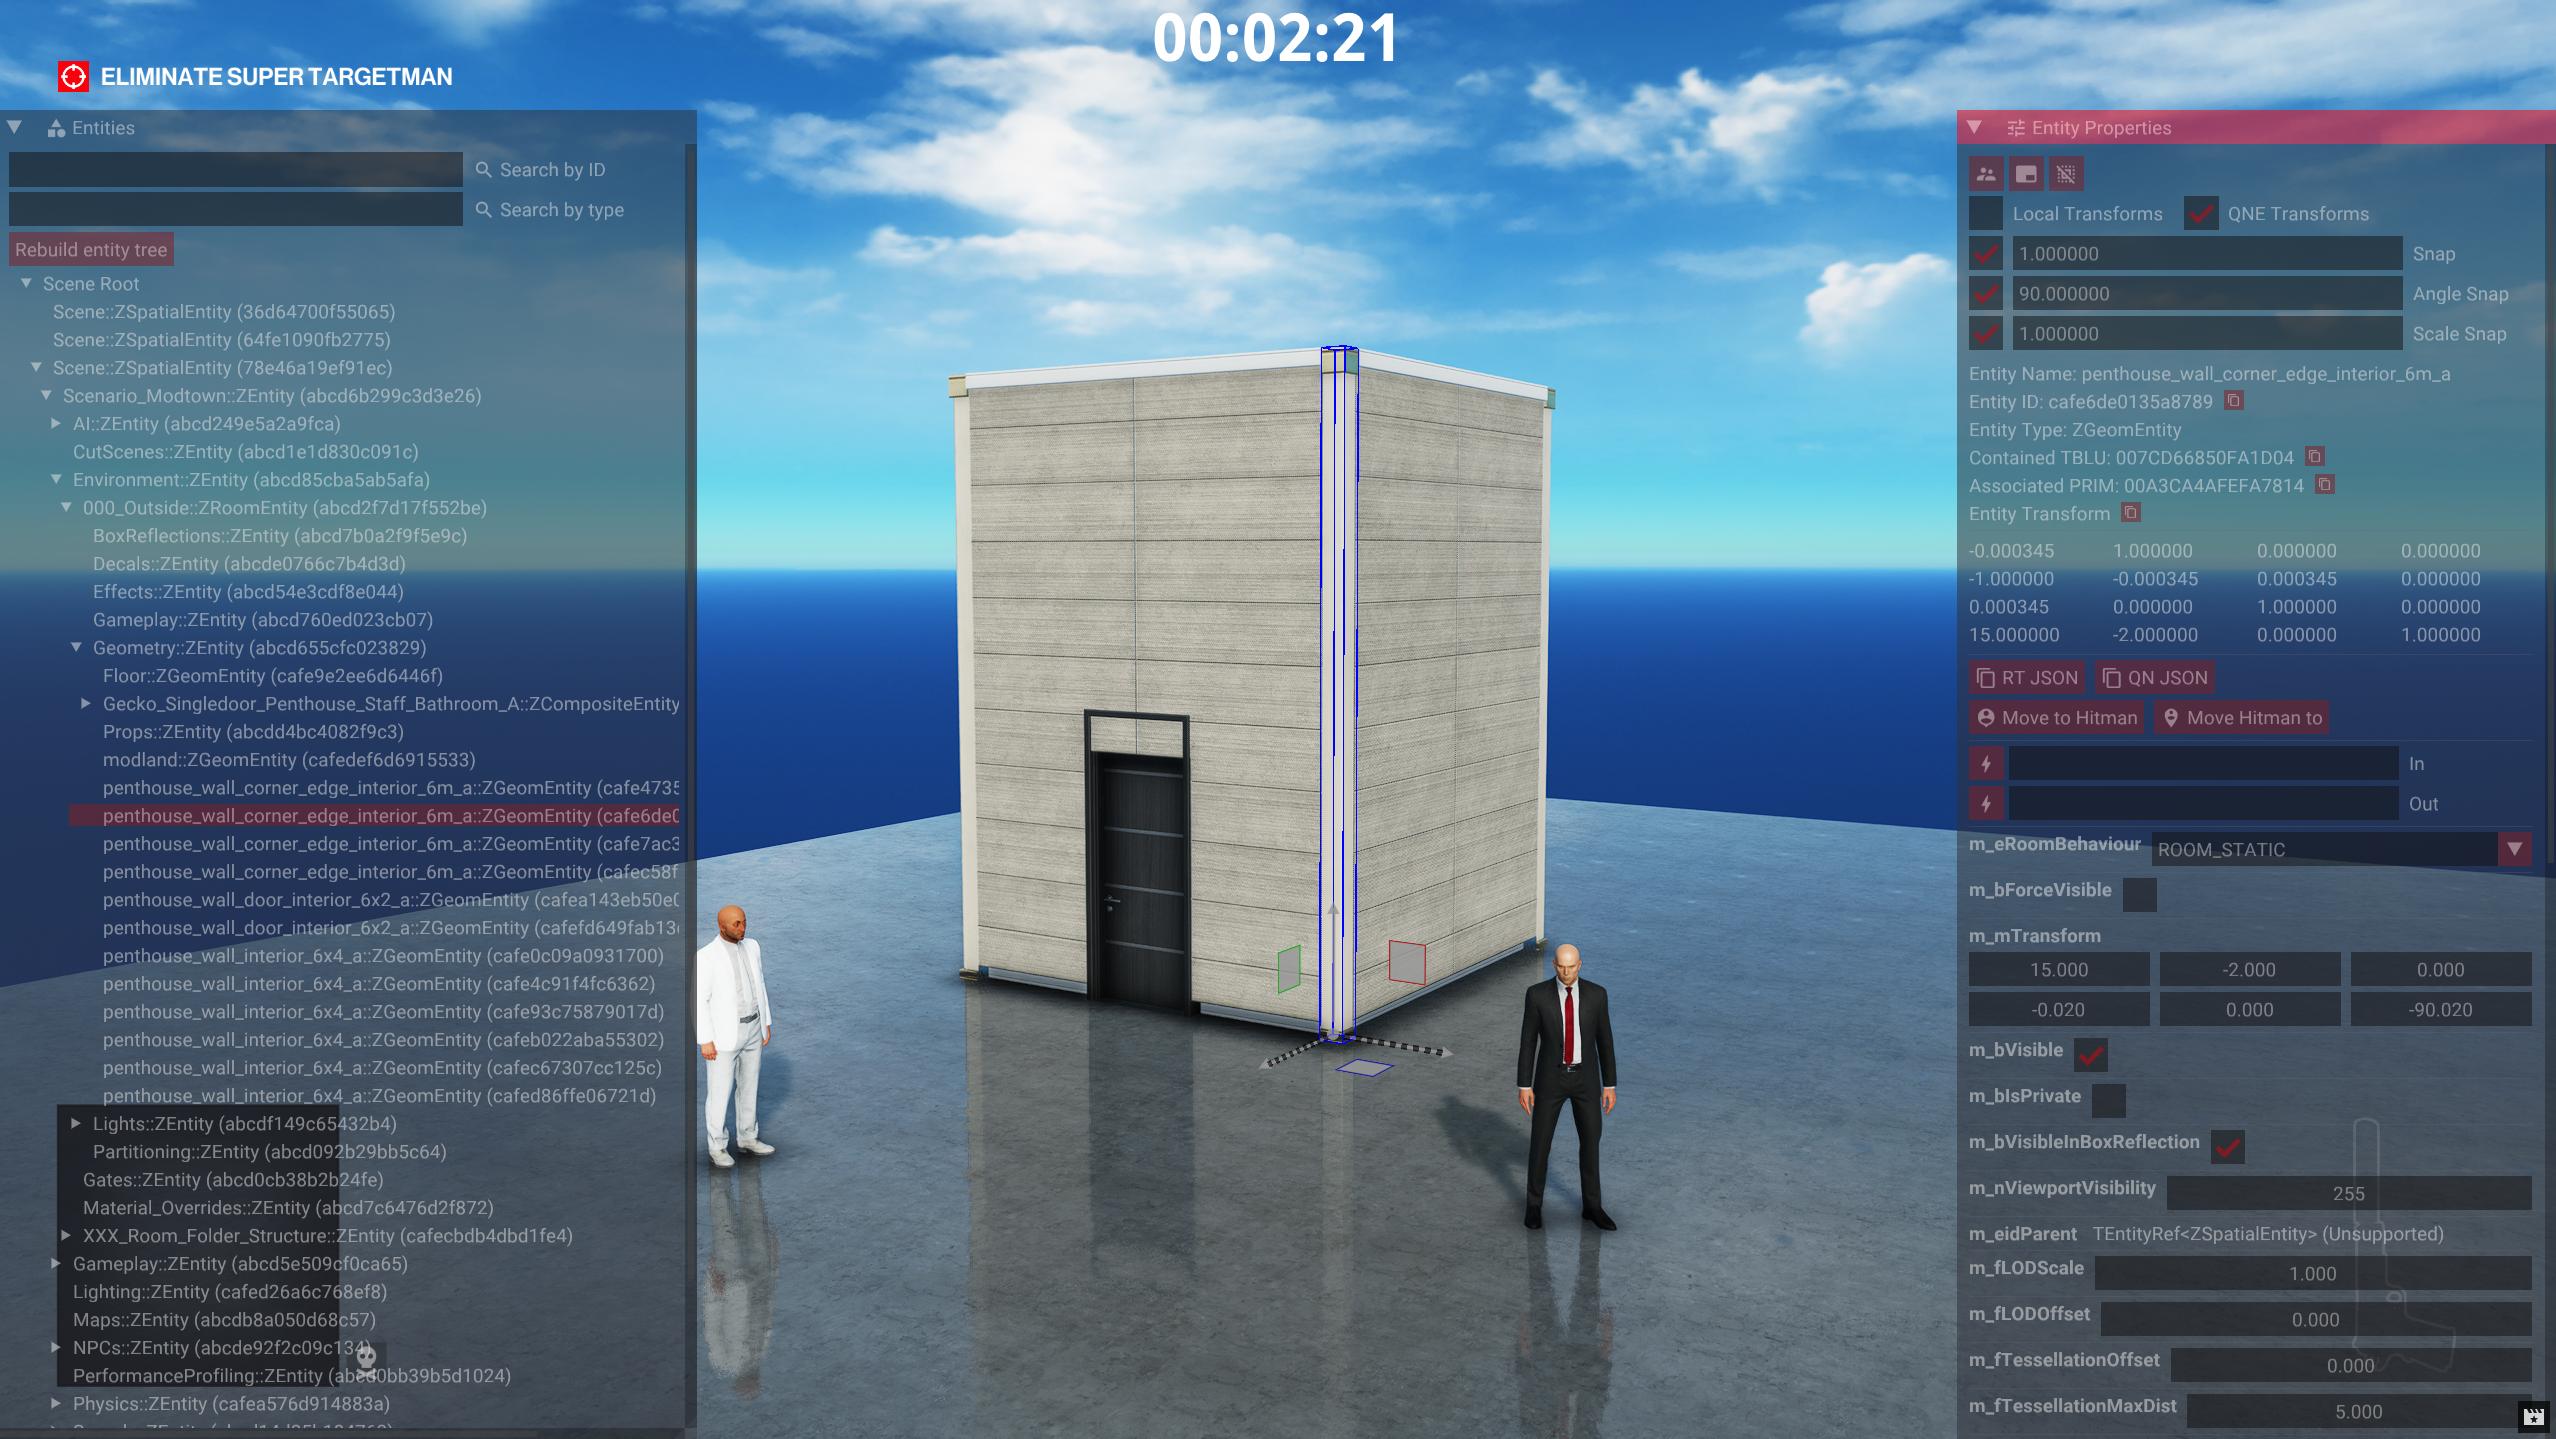
Press the save button in GlacierKit to save the scenario. Close the game, redeploy, relaunch, and start the mission.
Regenerating the NAVP and AIRG
Now that we've modified the geometry, the old NAVP and AIRG don't accurately represent the scenario. If we were to throw a coin behind the house for instance, Super Targetman would just walk right through the walls.

Let's open NavKit up, and follow the same steps as before:
- Click the
Extract from game and build objbutton - Click the
Build Navp from Obj and Scenebutton - Save the NAVP file to
content/chunk2/0051279576303266.navp - Click the
Build Airg from Navpbutton - Save the AIRG file to
content/chunk2/00D89D1CB094AD54.airg
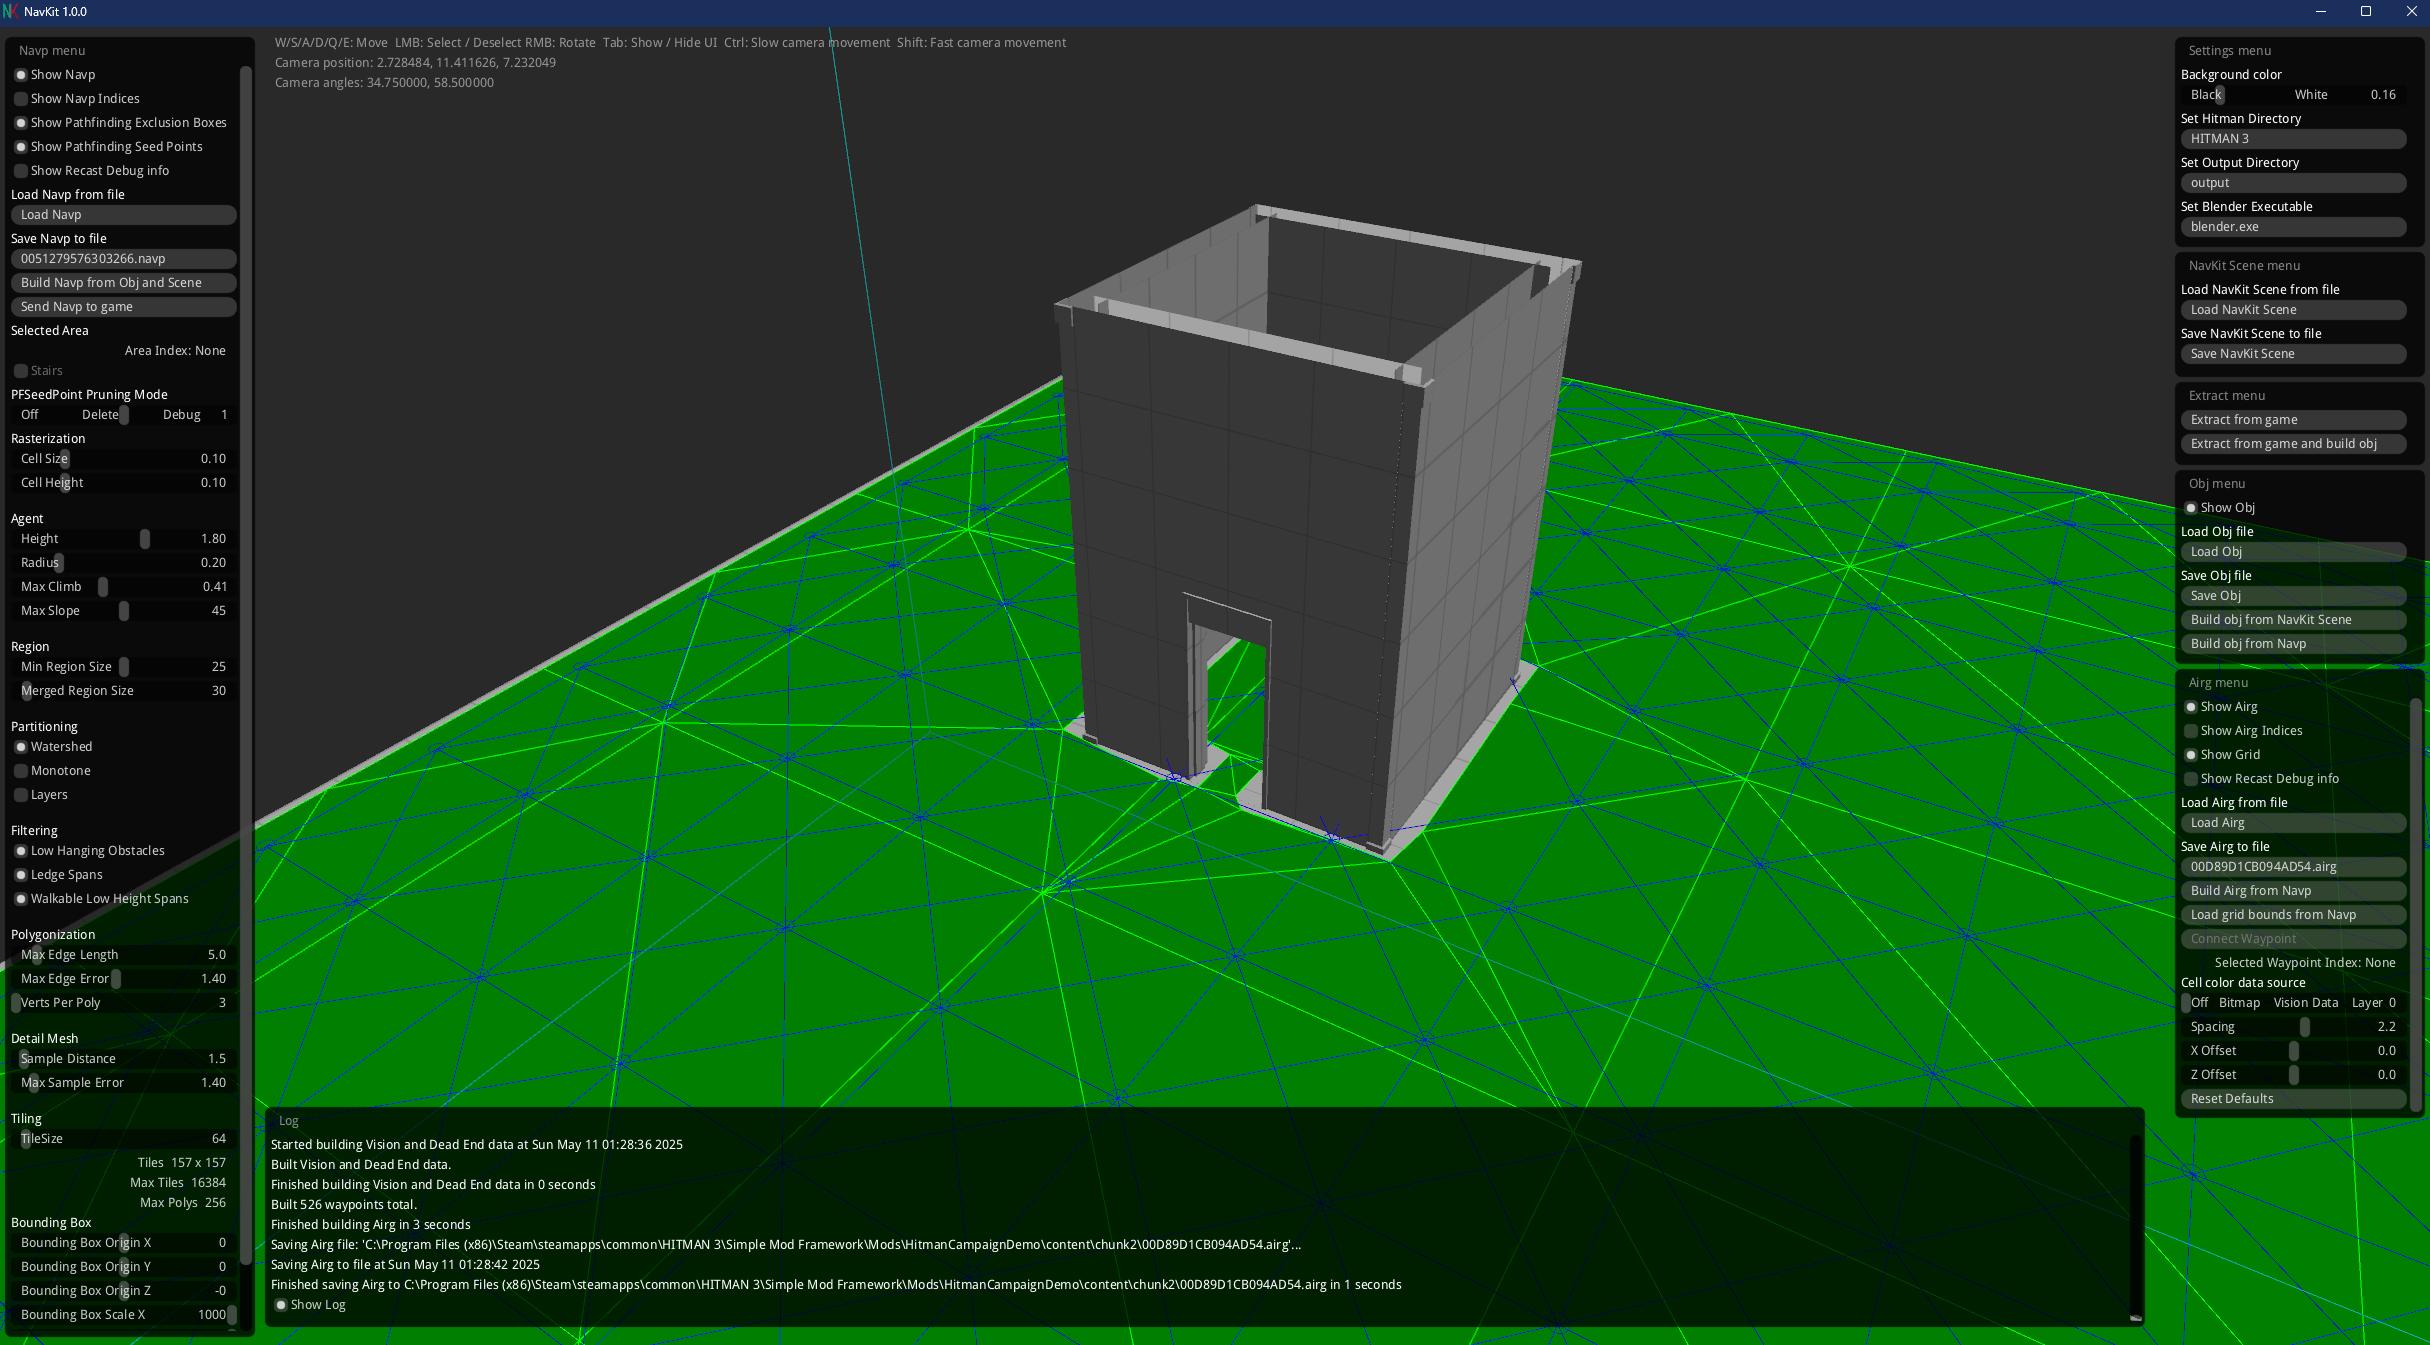
Redeploy, relaunch, and start the mission, and now Super Targetman will walk around the house if you throw a coin behind the house, or walk through the door if you lure him into the house.

Next Steps
We've seen how to reuse existing assets to build a scenario, but on the next page, we'll create all new 3D Geometry for our mission.