Creating a Campaign Mod
First we will need to set up a GitHub repository using the Simple Mod Framework smf-mod template.
Note: Custom campaign mods only work in Offline mode or can be set up to work with Peacock.
Creating the mod repository
For this tutorial, we will go over creating a GitHub repository for a custom campaign mod.
In this example we will be creating a custom campaign named Hitman Campaign Demo.
To start off with, create an account on github.com if you don't have one already. Then go to the
smf mod template and click the Use this template button:

Click the Create a new repository link. Enter HitmanCampaignDemo
(or your desired campaign name). In the description we'll put A custom Hitman: World of Assassination campaign. Set it
to Public or Private and click the Create repository button.
You should now have a new repository for your mod owned by your GitHub user account.
Cloning the mod repository to your computer
To get this mod on your local computer, you will need to clone this repository. To clone the repository you will first need to have git installed, and then run the clone command. For this, you have a few options:
- GitHub Desktop
- Download and install GitHub desktop.
- Go to the Download GitHub Desktop page.
- Click the Download button to download the installer. Run the installer and follow the prompts, granting it access to your GitHub account so you can use it to clone and update your repos.
- Open it and click the
Clone a repository from the internetbutton. - Choose the
HitmanCampaignDemomod from your repositories list. - For the local path, set it to
[HITMAN DIRECTORY]/Simple Mod Framework/Mods/HitmanCampaignDemo(or whatever the name of your repo is). - Press the
Clonebutton
- Download and install GitHub desktop.
- GitHub command line interface:
- Download and install the
gitcommand line executable.- On windows: Go to the git Download for Windows page and use the installer, or run the
wingetcommand on that page. - On Mac: Open a terminal and run
git --version, and it will prompt you to install it if you don't have it already. - On Linux: You probably don't need these instructions but anyway:
- Fedora-like: run
sudo dnf install git-all. - Debian-based: run
$ sudo apt install git-all.
- Fedora-like: run
- On windows: Go to the git Download for Windows page and use the installer, or run the
- Go to your mod repo's page on GitHub and click the green
Codebutton near the top right of the page, and click the copy icon next to the url:
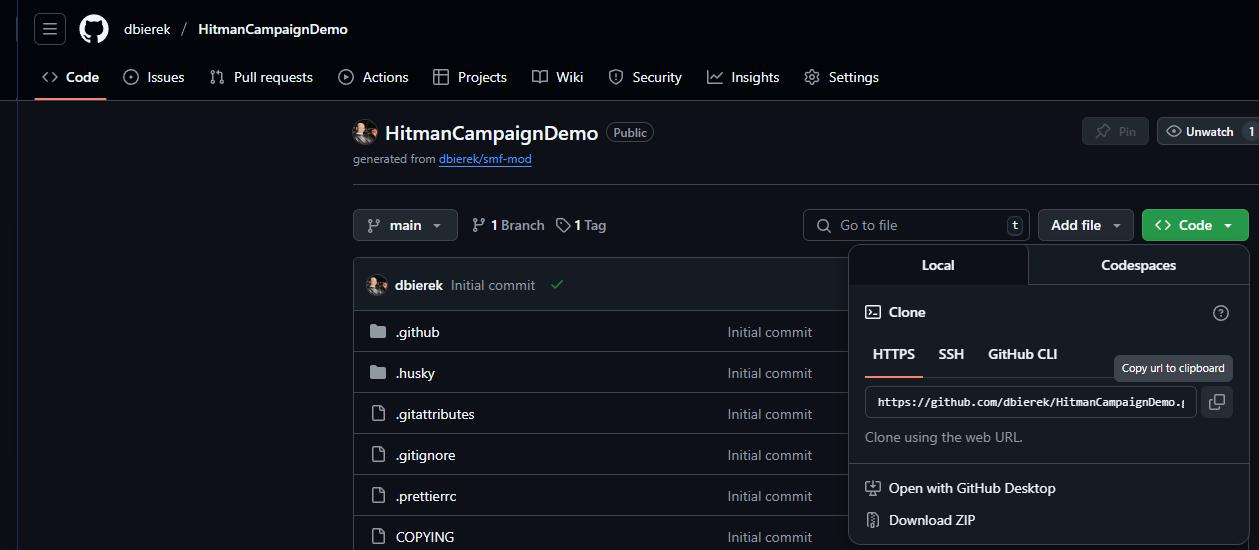
- Open a new terminal in the
[HITMAN DIRECTORY]/Simple Mod Framework/Modsdirectory. - Run
git clone [URL from clipboard].
- Download and install the
To be able to commit to your repo from your local computer you will need to set up a GitHub personal access token.
A note on Hitman Modding and GitHub
Hitman modding involves a lot of details, and if any of them are incorrect, the mod may not deploy, or the mission may crash on loading, or crash during gameplay. For this reason it is generally good practice to make small changes, save, deploy, and launch the mission frequently, and if it works well, to commit your changes to your GitHub repository. This can save you some time and frustration later, because if something breaks down the line, you can switch back to a previous commit to see the last time it worked, and what is different since then to narrow down the issue.
Check theREADME.mdfile in your new mod's folder for recommendations on how to make commits to your repo.
Next Steps
Now you should have a local copy of your mod, ready to be deployed using Simple Mod Framework. It won't do anything yet though, so lets get some things setup in the manifest.json file.