Making A New Outfit
For this tutorial, we will create an entirely new outfit. In broad steps, this is what we will do:
- Prepare new character set and outfit entities
- Brainstorm parts to use, find them in GlacierKit and put them into our outfit
- Patch globaldata to replace an existing suit
- Replace that existing suit's inventory image in blobs
- Replace that existing suit's name and description
- (Advanced, optional) Patch the repository and unlockables to add the suit to Peacock
A lot of this won't make sense right now, but don't worry, we will cover each step in detail. Again, before continuing, please make sure you have all the tools in the requirements. While it's exciting to make entirely new outfits we definitely recommend beginners try the first two tutorials to get accustomed to the tools before continuing, as this tutorial will go into more advanced concepts.
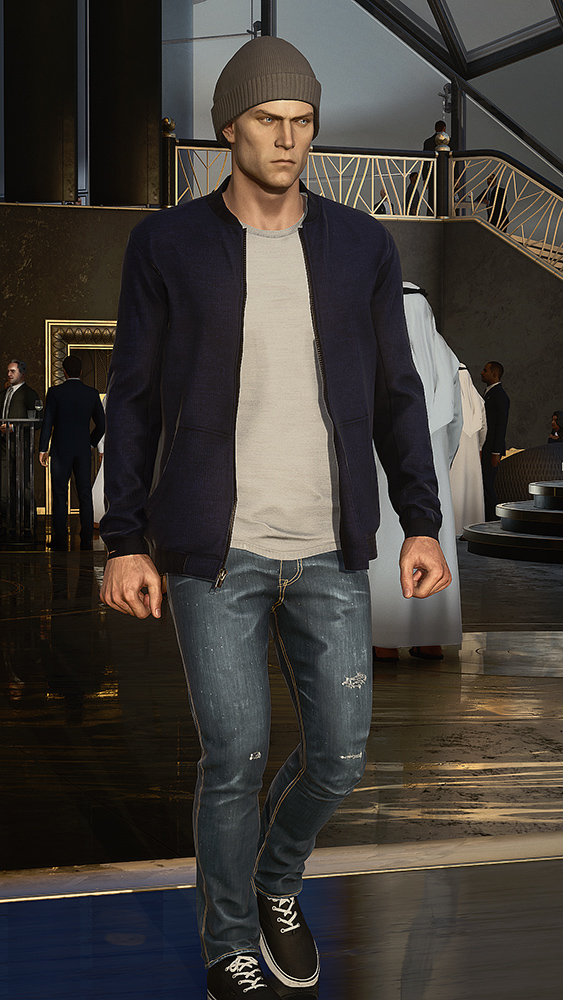
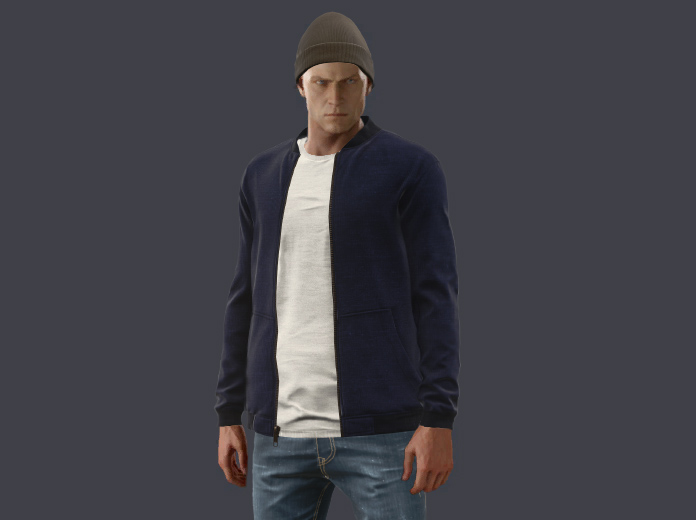
For the purposes of this tutorial we will be making an outfit we can call "Street Smart". When we are done it will look like this:
The theory
Before we start with the foundational work you should understand why we are doing it. With this knowledge you will be able to make more advanced mods in the future on your own.
Repository
The way Glacier 2 handles character appearances, "outfits", starts in the heart of the game which is the repository. The repository contains basically everything gameplay related, including but not limited to:
- Ammo and magazine configurations
- Areas on the map in each level
- Difficulty parameters
- Throwable items like coins
- Weapons, explosives, poisons and more
- Keys and other "quest items"
- NPCs and their names
- And most relevant for us right now, outfits and disguises
So every outfit in the game, whether wearable by the player or not, has a repository entry. That includes NPCs appearances as well, that's considered an outfit. The entry dictates the outfit's name, language localized description string, language localized name string, category, image, among other things.
We can make changes to the repository through mods, but the drawback is these changes will generally speaking not apply when playing online, with some minor exceptions, because the game synchronizes the repository with IOI's servers when it's running. Playing with Peacock allows us free rein to modify the repository as we like.
Localization
Repository entries and outfit bricks point to localized lines, LINE files. These files don't actually contain the text itself but reference entries in LOCR files which for Hitman 3 are localized text lists with entries in English, French, Italian, German, Spanish, Russian, Chinese, Traditional Chinese and Japanese.
Blobs
Blobs are online resources cached to disk, for playing offline. This includes a lot of things but most important for us is inventory images for outfits.
Outfit bricks
The next piece of the puzzle is an outfit brick. Because it was built by the Danish, Glacier 2 is designed like Lego, every part segmented into bricks, so the developers can build the game in a segmented way. Every location and mission has its own outfit brick which tells the game how the NPCs should look and what eventual disguises the player can use.
The outfits' entry in the outfit brick also dictates things like:
- Footstep sounds
- Voice modulation for masks
- Any sound effects that should be used when moving ("foley")
- Professions, which control enforcers and trespassing areas for the player
- Voice variations for NPCs
- Outfit AI Category, which mainly dictates how NPCs address the player
- Which character set to use
- Name and description, which is for the disguise bags in the level
There is also a brick called globaldata. This is a brick that the game always loads, and it includes important basic gameplay elements. This includes 47's starter outfits and any outfit you can go into a level with.
In previous tutorials we directed you to HMBM47's Hitman 3 Outfits Spreadsheet of game outfits, which, while a really good resource, is also a little outdated. If you cannot find an outfit you are looking for in the spreadsheet, try looking in globaldata.
Character set
As we mentioned the outfit brick references a character set. Often this is shortened to CHARSET in the files.
The character set will decide what variations are available for any given outfit. Since we don't want all NPCs on the map with a particular outfit to all look the same, we make slight variations, with different heads, hair, skin tone and so on. When the charset and outfits are set up all the level designers have to do when placing NPCs is place "guard, variation 3", or "waiter, variation 4".
Every charset has three categories; Actor, HeroA, and Nude.
Actor is what the NPC variation looks like when fully clothed. HeroA is what 47 looks like when wearing that variation. And Nude is the NPC when 47 has taken their clothes, or they are otherwise undressed.
Note that the charset doesn't necessarily need to have outfits for all categories. For instance, when it comes to 47's starter outfits, their charset will only have one single variation, which is HeroA. The Actor and Nude entries point to nothing, since no NPCs are supposed to wear that outfit.
And female NPCs only have Actor entries, because 47 can't wear their clothes and hence they will never be nude either. This applies to most unique male NPCs and targets as well.
Charset variations point to an outfit entity, which leads us to...
Outfit
This part is what you can actually see with your eyes in the game. It contains the models that the outfit is made of. Head, hairs, top, hands, legs, and feet, as well as any eventual materials to overwrite with new textures, or wet logic for the Chongqing rain. This is the part that we patched in the Patching suits with new parts tutorial.
As a fun example, the Paris CICADA bodyguards have 8 variations. With Actor, HeroA and Nude, that means a grand total of 24 outfit entities, for one charset!
Unlockables
Unlockables, to keep it simple, is a list of things that you can own through DLC, or unlock through challenges and mastery. All the weapons, items, starting locations, stashes or outfits you can pick in pre-planning before going into a mission. But it also includes things you can unlock for your Freelancer hideout. You can think of it like your player inventory.
In summary
This is a diagram of what we've just covered. To start, we only need to concern ourselves with making a charset, outfit, patching an existing suit's entry in globaldata, altering its name and description with a localization override and changing its image.
The other parts come into play for the extra credit portion of the tutorial which concerns making an addon version for Peacock. But the upside is, that part is not terribly difficult when everything else is already in place!
Everything click so far? If not, don't worry, you should get the hang of things after actually working with it.
Foundations
Let's begin by making our mod folder and selecting it with GlacierKit.
Go into /Simple Mod Framework/mods/ and create a new folder. Name it MyName.StreetSmart. Enter the folder and make two folders: content and blobs. Enter the content folder and make a chunk0 subfolder.
In the blobs folder make a subfolder called images, and in that folder make a subfolder called unlockables_override.
This should be the structure of your mod:
📁MyName.StreetSmart
├── 📁blobs
│   └── 📁images
│       └── 📁unlockables_override
└── 📁content
    └── 📁chunk0
Now that the folder hierarchy is set up, select the MyName.StreetSmart folder in GlacierKit by clicking Select a project and navigating to the /Simple Mod Framework/mods/ folder.
Right click the MyName.StreetSmart folder and click New File. Call it manifest.json and hit enter. Click the file to open it.
Feel free to paste the following into your manifest to get started.
{
    "$schema": "https://raw.githubusercontent.com/atampy25/simple-mod-framework/main/Mod%20Manager/src/lib/manifest-schema.json",
    "id": "MyName.StreetSmart",
    "name": "Street Smart",
    "description": "A Street Smart outfit for 47.",
    "authors": ["My Name"],
    "frameworkVersion": "2.33.22",
    "version": "1.0.0",
    "contentFolders": ["content"],
    "blobsFolders": ["blobs"]
}
The charset
We carry on by making the suit's charset. We can use IOI's work as a base for this. In the game files tab search for signaturesuit.
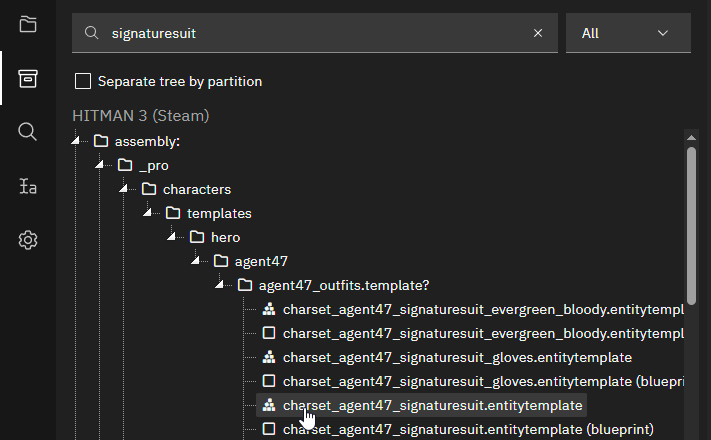
Under the /_pro/characters/templates/hero/agent47/agent47_outfits.template?/ folders, find and click the charset for the signature suit. Click Open in editor.
With the entity now open, first go into the Metadata tab. We should make up a new factory and blueprint path here before continuing. Let us again borrow IOI's design conventions.
If you go back to the other tab, the resource overview for the signature suit charset's factory, we see its path is [assembly:/_pro/characters/templates/hero/agent47/agent47_outfits.template?/charset_agent47_signaturesuit.entitytemplate].pc_entitytype. Let's copy this and use it to derive a path for ourselves by simply changing signaturesuit to street_smart, which is the name of our suit.
When we enter [assembly:/_pro/characters/templates/hero/agent47/agent47_outfits.template?/charset_agent47_street_smart.entitytemplate].pc_entitytype into the factory hash field and press enter, GlacierKit will automatically hash the path, and save the path into our project so we can find it later. Let's do the same for the blueprint hash field. The path is the same, but change the ending filetype .pc_entitytype to .pc_entityblueprint.

Now we go back to the Tree tab. Let's click the root entity, CHARSET_Agent47_SignatureSuit and change its name to CHARSET_Agent47_Street_Smart.
If you expand the Actor, HeroA and Nude folders you can see there is one entry in each. Computers begin counting at zero, so they're all called variation 0. You may notice from examining that only the HeroA variation has an m_Outfit property. As we previously explained, this is because NPCs aren't supposed to ever wear this.
Go into the HeroA variation and in the m_Outfit property, change the resource path. As it is now, it points to the signature suit outfit entity, whose factory path is [assembly:/_pro/characters/templates/hero/agent47/agent47_outfits.template?/outfit_agent47_signaturesuit_heroa_v0.entitytemplate].pc_entitytemplate.
Let's tweak that path and make it our own - [assembly:/_pro/characters/templates/hero/agent47/agent47_outfits.template?/outfit_agent47_street_smart_heroa_v0.entitytemplate].pc_entitytemplate. This is our outfit's factory path. We will be using it again later when making the outfit entity.
For now we can save our changes so click the Save button on the charset tab we have open. Navigate to the /content/chunk0/ path in the mod folder and save the file as charset_street_smart.
You can now close the tab and that's our charset done.
The outfit
Now for the outfit itself. This is the fun part.
We already have a concept for how we want the suit to look. A more casual streetwear suit with a beanie, bomber jacket, undershirt, jeans and sneakers. But first let's get a basic outfit entity we can build onto.
In the last step we used the signature suit charset so why not the signature suit outfit, too? In the game files tab search for signaturesuit and this time click outfit_agent47_signaturesuit_heroa_v0.entitytemplate in the search results.
You will notice there is two of these, the second one in the list is for a specific cutscene in Romania so click the first one of the two, then Open in editor.
As before we should go to the Metadata tab and enter new paths. In configuring our charset we already devised a factory path for the outfit, which is [assembly:/_pro/characters/templates/hero/agent47/agent47_outfits.template?/outfit_agent47_street_smart_heroa_v0.entitytemplate].pc_entitytemplate. So let's enter this as the factory path. And as before, the blueprint path is the same but with .pc_entityblueprint at the end.

Next let's go to the Tree view and begin building our outfit. First we can change the root entity name from OUTFIT_Agent47_SignatureSuit_HeroA_V0 to OUTFIT_Agent47_Street_Smart_HeroA_V0.
Let us save here before continuing. Click the Save button on the open tab, navigate to the /content/chunk0/ path in the mod folder and save the file as outfit_street_smart.
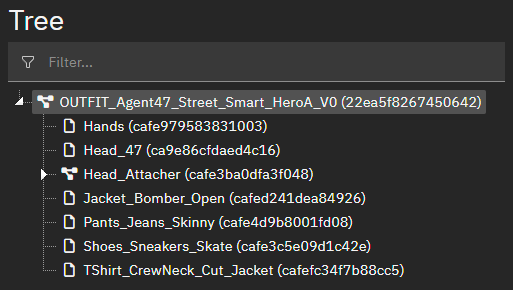
At this point, our outfit is just the stock signature suit. So let's clean out all the things we don't need. Right click and delete all parts in the tree aside from 47's head. Your tree ought to look like this.
Hat
Let's give his cold head a nice warm beanie. In the game content tab, switch the filter from All to Templates. Then search for beanie. You will find a factory - TEMP - without a path called hat_beanie_cuffed (005E3BF131F1E044). Let's click that to open its resource overview.
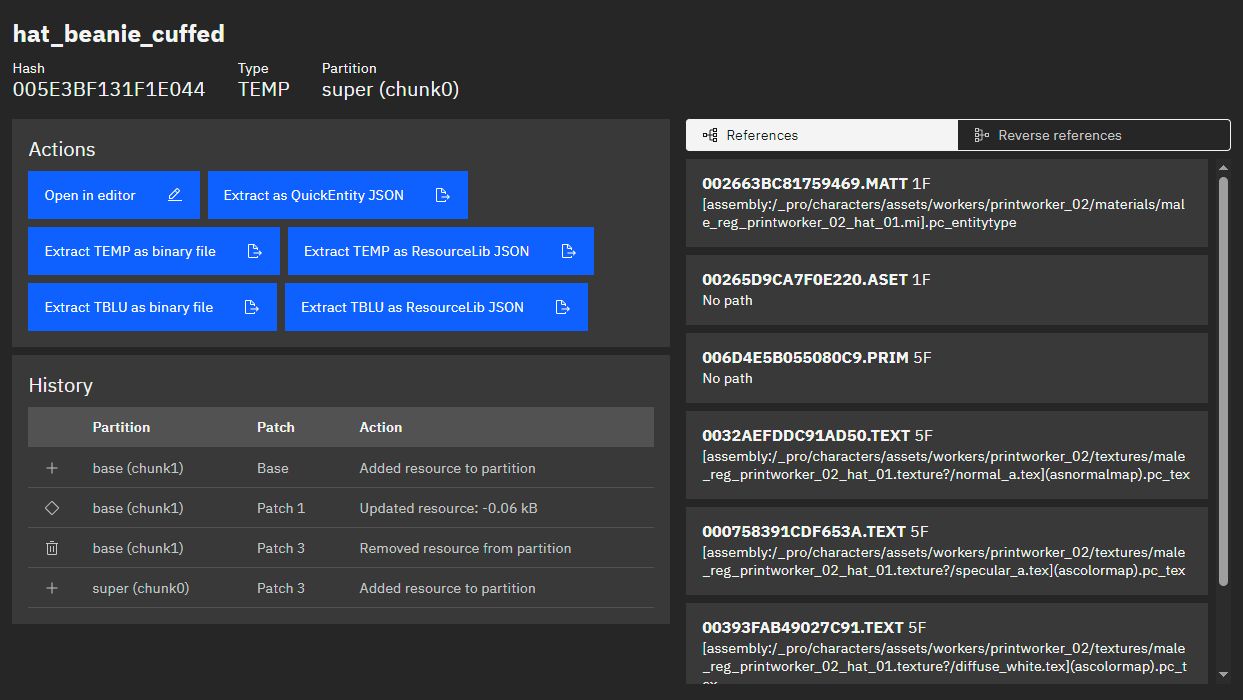
We see the beanies partition is super (chunk0) which is perfect, it means we won't have to add it to dependencies in our manifest.
We briefly mentioned this toward the end in the Patching suits with new parts tutorial, but any parts you want to use in an outfit has to be in chunk0 if it's a starter suit you can wear on any level. Any part that isn't in chunk0 will need to be added to the dependencies array in your manifest. Please see Chunk data for more information.
The positioning and scaling for hats to look good on 47's head can be very specific, so it would be prudent to copy it from some other HeroA outfit. Click Reverse dependencies in the beanie's resource overview and you'll see a list of outfits that uses the beanie. Let's click the first HeroA outfit in the list, which happens to be outfit_flamingo_worker_journalist_m_heroa_v4. Open this outfit in the editor.
Expand the Head_Attacher entity, there's our beanie. We don't want the headphones though, so right click them and delete them.
Next, right click Head_Attacher, select Clipboard and click Copy.
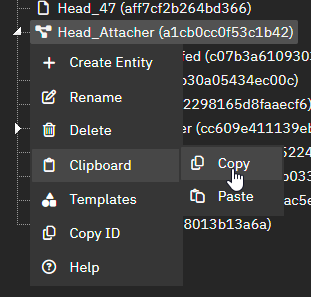
Tab back to our custom outfit, right click the root outfit entity, select Clipboard and click Paste. Now the Head_Attacher is in our outfit as well. But, we need to make sure all the properties are looking as they should. Compare the Head_Attacher and hat_beanie_cuffed in our outfit with the one in the journalist outfit.
Compare for yourself first. Do you see it?
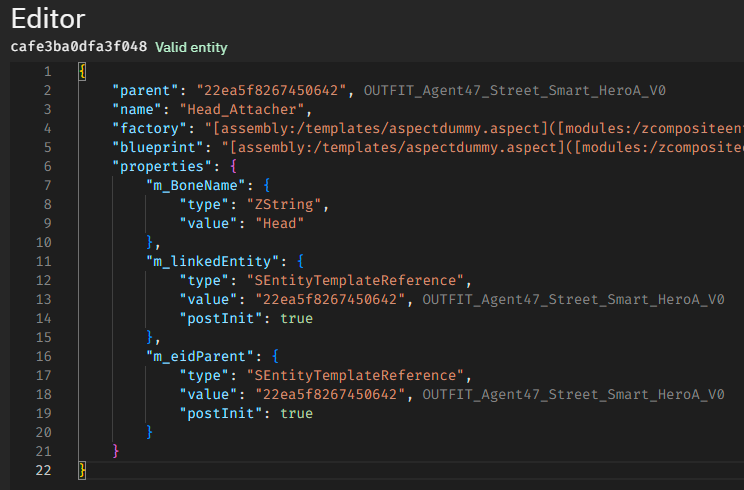
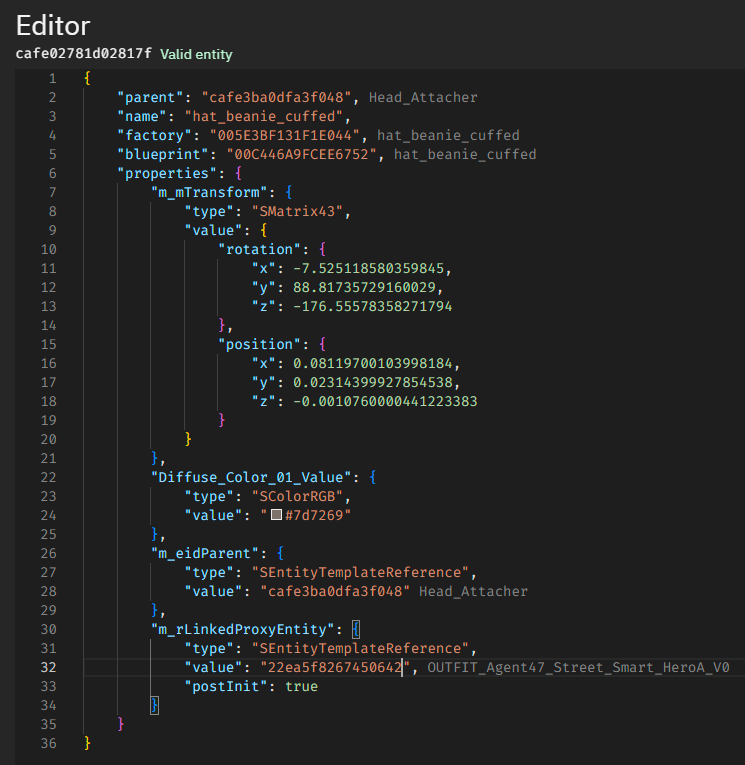
In Head_Attacher, the properties m_linkedEntity and m_eidParent, and in hat_beanie_cuffed, the property m_rLinkedProxyEntity have all had their values nulled. Why is that?
Well, these values all pointed to the root entity of the journalist outfit, whose ID was 1351129995b8231f. This entity doesn't exist in our custom outfit, so GlacierKit nulls these values when pasting the entity. These properties are essential for the attacher and the hat to work, so we will need to supply the ID of our root entity into these values ourselves. As you copy and paste entities back and forth when making mods, take great care that you are hooking up property values correctly after pasting.
Right click the root OUTFIT_Agent47_Street_Smart_HeroA_V0 entity and click Copy ID.
Paste the ID into the values of m_linkedEntity and m_eidParent on Head_Attacher, and m_rLinkedProxyEntity on hat_beanie_cuffed. You will need to enclose the ID in double quotes. It should look something like this now. (IDs may or may not be different for you.)
That's all we need to do for the hat. Save your changes and let's look for a jacket then.
Jacket, shirt and hands
Back to the game content tab, again with the filter on Templates, search for jacket_bomber. Click the first jacket_bomber_open TEMP in the list (00ED542C09DFC9F4). This one is also in chunk0, great! You will find that plenty of clothing templates are in chunk0 in fact, IOI did this to make assembling NPCs and outfits easier for themselves.
Again go into Reverse references to see the outfits that make use of the template. Let's click outfit_raccoon_civilian_bankcustomer_m_actor_v8.entitytemplate and open that outfit in the editor.
Just like last time. Expand the root entity, right click Jacket_Bomber_Open, select Clipboard and click Copy.
Go back to our outfit, right click the root entity, select Clipboard and click Paste.
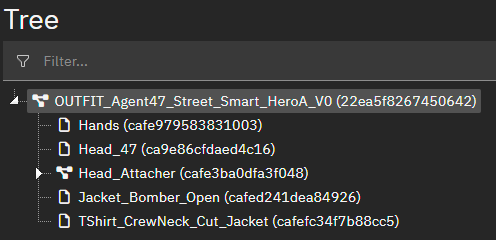
We will also need an undershirt, which the bankcustomer outfit also has. So tab back, copy TShirt_CrewNeck_Cut_Jacket and paste that as well into our outfit. Do the same for Hands as well.
Now your tree should look something like this.
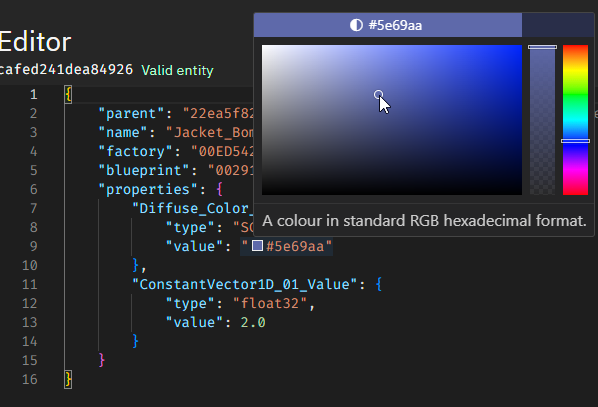
Let's recolor the jacket so it's not a boring beige. Click Jacket_Bomber_Open and mouse over the Diffuse_Color_01_Value property's value. A color wheel will appear and we can adjust the color to something like a light off-blue.
Jeans
Let's find a pair of jeans and shoes as well. Again in the game content tab with the filter on Templates search for jeans.
The second pants_jeans_skinny (00468CE157B575D3) in the list will do. The first one, if you examine reverse references, you will notice is for female models, so that won't work.
Let's go into the reverse reference outfit_fox_worker_tech_m_actor_v1.entitytemplate and open it in the editor. You know the deal by now. Copy the Pants_Jeans_Skinny entity from here, and paste it into our outfit. Do the same for Shoes_Sneakers_Skate.
With that, we are basically done.
Finishing touches
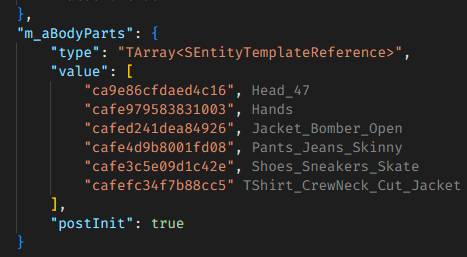
So all our parts are in place. But, they won't all render just yet. Click the root OUTFIT_Agent47_Street_Smart_HeroA_V0 entity and scroll down in it. At the bottom you will find an array property called m_aBodyParts. You will notice that only the Head_47 entity is currently in there.
m_aBodyParts controls what body parts should be rendered in the outfit. So what we need to do, is right click every new part that we've added, copy their ID and add them to this array. So let us do this now.
Any models that use bone attachments (see the entity Head_Attacher) like watches, jewelry, and hats such as the beanie in this case, do not need to be added to m_aBodyParts. They will always render regardless. Attachers themselves don't need to be added to the array either.
When you have added all the parts to your m_aBodyParts array it should look something like this. Note that your entity IDs will be different.
Save your work now and we will move on to replacing an existing suit with this new outfit.
Replacement
Globaldata
Assuming you have saved your outfit, you can close all open tabs in GlacierKit. Now go to the game content tab again and search for globaldata. Click globaldata.brick in the results and open it in editor.
In the entity tree, go into the Scene/[GlobalData.brick]/Gameplay/Outfits/MainGameOutfits/_Hitman folders. In the _Hitman folder you will find all starter suits available, but they all have developer names, which are not always intuitive. Note that there's plenty of suits here that are unused, such as the elusive targets outfits, (all beginning with CHAR_ET_Hero) which were originally planned to be unlockable. It's a treasure trove of interesting stuff.
Today we will be replacing The Black Streak, which all PC players have unlocked. And unless you are some sort of wizard, somehow modding the game for consoles, you also have it. In the list, it is called CHAR_Global_Hero_BlackSpecialSuit_M_PRO183133, so find that entity, expand and select it.
We can double check that this is the suit we're looking for. Find the m_rNameTextResource property, and on that line scroll all the way to the right in the window.
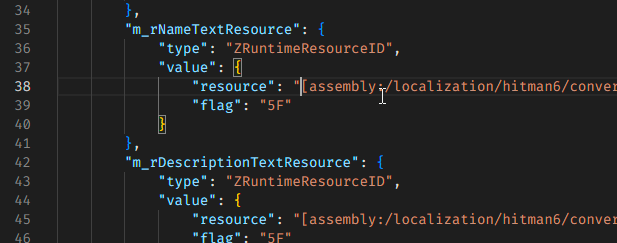
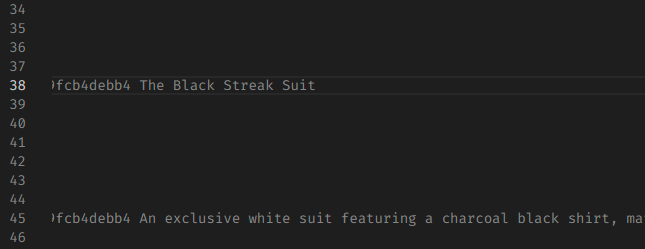
GlacierKit will render out the line for us at the end. And we can confirm that this is indeed The Black Streak we are looking for.
In this entity let's change some properties. Right now, m_eSoundFootwearType is set to EFWT_LEATHER, meaning leather shoes. m_eOutfitAICategory is set to OAC_47STARTCLASSY meaning NPCs will address us as if we are wearing a nice suit.
These are both wrong of course, we are wearing casual street clothes with sneakers, not leather loafers. So let's change them.
Begin by removing the value in m_eSoundFootwearType, and with the text pointer inside the double quotes, press CTRL + Space. This is an editor feature called Intellisense which will show you the possible choices for this property value. Intellisense is incredibly helpful and if you are ever in doubt of what properties or values you can use, remember to use CTRL + Space and you can get a helping hand.
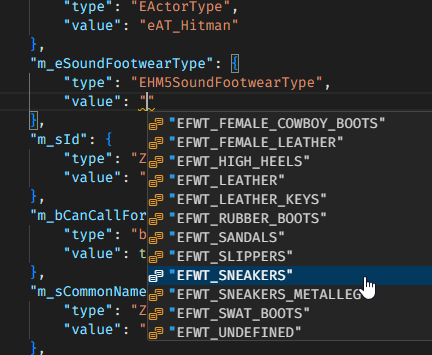
Since we are wearing sneakers, EFWT_SNEAKERS is the most fitting option. So choose that with your arrow keys and hit Enter, or scroll in the list and click it.
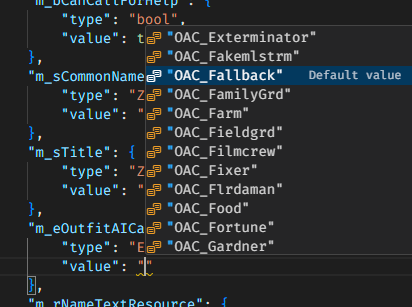
Let's move on to m_eOutfitAICategory. Let's remove the current value and use Intellisense again with CTRL + Space. For most casually styled suits, IOI tends to use OAC_Fallback, so we can do the same here. Select it with the arrow keys and hit Enter, or just scroll in the list and click it.
And now finally, it's time to change what charset the globaldata entry points to. Go into the subentity CHARSET_Agent47_Global_Hero_BlackSpecialSuit in the tree. We will need to replace the factory and blueprint paths with our own charset that we made up earlier.
If you need to find your paths again, click Settings in GlacierKit and you will find them under the header Custom paths.
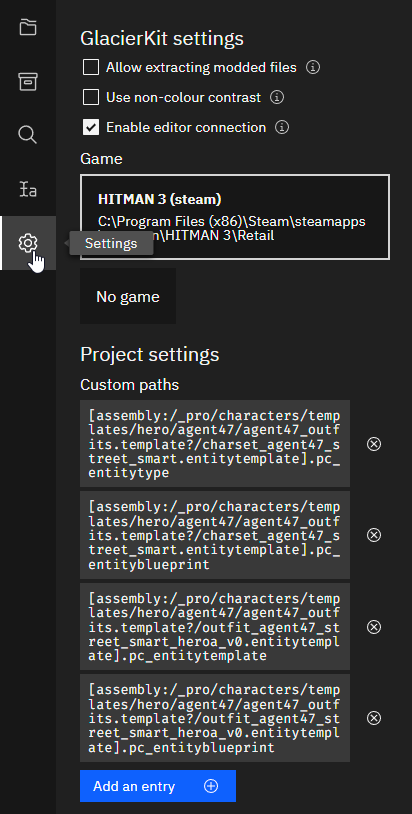
You will need to copy your charset factory path and blueprint path and replace the corresponding factory and blueprint in this entity. It should look like this when you've done it.

Our work in globaldata is now finished, so click the Save button on the tab we have open. Navigate to the /content/chunk0/ path in the mod folder and save the file as street_smart_replace_black_streak.
Strictly speaking, this is all you need for your mod to be functional. If you deploy your mod now, go into a level and pick The Black Streak, you will be using the modded outfit we built. These next finalizing steps will be all about tweaking the inventory image, name and description of The Black Streak so it makes it clear to the user that this outfit is modded.
Inventory image
For this part we will be using the blobs folder we created earlier. As explained, blobs is the term for online resources, in this case the inventory image for The Black Streak.
First we will need to know what the inventory image is called, we have to look in the repository for this. Go to the game content tab, set the filter to All and search for pro.repo. There is only one result, click it and open it in the editor.
Under the Unmodified header, search for BlackSpecialSuit. Click it in the list to see the repository entry.
Here you will see the Image path is "images/unlockables_override/47_Outfits_BlackSpecialSuit.jpg". In the game content tab, search for 47_Outfits_BlackSpecialSuit.jpg. Under the assembly:/_pro/online/default/cloudstorage/resources/images/unlockables_override/ folders you will find the image, click it to open.
In the overview click Extract image. Navigate to blobs/images/unlockables_override in your mod folder. Save the file as 47_Outfits_BlackSpecialSuit. Note that it will be saved as a PNG file, you will have to convert this PNG file to a JPG, and you should edit it in some way to reflect the new outfit you have made. We will not be covering creative editing in this tutorial. A tip from the author though, is take the outfit into the shortcut stairway room in Dubai, because it has neutral lighting, take an angled front-on screenshot with freecam, preferably with NVIDIA Ansel if you can, and painstakingly edit it onto an existing unlockables_override image in Photoshop.
Or if you like, you can right click and save the following prepared image. Just save it into the blobs/images/unlockables_override folder in your mod and delete the PNG you extracted. You're welcome.
Localization strings
Overriding localization strings is done in the manifest. Let's prepare our manifest now.
Go to the project files tab in GlacierKit.
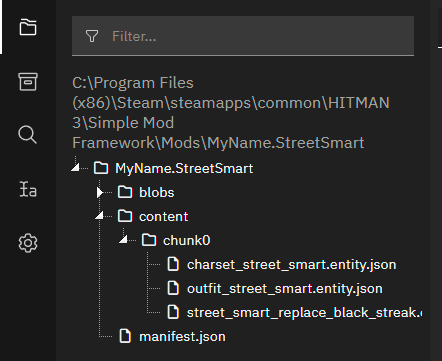
The manifest is a JSON-file, and is structured with JavaScript Object Notation. We will be using terms such as object, keys and values. If you are completely unfamiliar, it may be best to read a crash course on JSON. JSON is used everywhere in GlacierKit either way so it is good to know.
Open the manifest.json file, and add a comma after the last property (blobsFolders). Hit enter to make a new line and add a double quote, the editor will automatically it a pair of double quotes.
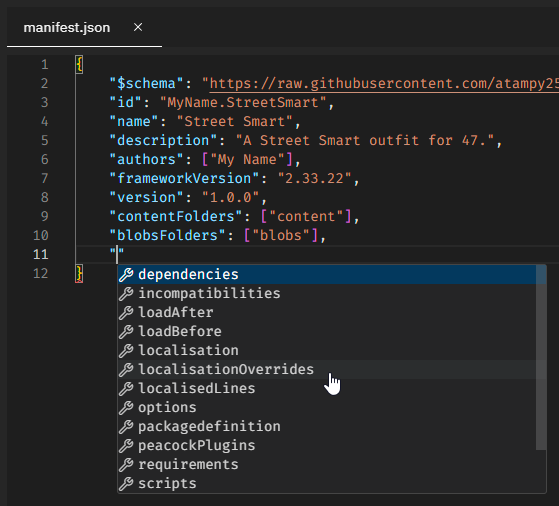
Hey, look at that! It's our old friend Intellisense! That's right, it's available for the manifest as well, thanks to the "$schema" key at the top of the file. This will help. Choose the localisationOverrides property. Inside this new property, make a new object which you can call Placeholder for now. And inside Placeholder, make a new object called english.
Inside the english object, make two keys, called 1 and 2 respectively. In the value for 1 you can write "Street Smart Suit". In the value for 2 you can write a description of the suit, such as "A comfortable and savvy suit for when you're out on the town."
Your manifest should look like this when you've done this.
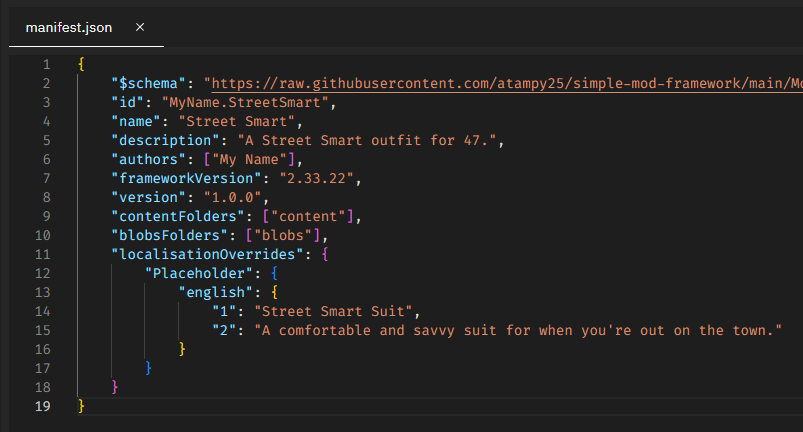
If we deploy now this will not work, we need to supply some IDs in the manifest to make these replacements. Go to the game content tab and search for BlackSpecialSuit. Under the localization folder you can find two .sweetline files for BlackSpecialSuit, one for the name and one for the description. Click either of them, doesn't matter.
In the asset overview, click the only dependency, the LOCR file (004B8C5124A49543). Copy this hash, and replace Placeholder in your manifest with 004B8C5124A49543.
Going back to the LOCR file's overview, click in the Preview textbox and press CTRL + F to open the search bar. Search for BlackSpecialSuit.

There is the name and the description lines. But we actually can't use these as-is, we will need to hash them. First copy the whole name key, CHAR_GLOBAL_HERO_BLACKSPECIALSUIT_M_PRO183133_NAME_A9374970-9A06-4469-993A-329FCB4DEBB4. Open the GlacierKit text tools on the left, and in the Localisation hash calculator, paste the line into the text box. Copy the decimal that you get as a result. Take this to your manifest, and replace "1" under localizationOverrides with this number.
Now repeat this process for the description line, replacing "2" with the localization decimal hash you generate in GlacierKit.
When you are done, your manifest should look like this:
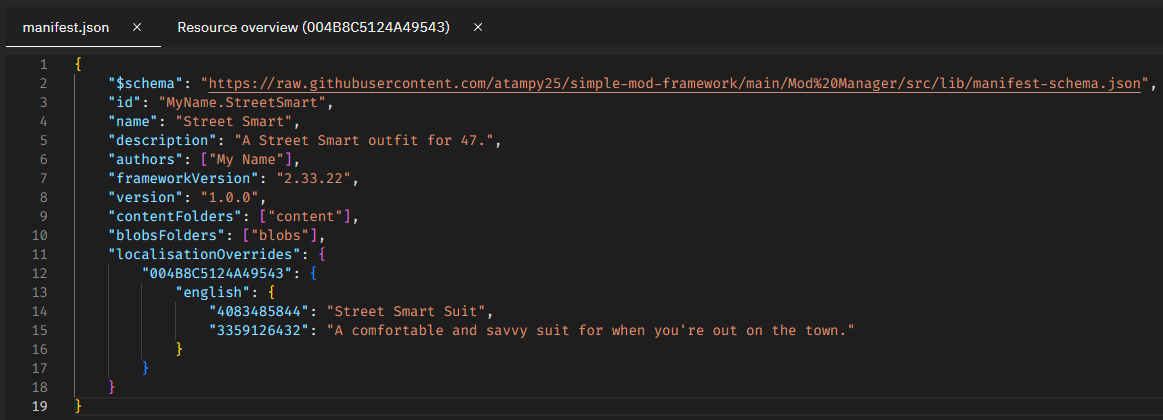
Save your manifest. Why don't we try deploying the mod in SMF and booting up the game? Give it a try, and if you've done everything right so far, your results should speak for themselves!
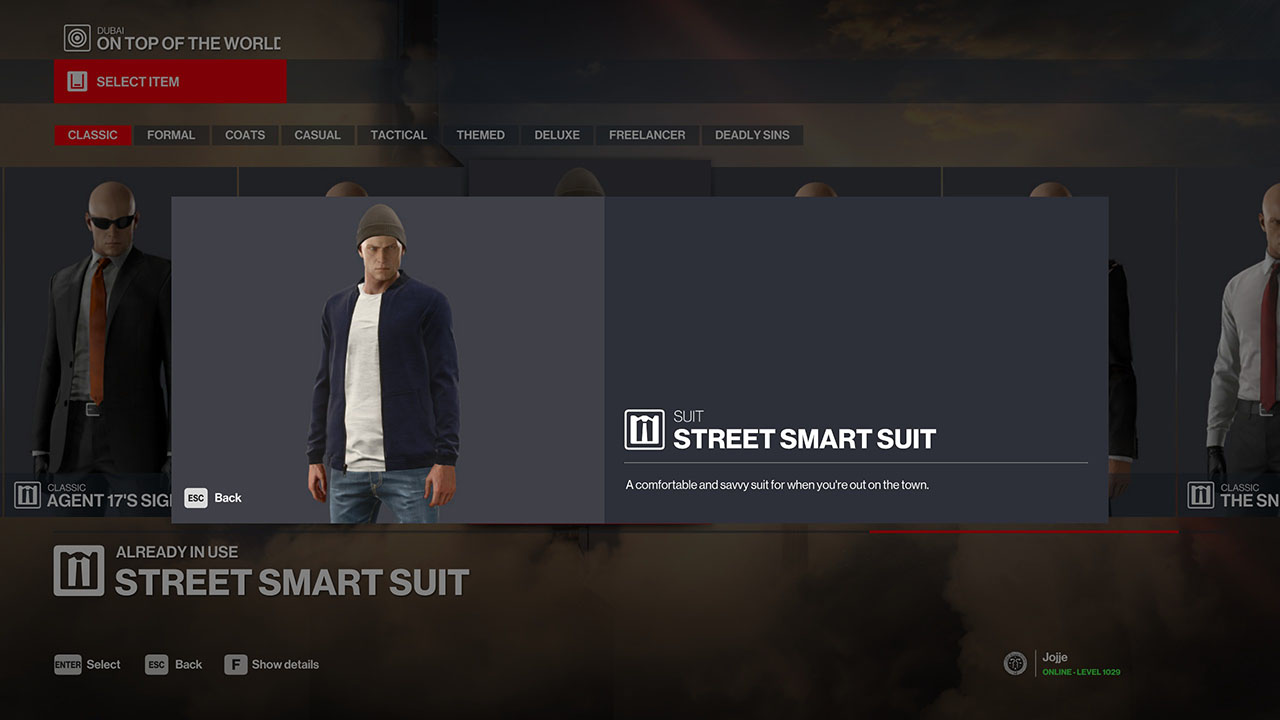
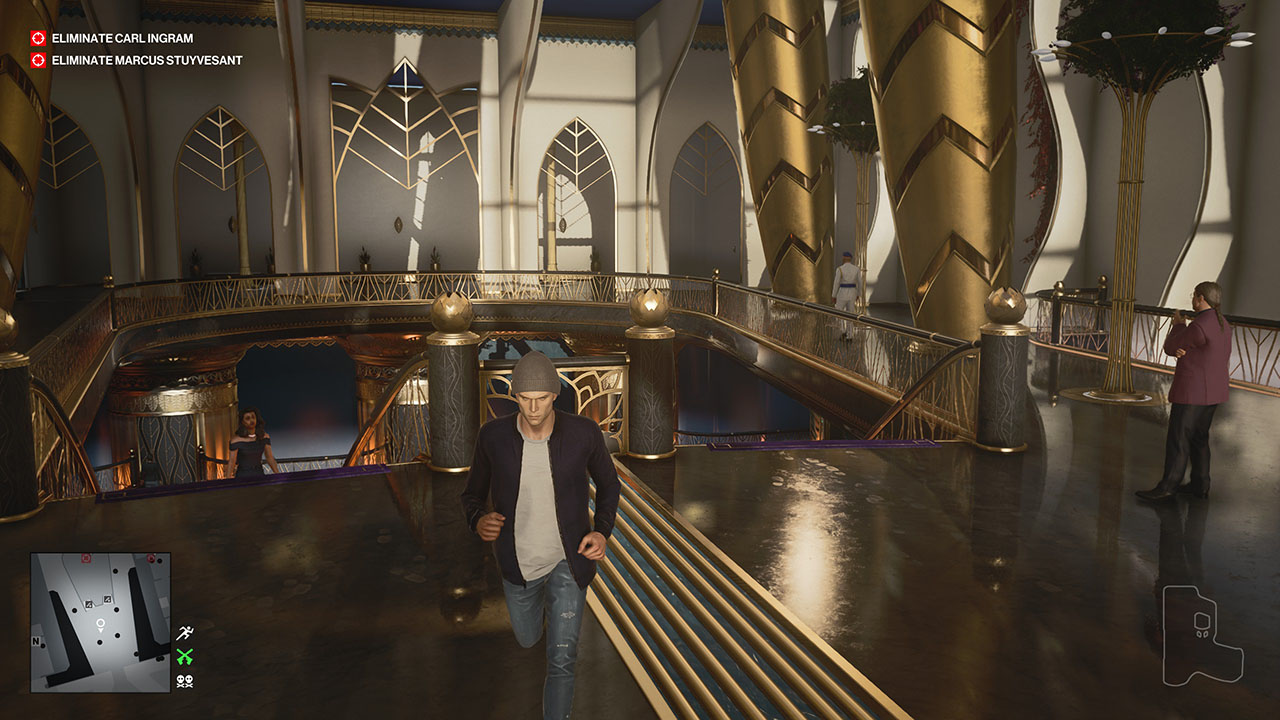
For completion's sake, in your manifest, you should probably not stop with just English localization. If you have the means, you should translate to as many languages as you can. Intellisense will tell you which languages are valid. The more translations you provide, the bigger the potential audience of your mod, which is always cool.
Extra Credit: Peacock Addon
Your mod is finished now, if your goal was just to replace a suit with your own. But we can go the extra mile too, and add our suit to the game without replacing any others. However note that this will only work if the mod user is playing on Peacock, or offline with a special optional patch. Doing this will require modifying the repository and unlockables which won't do anything if we play on IOI's servers, as we mentioned earlier.
The worst of the work is already done, the only things we have to do for Peacock support is:
- Add our suit to the repository
- Add our suit to unlockables
- Add our suit to globaldata with a patch
- Add localization lines to the manifest
So let us do this now! First, in your mod files, under content/chunk0, delete the street_smart_replace_black_streak.entity.patch.json file. We won't need it.
Repository entry
In the game content tab search for pro.repo. Open it in the editor. Under Unmodified let's search for a reference to see what a typical entry looks like. Search for hitmansuit and choose it in the list.

The "ImageTransparent" property is a holdover from older games in the trilogy, it's not used in World of Assassination. But this entry is a good basis.
Under Modified click the New item button. A new Unknown entry has been created, click it to open the editor. Feel free to copy and paste this repository entry:
{
	"CommonName": "CHAR_Global_Hero_Street_Smart_M",
	"Description": "UI_TOKEN_OUTFIT_HERO_STREET_SMART_DESC",
	"HeroDisguiseAvailable": true,
	"Image": "images/unlockables_override/47_Outfits_street_smart.jpg",
	"IsHitmanSuit": true,
	"Name": "UI_TOKEN_OUTFIT_HERO_STREET_SMART_NAME",
	"Category": "",
	"ImageTransparent": "",
	"TokenID": "TOKEN_OUTFIT_HERO_STREET_SMART"
}
When writing your own just stick to naming the values something that makes sense to you. We will be using the Name and Description in our manifest later to make localized lines. You can save your changes under content/chunk0, name the file street_smart and it will be saved as street_smart.repository.json.
You can now go into your blobs folder in your mod and rename the 47_Outfits_BlackSpecialSuit.jpg file to 47_Outfits_street_smart.jpg.
Unlockables entry
In the game content tab search for config.unlockables. Open it in the editor. Under Unmodified search for hitmansuit again and choose the entry in the list.
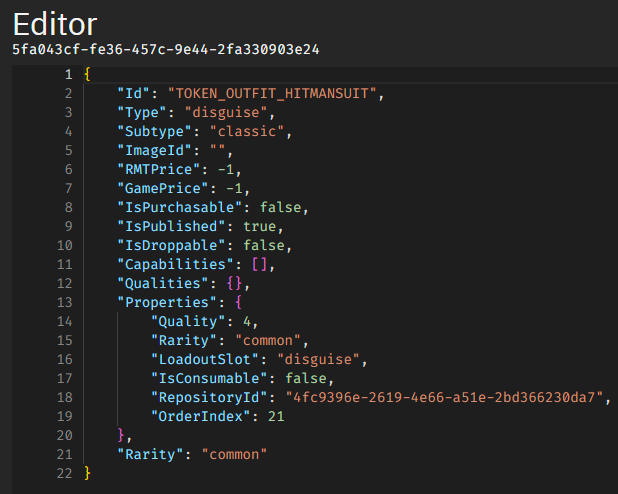
A lot of these values are not functional and are left over from early development or earlier entries in the trilogy. The ones we really have to care about as far as outfits are concerned are Id, Subtype, and RepositoryId.
Select this whole entry and copy it. Under Modified click the New item button. A new Unknown entry has been created, click it to open the editor. Paste in the HitmanSuit entry you copied.
Change the Id to "TOKEN_OUTFIT_HERO_STREET_SMART".
The Subtype is what category the outfit should be added to. The choices of subtype that are in the game are classic, formal, coats, casual, tactical, themed, sins, deluxe, evergreen (meaning Freelancer).
You can even write in your own subtype and the game with handle that just fine. If that's something you want to do, you will have to add localized lines for the subtype or you will have a broken string in the game. If you for example choose to write in a subtype called groovy the manifest localization entry might look like this:
"localisation": {
	"english": {
		"UI_ITEM_SUBTYPE_GROOVY": "Groovy suit",
		"UI_ITEM_SUBTYPE_IN_PLURAL_GROOVY": "Groovy suits"
	},
	(more languages here...)
}
Write in casual instead of classic as a Subtype.
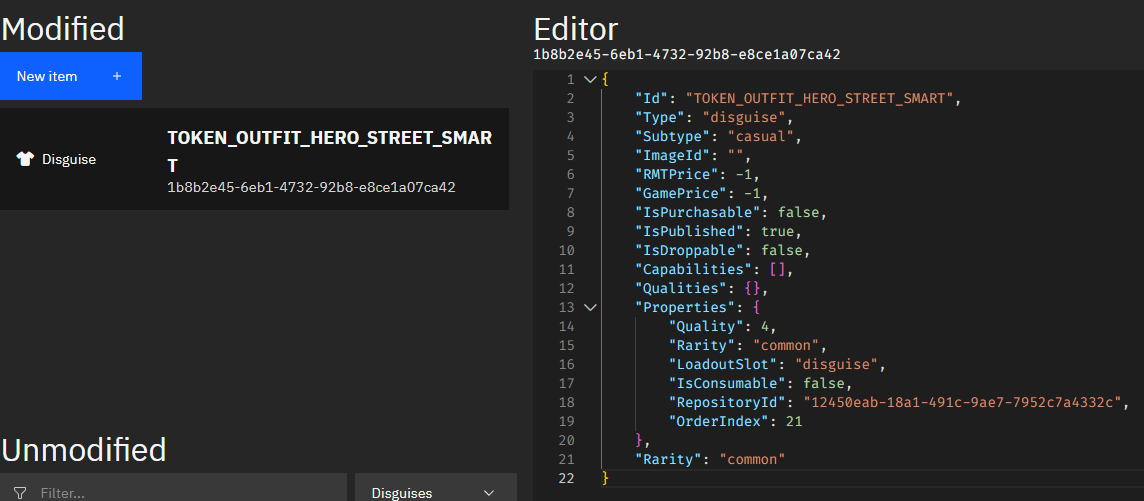
Finally we will need to specify the GUID of our outfit's entry in the repository. Go back to your repository patch and under Modified, select and copy the ID that your entry has automatically generated. It is a long string of numbers and letters separated by dashes. Paste this into the RepositoryId property under Properties.
Finally it will look something like this. Note: do not use the same RepositoryId as in this screenshot, the ID in your repository will be different.
Save the unlockables entry to your content/chunk0 folder, name the file street_smart and it will be saved as street_smart.unlockables.json.
Globaldata entry
We have basically done this once before. We're just making bigger changes this time.
Go to the game content tab again and search for globaldata. Click globaldata.brick in the results and open it in editor.
In the entity tree, go into the Scene/[GlobalData.brick]/Gameplay/Outfits/MainGameOutfits/_Hitman folders. Scroll all the way down in this folder and find HitmanSuit (2662d409d1c5bc39), it's the last in the list. Right click HitmanSuit, select Clipboard and click Copy.
Now scroll all the way back up in the tree, right click the _Hitman folder, select Clipboard and click Paste. Scroll all the way back down and we have created another HitmanSuit entity. You can tell what entities are modded because their IDs start with cafe. Expand this entity, and click it to select it.
Change the entity name from HitmanSuit to CHAR_Global_Hero_Street_Smart_M.
Like last time, change the m_eSoundFootwearType value to EFWT_SNEAKERS.
Change the m_sId value to your repository entry's GUID.
Change m_sCommonName to CHAR_Global_Hero_Street_Smart_M.
Change m_sTitle to Street Smart.
Like last time change m_eOutfitAICategory to OAC_Fallback.
Now navigate into the charset entity. Change the entity name from CHARSET_Agent47_SignatureSuit to CHARSET_Agent47_Street_Smart, and change the factory and blueprint paths to your custom charset paths. Remember that you can find your saved custom paths in the Settings screen in GlacierKit!
Go back to the CHAR_Global_Hero_Street_Smart_M entity. We still have two properties to change which is m_rNameTextResource and m_rDescriptionTextResource. As you've probably gathered these are the paths for the name and description LINEs. We can use these to make up our own paths again. These are the paths for the name and description of the signature suit:
[assembly:/localization/hitman6/conversations/ui/pro/online/repository/outfits_hero.sweetmenutext?/4fc9396e-2619-4e66-a51e-2bd366230da7_hitman6_hero_hitmansuit_m_name_.sweetline].pc_sweetline[assembly:/localization/hitman6/conversations/ui/pro/online/repository/outfits_hero.sweetmenutext?/4fc9396e-2619-4e66-a51e-2bd366230da7_hitman6_hero_hitmansuit_m_description_.sweetline].pc_sweetline
That is a lot. Let's break it down.
[assembly:/localization/hitman6/conversations/ui/pro/online/repository/outfits_hero.sweetmenutext?/Repository GUID_hitman6_hero_Name of the suit_m_name_.sweetline].pc_sweetline[assembly:/localization/hitman6/conversations/ui/pro/online/repository/outfits_hero.sweetmenutext?/Repository GUID_hitman6_hero_Name of the suit_m_description_.sweetline].pc_sweetline
With that in mind, our paths basically write themselves. In my case they would be:
[assembly:/localization/hitman6/conversations/ui/pro/online/repository/outfits_hero.sweetmenutext?/12450eab-18a1-491c-9ae7-7952c7a4332c_hitman6_hero_street_smart_m_name_.sweetline].pc_sweetline[assembly:/localization/hitman6/conversations/ui/pro/online/repository/outfits_hero.sweetmenutext?/12450eab-18a1-491c-9ae7-7952c7a4332c_hitman6_hero_street_smart_m_description_.sweetline].pc_sweetline
Again, when you are coming up with your own paths you should use the randomly generated GUID you got when you made the repository entry.
You should save these paths in your project in GlacierKit. Click Settings, and under Custom paths click Add an entry, save both the name and description paths so you can get to them easily later.
Fill in these paths in m_rNameTextResource and m_rDescriptionTextResource respectively.
Save your globaldata changes to content/chunk0. Call it street_smart_globaldata.
At this point you can delete the old globaldata patch street_smart_globaldata.entity.patch.json from your project.
So we've added the suit to the repository, unlockables, and globaldata. When you run Peacock and the game, you will find the suit in your inventory, under the subtype you specified.
We will not cover it here, but you can also write a TypeScript plugin to drop the outfit as part of a challenge. If the suit is tied to a challenge, Peacock will not automatically add it to inventory.
Patch unlockables starting package for offline
There is one last thing you can do if you also want to allow people playing the game offline to use the outfit. To do this, we add our outfit token to the starting package in unlockables. The starting package includes things like the signature suit, the coin, the ICA19, among other things.
This part can't be done in GlacierKit unfortunately so open a text editor like VSCode. Make a new file and paste in the following:
{
	"file": "0057C2C3941115CA",
	"type": "ORES",
	"patch": [
		{
			"op": "add",
			"path": "/PACKAGE_STARTING_PACKAGE/Properties/Unlocks/-",
			"value": "TOKEN_OUTFIT_HERO_STREET_SMART"
		}
	]
}
Save this file to your mod folder under content/chunk0. Name it unlockables_street_smart.JSON.patch.json. This filename is case sensitive, it must be called .JSON.patch.json as the extension.
This file simply patches the starting package to include our new outfit token, so when you deploy and run the game offline you will have the suit in your inventory.
Manifest localization
Open the manifest again. You can remove the localisationOverrides object, since we're not overriding The Black Streak suit anymore.
Make an object called localisedLines, and another called localisation. Use Intellisense for assistance if you're unsure.
Under localisedLines make two keys, one called "0" and another called "1". The values are "UI_TOKEN_OUTFIT_HERO_STREET_SMART_NAME" and "UI_TOKEN_OUTFIT_HERO_STREET_SMART_DESC" respectively.
Under localisation make an object called english. Under english make two keys, one called "UI_TOKEN_OUTFIT_HERO_STREET_SMART_NAME" and one called "UI_TOKEN_OUTFIT_HERO_STREET_SMART_DESC". The values are "Street Smart Suit" and "A comfortable and savvy suit for when you're out on the town." respectively.
Your manifest should look like this:
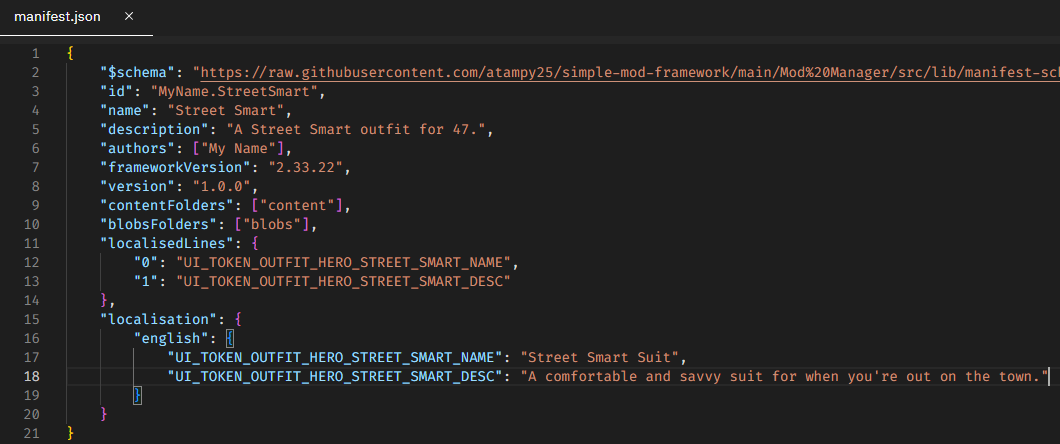
Now we need to replace "0" and "1" with our LINEs we came up with earlier. You saved the paths in the GlacierKit settings, right?
Copy the path to your name .sweetline. Go into GlacierKit's text tools and paste it into the hash calculator - not the localisation hash calculator. Copy the resulting Hex, and replace the "0" in the manifest with the resulting hash.
Do the same with the path to your description .sweetline, replacing "1" in the manifest. Your resulting manifest should look something like this. Note that your localisedLines hashes will be different.
{
    "$schema": "https://raw.githubusercontent.com/atampy25/simple-mod-framework/main/Mod%20Manager/src/lib/manifest-schema.json",
    "id": "MyName.StreetSmart",
    "name": "Street Smart",
    "description": "A Street Smart outfit for 47.",
    "authors": ["My Name"],
    "frameworkVersion": "2.33.22",
    "version": "1.0.0",
    "contentFolders": ["content"],
    "blobsFolders": ["blobs"],
    "localisedLines": {
		"00FA39746422A77A": "UI_TOKEN_OUTFIT_HERO_STREET_SMART_NAME",
		"0094E475D38D6641": "UI_TOKEN_OUTFIT_HERO_STREET_SMART_DESC"
	},
	"localisation": {
		"english": {
			"UI_TOKEN_OUTFIT_HERO_STREET_SMART_NAME": "Street Smart Suit",
			"UI_TOKEN_OUTFIT_HERO_STREET_SMART_DESC": "A comfortable and savvy suit for when you're out on the town."
		}
	}
}
You are now done converting your mod to Peacock addon! Deploy the mod, run Peacock and the game, and look in your inventory. If you have done everything correctly, you will find your custom suit in the Casual category, and it hasn't replaced any other suit.
Addendum: Chongqing rain effects
If you use the suit now and go into Chongqing, you will notice that you don't get wet in the rain. This is controlled by a logic entity in the outfit. Let's set that up now.
We will be learning about ConstantVectors, which are material parameters that control aspects of the material such as roughness values, specular values, albedo map brightness, and many other things.
ConstantVectors are defined in the material instance (MATI)'s material class (MATE). The easiest way to find the human readable meanings of ConstantVectors in GlacierKit is to look at a material template/blueprint entity (MATT/MATB).
As an example, in the Jacket_Bomber_Open template IOI have put in an entity called base_male_jacket_bomber that points to the MATT/MATB, in order to override colors, specular and textures. The human readable meanings are displayed right next to the ConstantVector property.
To make things look wet, what we do depends a little on what the material of that thing is. For fabrics we want to make the albedo darker, turn up the minimum roughness and turn up the bumpmap scaling. This will make the clothing look darker and shiny with rain.
Open your outfit file in GlacierKit.
Copy the following textbox (it is an entity) and paste it into the root OUTFIT_Agent47_Street_Smart_HeroA_V0 entity by selecting Clipboard and clicking Paste.
{"rootEntity":"cafe1c73325d6168","data":{"cafe1c73325d6168":{"parent":"8d2dd8c9d88913be","name":"FX_Hitman_Wet_Logic_Character","factory":"0067CFB703A80787","blueprint":"00AA88C960CD2080","properties":{"HeadMaterialToOverride":{"type":"ZRuntimeResourceID","value":{"resource":"009F7978C601815A","flag":"5F"}},"HeadMaterialOverride":{"type":"TArray<SEntityTemplateReference>","value":[],"postInit":true}},"events":{"HitmanWetness":{"T":["cafeb592e0ab9249","cafedc850188fd63","cafe57b613171dc2","cafee50db419698b"]}}},"cafe57b613171dc2":{"parent":"cafe1c73325d6168","name":"Lerp roughness fabric","factory":"[modules:/zmathlerp.class].pc_entitytype","blueprint":"[modules:/zmathlerp.class].pc_entityblueprint","properties":{"m_A":{"type":"float32","value":1.0},"m_fT":{"type":"float32","value":0.0},"m_B":{"type":"float32","value":2.0}},"events":{"Lerp":{"ConstantVector1D_14_Value":[]}}},"cafedc850188fd63":{"parent":"cafe1c73325d6168","name":"Lerp bumpmap","factory":"[modules:/zmathlerp.class].pc_entitytype","blueprint":"[modules:/zmathlerp.class].pc_entityblueprint","properties":{"m_fT":{"type":"float32","value":0.0},"m_B":{"type":"float32","value":0.30000001192092896}},"events":{"Lerp":{"ConstantVector1D_06_Value":[]}}},"cafee50db419698b":{"parent":"cafe1c73325d6168","name":"Lerp roughness other","factory":"[modules:/zmathlerp.class].pc_entitytype","blueprint":"[modules:/zmathlerp.class].pc_entityblueprint","properties":{"m_B":{"type":"float32","value":0.4000000059604645},"m_A":{"type":"float32","value":0.0},"m_fT":{"type":"float32","value":0.0}},"events":{"Lerp":{"ConstantVector1D_04_Value":[]}}},"cafeb592e0ab9249":{"parent":"cafe1c73325d6168","name":"Lerp albedo","factory":"[modules:/zmathlerp.class].pc_entitytype","blueprint":"[modules:/zmathlerp.class].pc_entityblueprint","properties":{"m_fT":{"type":"float32","value":0.0},"m_B":{"type":"float32","value":0.20000000298023224}},"events":{"Lerp":{"ConstantVector1D_01_Value":[]}}}}}
You should now have an FX_Hitman_Wet_Logic_Character entity in the tree.
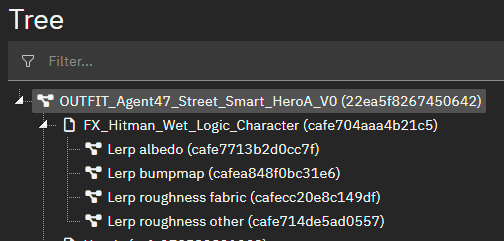
Click FX_Hitman_Wet_Logic_Character. In the HeadMaterialOverride property we will have to insert the root entity's ID. Right click OUTFIT_Agent47_Street_Smart_HeroA_V0 in the tree and click Copy ID. Click in the value array, make a new line and double quotes. Paste in the ID. It should look something like this.

Now expand the FX_Hitman_Wet_Logic_Character entity and we will look at its child entities. These are all zmathlerp entities, lerp being short for linear interpolation. Basically they do math, to make a value go from A to B over time, amount of time represented by T. Click the Lerp albedo entity.
This will make the ConstantVector1D_01_Value go from A to B when it is triggered. ConstantVector1D_01_Value is a value that controls the brightness of the albedo (or diffuse) texture. It will, in effect, make a texture darker over time.
You might notice that it has an m_B (after) property, but not an m_A (before) property. If A is not specified it will use the referenced entity's standard ConstantVector1D_01_Value value as A.
Under the events and Lerp property we find an array called ConstantVector1D_01_Value. This is an array of entity IDs whose ConstantVector1D_01_Value that the zmathlerp entity should modify. Right now it is empty, so let's fill it up.
Like I mentioned only things made of fabric should be darker in the rain. So right click and copy the IDs of hat_beanie_cuffed, Jacket_Bomber_Open, Pants_Jeans_Skinny, and TShirt_CrewNeck_Cut_Jacket, and put them into this array, separated by commas.
It should look something like this when you are done.
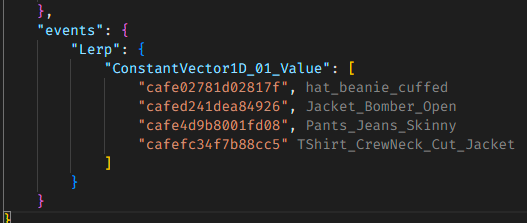
With the Lerp albedo supplied let's continue with Lerp bumpmap. The property for this lerp is ConstantVector1D_06_Value which controls how strong the normal map is.
We will be using the same entities as we specified in the albedo lerp for this one, so you can copy the array and paste it in for this. Just take care not to replace ConstantVector1D_06_Value.
Lerp bumpmap should look something like this.
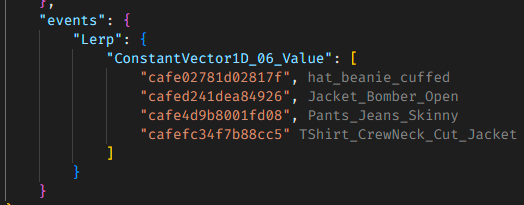
Finally we need to hook up the specular and roughness values. You'll notice we have two lerps for this, one for fabrics and one for other. This is because things made of fabric use ConstantVector1D_14_Value for minimum specular roughness, and other things, like shoes, use ConstantVector1D_04_Value.
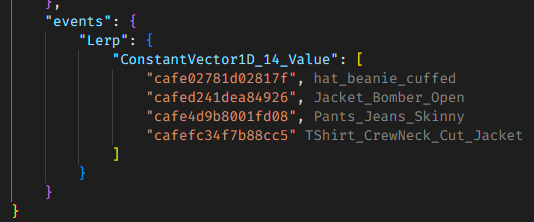
Click Lerp roughness fabric. The same deal here, put in hat_beanie_cuffed, Jacket_Bomber_Open, Pants_Jeans_Skinny, and TShirt_CrewNeck_Cut_Jacket in the ConstantVector1D_14_Value array.
Lerp roughness fabric should look something like this.
Moving on to Lerp roughness other, supply the Shoes_Sneakers_Skate ID in the ConstantVector1D_04_Value array.
Lerp roughness other should look something like this.

Save your work, deploy your mod, go to Chongqing and check it out!
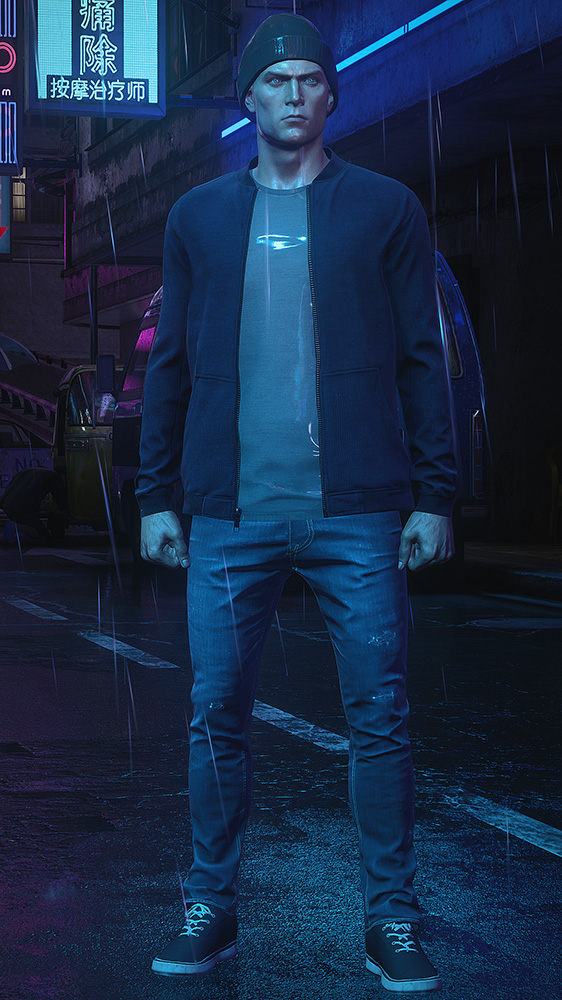
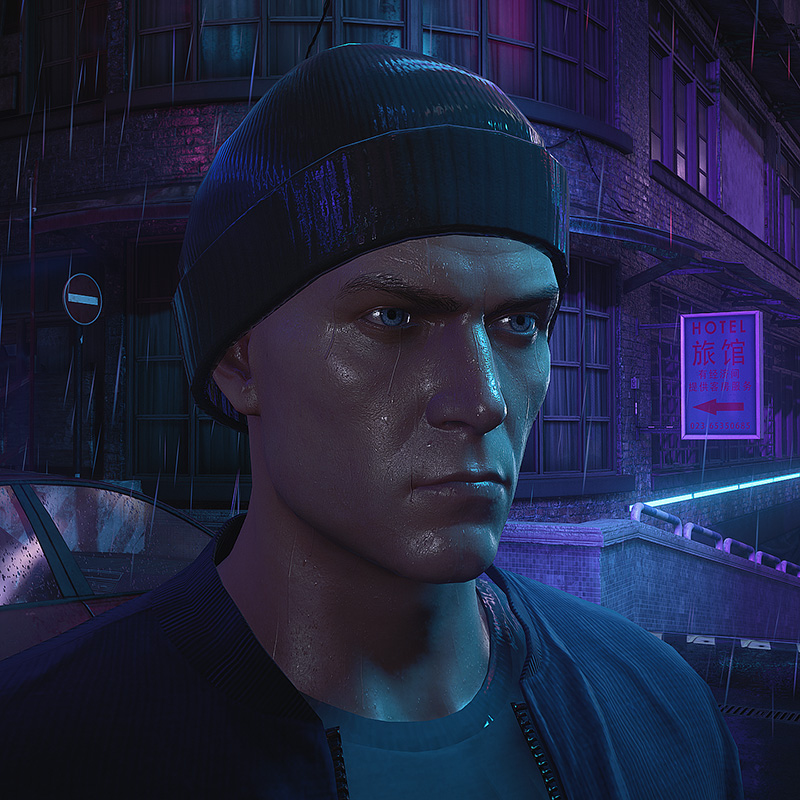
If you find that the effect is way too dramatic, you can experiment by tweaking the m_B values of the lerps, making more lerps for finer control over each part, among other things. Get creative in making the outfit look its best.
Final Tips
You can use the Outfit Helper mod in conjunction with the ZHMModSDK's Editor to tweak material values directly in-engine to see their effects. This will help you determine the best material values for your outfit, including lerp values!
