Using zbodypartentity, and Material Overrides
Until now in the tutorial series we've told you to use finished clothing part templates found in _part_library. But using templates isn't the only way to assemble an outfit. It could be that a clothing mesh you want to use doesn't have a template. That's where you can use zbodypartentity.
We will be looking at the Absolution Suit with Gloves as a reference. In GlacierKit, open Game content and search for absolution_gloves_heroa_v0. Open the entitytemplate in the editor. In the entity tree you will notice a whole bunch of entities starting with Mesh_. Click on Mesh_Jacket.
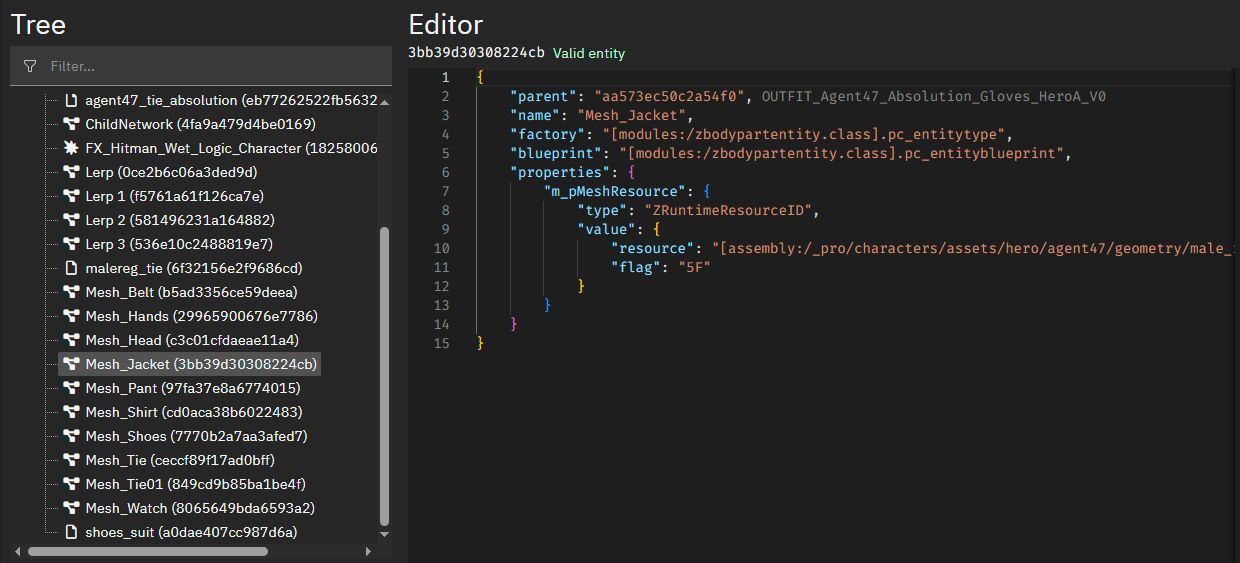
As you see this entity is nothing special. It's a zbodypartentity that takes one property, which is m_pMeshResource. So quite plainly all this does is render a model, skinned to the outfit's skeleton rig. So with a zbodypartentity in your outfit you can use any weightedprim.
This entity does not have all the fancy material properties that we are used to from templates. But that doesn't mean that we can't modify the meshes materials at all. In fact, IOI have done this in this outfit.
Scroll up in the tree and click the agent47_jacket_02 entity.
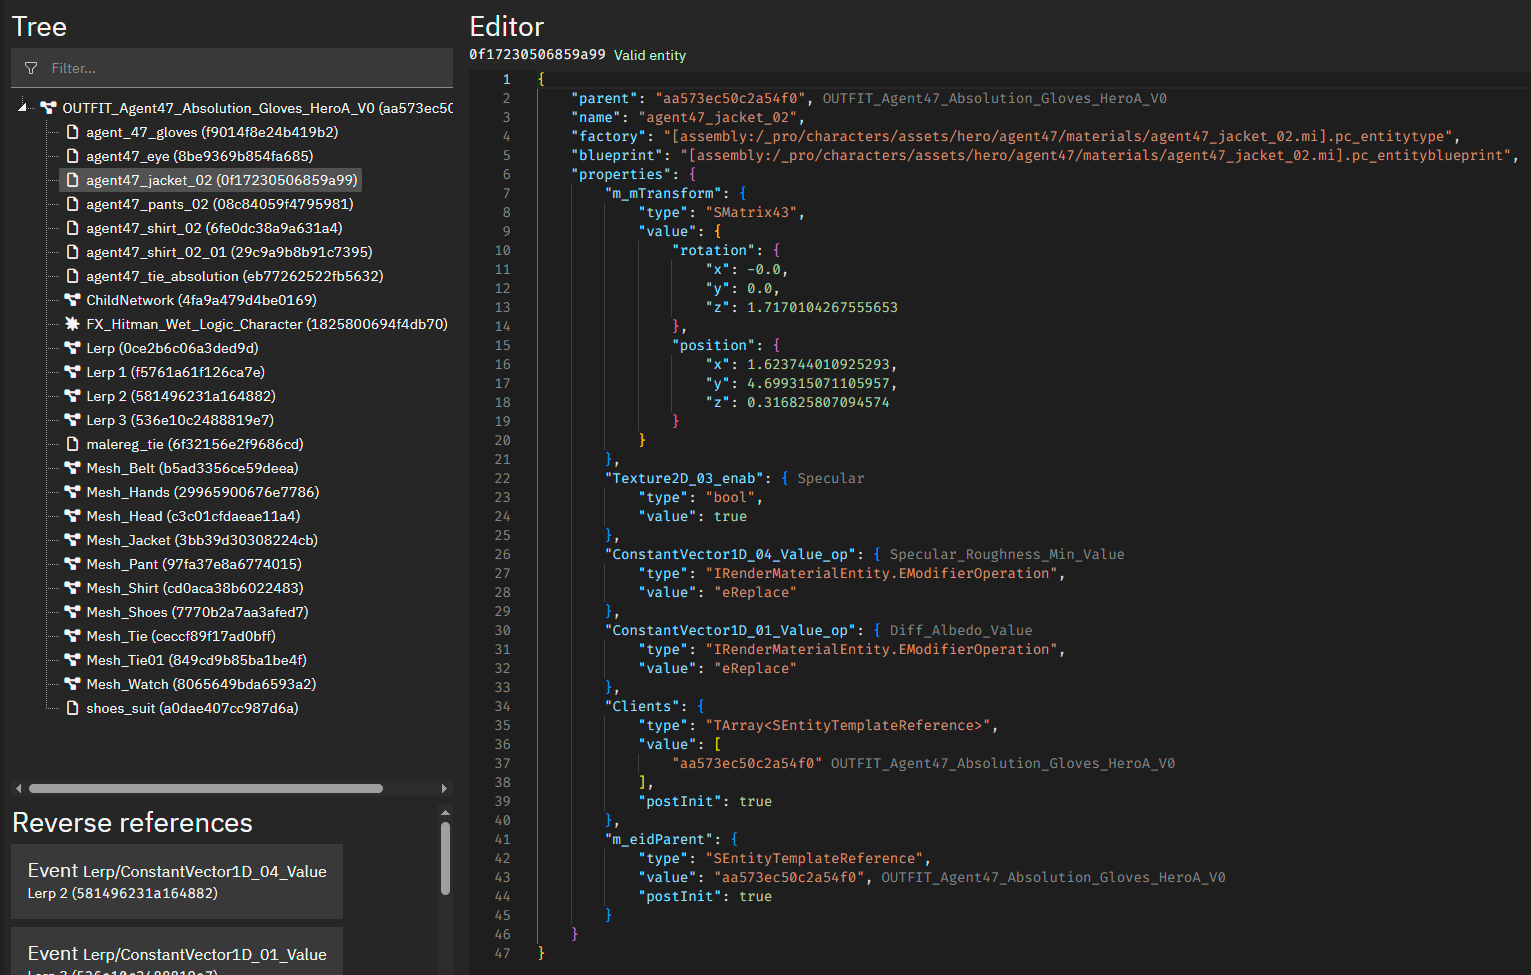
This is a material entity. It works just the same as any other entity, and its role is to change the values of the given material instance. In this case, the Mesh_Jacket model's material, agent47_jacket_02.mi.
Material entities are linked to the root outfit, not the zbodypartentity itself, so be aware that if you have multiple meshes that share a material, the material entity will change the parameters of that material for all of those meshes in the tree.
The key here then is the Clients array and m_eidParent value. The root outfit has to be present in both of these for the material entity to take effect.
Introducing a material entity to a zbodypartentity
Let's pretend for a moment that this material entity agent47_jacket_02 doesn't exist in this outfit. We want to edit the jacket's materials. How do we do this?

Go back to Mesh_Jacket. Right click the resource under m_pMeshResource and click Open resource overview in new tab.
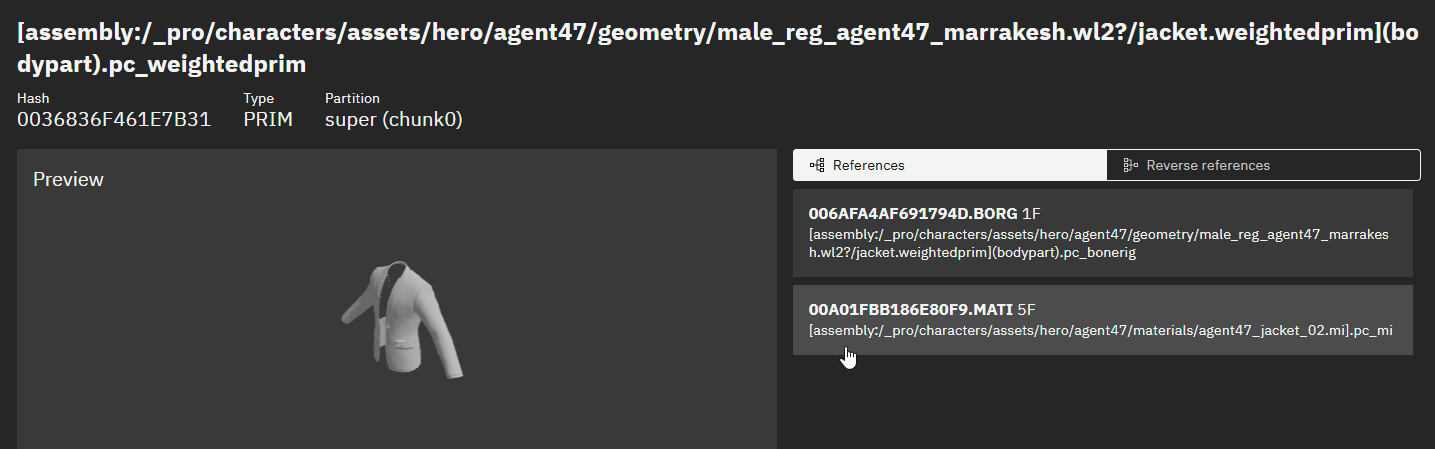
Here we have an overview of the mesh. On your right you can see what the mesh references, at the top you have the bonerig (the skeleton), as well as all the MATI (material instances) that it uses. This particular model only has one material, agent47_jacket_02.mi. Let's click that.
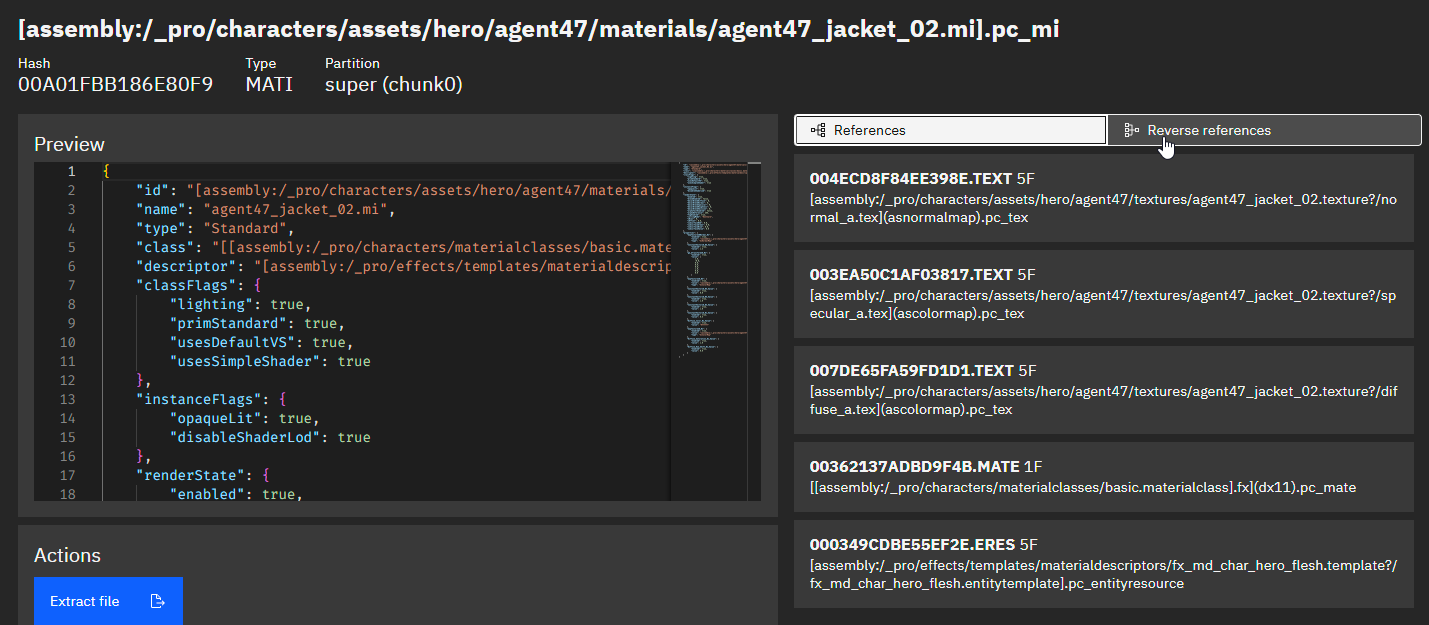
The material instance is open, and we can see how it is structured in the preview, as well as all the textures it uses on the right under References. This is not what we are looking for, the material entities and blueprints can always be found in the Reverse references of a material instance, so click that.
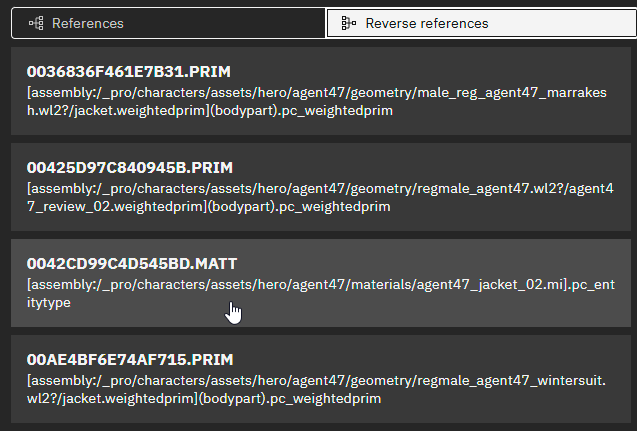
Under reverse references you can find all the meshes that use this material, and more importantly the material entity. Click the MATT to open it in the editor. Let's begin by copying the path for this MATT which is [assembly:/_pro/characters/assets/hero/agent47/materials/agent47_jacket_02.mi].pc_entitytype.
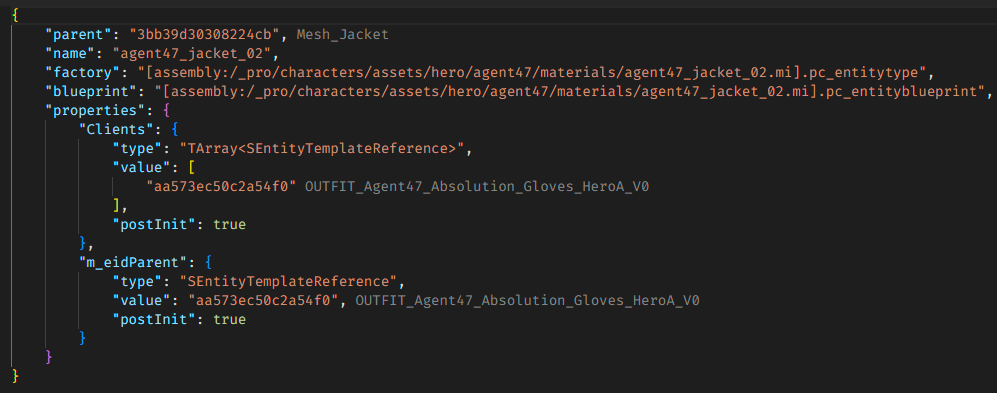
Go back to our Absolution Suit and right click on the Mesh_Jacket bodypart and create an entity. It's good practice to name these material entities after the material it changes, so name it agent47_jacket_02.

Paste the path we copied into the factory field of our new entity. For the blueprint, the path is the same, but it ends in .pc_entityblueprint. Let's begin by adding an empty properties object.

Before we do anything we need to set up Clients and m_eidParent. Set up these properties now. Remember that the values should be the root outfit, so right click OUTFIT_Agent47_Absolution_Gloves_HeroA_V0 in the tree and copy its ID. Paste it into the Clients array and m_eidParent's value.
Also, make sure to add "postInit": true to both Clients and m_eidParent.
We have been unable to determine the exact function of the postInit boolean, however it needs to be set to true in certain circumstances or the game will crash. Our best assumption is it determines whether or not to apply the property during or after instantiating the actual class in the game's engine. It makes sense that we would want to wait for the material to be initialized before using it. Given that IOI always set the flag to true on material entities, it is prudent that we follow the leader.
It should look something like this when you're done.
With that you can continue to add material properties to this material entity to tweak the look of the mesh as much as you want. Remember to use Intellisense with CTRL + Space if you feel lost.
What if my material instance doesn't have a material entity?
This can happen sometimes. The material entities are only created if IOI themselves have ever overwritten the material values in an entity. Sometimes they haven't done that.
As an example, the Casual Tourist suit uses a pair of boots that do not have a material entity. Look up its material instance [assembly:/_pro/characters/assets/_apparel/male/volumes_l01/shoes/materials/boots_derby_captoe_roundtip.mi].pc_mi in GlacierKit and you will find that in the reverse references only the weightedprim can be found.
Not to worry, we can make this material entity ourselves. First, you have to extract your MATI as a JSON file. GlacierKit actually cannot be used for this so open RPKG Tool.
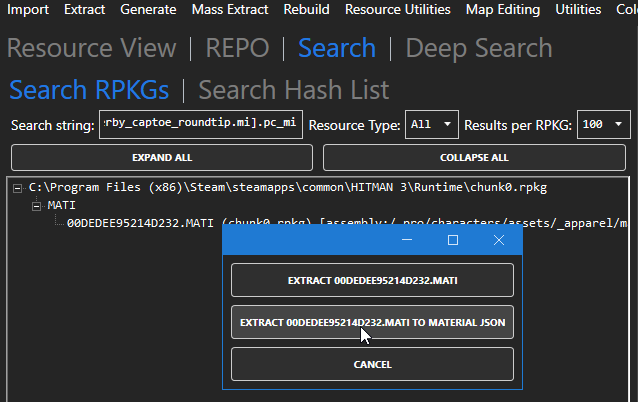
Import RPKGs folder and point it to your Runtime folder in your game installation. Search for the material instance under Search.
Right click the MATI result in the list and click EXTRACT 00DEDEE95214D232.MATI TO MATERIAL JSON.
Put this file somewhere you can easily find it. Now go to our Material Overrides tool. Drag and drop your .material.json file that you extracted to this window.
A new material will be generated with proper overrides, and paths for a MATT and MATB. The new file will be automatically downloaded in your browser.
Put this new boots_derby_captoe_roundtip.material.json file into your mod content folder, under the chunk it belongs to, in this case chunk0.
You can now use this new material entity in your outfit. Create a new entity in your tree just like before. We already have the path for this material which is [assembly:/_pro/characters/assets/_apparel/male/volumes_l01/shoes/materials/boots_derby_captoe_roundtip.mi], put .pc_entitytype and .pc_entityblueprint onto the end of it and that is your factory and blueprint respectively.
This material entity is custom, which means GlacierKit won't be able to give Intellisense support, because it can only do this for stock game entities.
The properties you can use are derived from the material class or MATE. Consult the original MATI to find the MATE which in this instance is [[assembly:/_pro/characters/materialclasses/basic.materialclass].fx](dx11).pc_mate.
Consult the reverse references of the MATE to find an existing material entity TEMP to find the usable properties. You can also open the .material.json file itself and look at the Overrides object to find the properties and their stock values.